Showing posts with label Microsoft Office 2007. Show all posts

Wednesday, April 21, 2010

The Next Wave of Productivity – Office 2010

Microsoft keynote speaker Stephen Elop talks about Office 2010 & SharePoint 2010

Wow, it’s hard to believe that Office 2010 is here already.  I’ve been running different forms of beta for just shy of a year!  In fact, I can’t even consider running Outlook 2007 anymore, as the new Outlook 2010 makes me sooo productive.  The new Outlook ribbon, the detailed calendar views, the ability to import my Facebook internet calendar directly into Outlook (2007 did it, but one-time only, 2010 will continuously do it, keeping me up to date). 

I’ve been using it exclusively for work, and the features are amazing, but I hear (and can’t wait to try) that it has some social connectivity for personal use.  Can’t wait to get it on my home PC!

Join Microsoft & Steven Elop at the virtual launch!

Click the graphic above, to add to your calendar, then watch Stephen Elop, President of the Microsoft Business Division, announce the launch of Office 2010 and SharePoint 2010 on May 12, 2010 at 11 a.m. EST. The live Microsoft keynote focuses on the next wave of productivity that delivers:

  • End user productivity across the PC, phone and browser
  • IT choice and flexibility
  • A platform for developers to build innovative solutions

Join the virtual launch event with Microsoft executives, product developers, partners and customers to:

  • Find out how peers and partners are already seeing benefits to their business by leveraging the next wave of productivity.
  • Submit your questions through live Q&A.
  • Participate via blogs, tweets, social media networks, commenting, and more.

View on-demand breakout sessions showing how Office 2010 and SharePoint 2010 meet the unique challenges people and businesses are faced with today, and provide the solutions they need for tomorrow.

Thursday, October 29, 2009

How to Import your Facebook Events Calendar into your Personal Calendar

Facebook has really taken off these days, especially for keeping in touch with friends, family and things you Like.  I’ve been invited to Halloween parties, Soccer matches, Work events, pretty much any invite these days comes in through Facebook.  It’s taken over as the new social scheduling calendar.

Unfortunately for many of us, that means copying the details out of the Facebook calendar and into the one we use most primarily.  As you probably guess, I use Outlook/Exchange for my work functions, but for my home and personal events, I use Windows Live Calendar..

Recently I stumbled across a post from Sean Bonner on how to import your Facebook events into Google Calendar, discovered through one of my favorite blogs, LifeHacker.  All Sean is using is the iCal format, and not only Google Calendar supports this format.  In fact, most things do!  So I’m going to expand on his instructions, and provide you the same instructions for Outlook 2007/2010 and Windows Live.  Additionally I copied his steps for Google to have them all in one place.

Here’s how I did it.  First we need to get the iCAL internet link from Facebook:

  1. In Facebook, Go to your Events page
  2. At the top of this page, click Export Events, Facebook will give you a URL for the iCAL of your private events function.
  3. Don’t click and save the ICAL file, simply copy the link to your clipboard

 Facebook iCAL export

At this point you’re ready to import this link into a number of different calendar programs, choose the one that you use:

Windows Live Calendar

Windows Live Calendar is where I keep all my personal events, so I’m going to show this one first.

  1. Open your Live Calendar
  2. Click the Subscribe button at the very top of the page

Windows Live Calendar

  1. Paste the Facebook iCAL link from above into the Calendar URL
  2. Give it a calendar name, I called it “Facebook Calendar”
  3. Click subscribe, and then Done on the next page

The Windows Live Calendar will refresh every 24-hours from the Facebook feed.  Mine refreshed around midnight PST and then took another day to update.

Outlook 2007

  1. Flip to the Calendar mode and choose File and Import and Export…
  2. Select to Import an iCalendar (.ics) or vCalendar file (.vcs) and click Next.
  3. A familiar dialog will open asking you for a file name.  Paste in the Facebook iCAL URL from above and click Open
  4. The next dialog offers you a choice to import as a new or into your current calendar.  If you import into your current calendar, you can’t quickly remove it.  So I choose as Open as New.
  5. Outlook then names your calendar in the “Other Calendars” section based on the URL, To fix that, I right-clicked on this and choose Properties.
  6. I just chose a name and typed that in, such as “Facebook” Outlook 2007 Properties
  7. Chose OK

Now you’ll see your Facebook calendar next to your other calendar and you can drag and drop the ones you want into your actual calendar (if you want it on your Windows Mobile phone for example).  You can also turn this calendar on and off.

The challenge here is I don’t think that Outlook 2007 will auto-refresh this one, at least I can’t figure out why mine won’t refresh.  Seems to me like an area the Office team has improved on (given the Beta of 2010).

Outlook 2010

Outlook 2010 is still in Beta, so these steps might change slightly.  This is much simpler than Outlook 2007

  1. Change to the Calendar mode and select the down arrow next to Open Calendar, then select From the Internet

image

  1. Paste in the Facebook iCAL URL from above and choose OK.
  2. Click the Advanced… button, given the folder name the name of the calendar like “Facebook” and click OK.
  3. Click Yes to subscribe to updates

I’ve noticed that Outlook 2010 takes about 30 mins to 1 hour to obtain any new items that appear in the Facebook calendar, this is the fastest of the lot.  I guess I’d suspect this since you’re doing it for yourself, where the other hosted services are doing it for millions of people.

Google Mail

As I mentioned earlier, this section is courtesy of Sean Bonner.

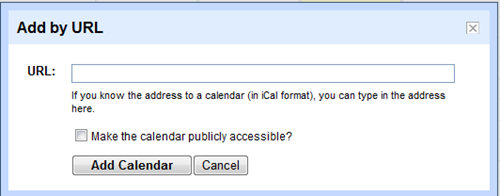
  1. In Google Calendar, you’ll see Other Calendars on the left, click the Add link and choose Add by URL
image

  1. Paste in the Facebook iCAL link you copied earlier

The Google Calendar will refresh every 12-24-hours from the Facebook iCal feed.  Everything I can find online says it’s 24-hours, but from my experience it’s twice/day

Once you set this up, Facebook becomes just a little bit more powerful, and you become just a little bit more in the know.

Monday, September 28, 2009

Embedding Google Reader into Outlook

Today was I talking with Cody from EFluxDesign (A web design and search optimization company) about using RSS to follow different blogs for education, pleasure or whatever you follow blogs for.

While Cody only has one PC that he uses, following RSS feeds in Blogs is as simple as adding it to Internet Explorer, and then Outlook automatically picks those up and they show up right in the familiar Outlook interface. 

However, when using multiple PCs, you can find yourself reading the same blog post PC after PC after PC.  Google’s answer to this (I haven’t found one that’s run by Microsoft yet, suggestions?) is Google Reader.  Simply add the RSS feed into the reader and you have a simplified view.

The best part of it, is you don’t have to abandon Outlook.  You can have the Google Reader appear right inside of Outlook, here’s how:

  1. Open Outlook and right-click on the RSS Feeds folder and choose Properties. image
  2. On the Home Page tab, choose to Show home page by default for this folder and change the address to: http://www.Google.com/reader/

 image 

Now when you simply click on the RSS feeds link, Google Reader will show up in this list and you can take advantage of only reading blogs once/PC, and all the data about what you read as well.  If you’re using Exchange 2007 or greater as a back-end, this setting will replicate around all of your PCs as well!

Wednesday, August 26, 2009

Testing AutoDiscover using Outlook

A while back on this blog, I discussed how Outlook AutoDiscover works and how it aids in mailbox configuration on the client side.  I also went into detail on a service the Exchange team provides to troubleshoot remote connectivity.

But I wanted to inform you of a handy troubleshooting tip that sits right on your desktop (provided you are running Outlook!)

In the notification area of the task bar (near the clock) there is an Outlook Icon( ).  This icon is your access to troubleshooting AutoDiscovery.  Here’s how:
  1. Hold down Control and then right click on the Outlook Icon, you’ll get two new options in the menu that you wouldn’t normally see if you were just simply right-clicking. Those options are Connection Status and Test E-Mail AutoConfiguration. The second one is the one we want, click on Test E-mail AutoConfiguration. Test E-Mail AutoConfiguration
  2. Type in the user you want to check E-Mail address and password and click Test

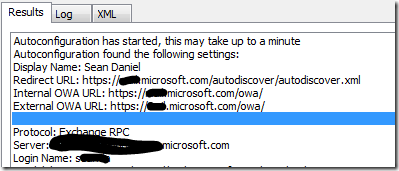
When the test launches you’ll get a bunch of results, reading through the results you’ll be able to determine what’s broken and where.  For example, here is mine that is fully functional:

image

Here is what you might see if the ports aren’t open on your router, or your SRV record is miss configured:

Play around with it, get use to it and use it to troubleshoot what’s going on with your remote Outlook over the Internet connections.

Thursday, July 09, 2009

Monday, June 22, 2009

Preventing Reply-All without DRM E-Mail

[This post courtesy of Becky Ochs]

I'm back from vacation, and all rested up and it's time to continue with the tips that have built up!  This one is great.  Have you ever been on a "Me Too!" e-mail thread?  You know those ones that people won't stop replying-all to save your life.  It's tough for the mail server to handle with large distribution lists (although with Exchange 2007, roughly 15.5 million email messages were delivered in the span of an hour, as seen in the link above), but mostly irritating for people on the mail list.

With the introduction of DRM (Distributed Rights Management), once configured your users can click a button and not allow “reply-all” as an option to the message.  However, this does lace DRM meta-data around the message such that you need to connect to your corporations “rights-management” server to actually open the message.  It also means that on mobile devices, you have to ensure the device is enabled for DRM, and then download the entire message just to decrypt and read it. 

Well, there is an easier way with Office 2007!

  1. On the open e-mail message, select the Options tab on the ribbon and then click on Direct Replies To button: image
  2. Once the property window opens ensure that the Have replies sent to… is selected and your email address (or multiple email addresses if you’re working a team) is in the box next to it: image
  3. Close the message options window

That’s all there is to it.  Now when someone hits reply or reply-all, the message goes to whomever you specify in that list.  Thus if the whole alias is back on the mail when you get it back, you know that person explicitly wanted to send to that alias, and there are no issues when trying to open it on a smartphone, or without Internet access (like on a plane).

Now DRM still has it’s uses, such as preventing forwarding, or copy/paste out of the email, so choose your technology wisely!

Monday, April 20, 2009

“Quick Parts” for re-using text

Using Microsoft Office 2007, Outlook 2007 has a new feature called “Quick Parts”.  Quick Parts allow you to save text you type a lot, allowing you to easily dump that text into a new email without having to re-type it.  I discovered this over at LifeHacker’s Blog on Saving Time with Outlook 2007’s Quick Parts.

Save Selection to Quick Part Gallery

Once you save text to the gallery, you can simply go to the Insert tab and drop that text in anywhere in an email.  Use it for signatures, or templates, or any type of repetitive text.

Wednesday, March 25, 2009

Exchange Server Remote Connectivity Analyzer

The Official Exchange Team Blog just announced the release of their Exchange Server Remote Connectivity Analyzer. The connectivity check will allow you to choose what type of Exchange protocol you want to talk to your Windows Small Business Server on and prompt you for a particular user and it will tell you what the problem is for connecting to that server.

Overview

The Exchange Server Remote Connectivity Analyzer is a web site for IT Administrators to validate and diagnose end-to-end Exchange scenarios.  The site simulates multiple Exchange client access and inbound SMTP scenarios from outside the customer’s infrastructure and reports whether the test was successful.  If the test fails, we tell the IT Admin exactly where in the process it failed as well as provide troubleshooting tips on resolving the issue.  See the screenshot below.

ExchRCA02.jpg

In this version, the tool provides the following end-to-end tests:

  • Exchange ActiveSync (v2.5 and greater… including AutoDiscover)
  • Outlook Anywhere (OL2003 and greater… including AutoDiscover)
  • Inbound SMTP

Note: The Outlook Anywhere test will fail when the server is running MOMT (e.g. an Outlook.com mailbox) since the tool doesn’t currently test encrypted RPC… but check out the detailed and clear error message!

Coming Soon

We will be expanding the Exchange scenarios in the next few months to include the following:

  • Outlook Web Access
  • IMAP
  • POP
  • Exchange Web Services

Quick demo


Get Microsoft Silverlight

Check out the short video describing the tool on TechNet Edge.  Or try the high quality version.

Friday, February 13, 2009

Embedding Live SharePoint Data into an Excel Spreadsheet

[This post courtesy of Chris Almida]

Windows Small Business Server includes Windows SharePoint Services by setup by default.  We use SharePoint daily at Microsoft to collaborate as a team.  One of the greatest benefits seems to be sharing a spreadsheet or List of items.  The beauty of SharePoint is multiple people can work on it at the same time.  Unlike with Excel, if you put it on a share, only one person can open it in Read/Write to make changes, or if you’re e-mailing it around, knowing which version has all the information in it.

With a SharePoint List, multiple people can work on different sections of a spreadsheet, but this causes the problem of what if you want the power of Excel behind your data to do graphing, or calculations on that data?  Well, you can build an Office Connection to download the latest data each time the spreadsheet is opened!

It’s super straight forward, here’s how (at least with SharePoint v3 UI):

On the SharePoint site

  1. Navigate to the list you want to update from within Excel.
  2. In the top right-hand corner of the sheet drop down the View box and choose Create View.
  3. In the page that shows, choose a Datasheet View.
  4. Give the view a friendly name so you can find it, for this demonstration let’s just call it “Datasheet View”, and click OK.
    1. Feel free to scroll down and apply any filters to strip data out depending on the purpose of the spreadsheet you’re building.
  5. Once you’re looking at your new Datasheet view, you want to go to Actions and then choose Task Pane. A task bar will open on the right (you can also use a little gray arrow on the right if you want).
  6. click Query List With Excel, and Excel will automatically open image

In Excel

  1. Choose to Enable the Data Connections (as for security reasons they are typically blocked, but we trust our Internal SharePoint site, so it’s ok).  Once you Enable the data connection, all that Data goodness from SharePoint comes flying into Excel, ready to be worked with.  If you wanted a one time connection, you’re done and you can stop now.  If you want to create a connection you can use over and over again, continue on.
    1. If an Import Dialog shows, make sure it says New Workbook at the bottom
  2. Let’s go and Export the Office Connection so we can use it over and over again
    1. On the Data tab of the ribbon, click on Connections image
    2. On the Work Book Connections pop-up, you’ll see a randomly named connection, ensure it’s selected and click Properties image
    3. Give the connection a friendly name under Connection name as I have done above.
    4. Select the Enable background refresh and Refresh data when opening the file.
    5. After you’ve made these changes, switch to the Definition tab and at the bottom, click Export Connection File.  Save this file with a well known name in a well known place.  I use the Connection Name I defined earlier as the file name as well, then click OK.

Using the Saved Connection in a new Excel file

  1. Now that you have the connection to SharePoint saved as an Office Connection, simply open a new or existing excel spreadsheet, and select the A1 cell (the headers will come in with the connection, straight out of SharePoint!
  2. Click on the Data tab and click Existing Connections and then Browse for More … and navigate to the saved Office Connection.image
  3. On the Import Data  select OK, and the Data from SharePoint just seamlessly Jumps into the Spreadsheet.

Now every time you open that Excel file, it will re-query the SharePoint site for the latest data.  Updating data only in one place saves time and energy.  You can program Excel to make calculations on the data, graph the data and show the data in different pivots as you see fit within Excel.

As a side note, my manager uses this remote data methodology to also download tables from the Internet for his fantasy baseball league to help him make his weekly picks!  If anyone generates a spreadsheet as sophisticated as his, let me know….. No, I can’t give his out, because I don’t have it!

Tuesday, September 23, 2008

Creating a "New E-Mail" Link in the Quick Start Menu

Personally, I'm all about efficiency on a computer.  Computers and Software should make your life easier, not harder.  In the office, I have 3 monitors, one of which always runs Outlook, so the "New E-Mail" link on Outlook is always accessible without 10 ALT+TAB key strokes.  On my laptop, with the limited sized monitor, and only one at that, getting to Outlook can take some time to start that new e-mail message.

So, I added a "New E-Mail" link to the Quick Launch menu.

It's not that hard, here are the steps that I use:

  1. Right-Click on your desktop and point to New and then click on Shortcut.
  2. In the wizard that opens, you're prompted for the item you'd like to point to, type in mailto: (don't forget the colon) and click Next
  3. For the friendly name on the next page, change it to New E-Mail (this helps with the mouse over) and then click Finish.

At this point you have a link to a new e-mail message using your default mail client (mine is of course Outlook).  Now, unfortunately, since Outlook is associated with the mailto: OS shortcut, you end up with the Outlook icon.  This can be confusing as you will also look for this icon to actually launch Outlook.  So we need to change the icon to the envelope icon.  Here's how:

  1. Right-Click on the new shortcut you just created, and click on Properties
  2. Click on Change Icon.
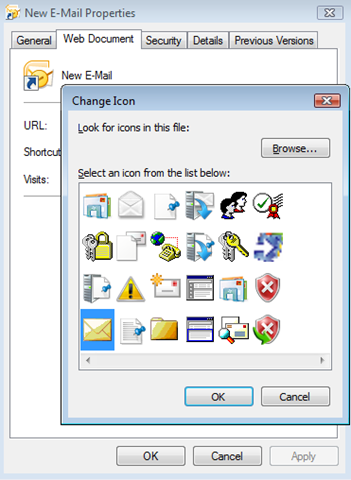
  3. Click the Browse button and point the browser to "C:\Program Files\Windows Mail\MSOERES.dll".  This is the Windows Mail (previously known as Outlook Express) icon repository, and click OK.
  4. Select the envelop icon
    1. image
  5. Then close all of the property pages using the OK buttons

Now you have a shortcut for a new e-mail message, the next step is just to drag and drop it into the Quick Launch menu, and now there is no need to minimize what you're doing or ALT+TAB to Outlook just to start a new mail message.

Seconds saved over and over could mean you now have time to go out and grab that coffee after all.