Showing posts with label Home Server. Show all posts

Wednesday, December 04, 2013

Using the Windows Credential Manager to Store Server Credentials in Windows 8.1 (and on Surface!)

My wife got a new laptop, first one in 10 years.  I’m very proud of her.  She’s the opposite of me, and pretty much doesn’t like change on her computer.  This is most likely due to the fact she touches a computer for less than 1/2 an hour a day, and doesn’t want to spend 10 minutes of the 30 figuring out where the “File” menu went (yes, the IE7 upgrade just about killed my wife).  She went with the Lenovo Yoga 2 Pro. It’s an amazing laptop, but doesn’t have a TPM chip, so I can’t use it for work (otherwise I’d have one too!)  The screen is breathtaking, but I digress.

We have a Home Server 2011 in our house (obviously), but it doesn’t back up UEFI machines (not that I know of anyways) via the Client Backup.  So installing the Launch Pad seemed a bit of overkill so she could just go to \\server.  Her Windows Explorer has a link to the root of the Server share so she can get to the pictures, the videos, the TV shows, and so on.  I’m a big fan of security, and she has her own account on the server, but I couldn’t get her username and password to save for the server through a reboot.  And as you can probably guess, it has to be easy for her (a click to get access). 

I ended up simply saving this into her Windows Credential Storage (details below).  Worked like a charm.  It got me thinking, does this work on my Surface 2?  Sure enough it did!!  This means that I can simply access the server without providing credentials every time.  Now when I’m in my home, my Surface can just access an additional 4TB of data, right from inside the Metro Apps (more on this in my post "Adding Server Shares to Modern Photo App"). 
Let me tell you how to use the credential manager first. 
  1. Hit the Start key or swipe out the charm bar and press the Start button
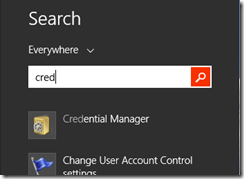
  2. Type in Cred to search the start menu for the Credential Manager. Search for 'Cred'
  3. Launch the Credential Manager, and select the Windows Credentials button. 
  4. Under that button, simply click the Add a Windows credential.
  5. Fill out the wizard with the name of your server, in my case “SERVER”, my credentials Fill out the Add a Windows Credential Wizard
  6. Notice it’s in the list and then close the Credential Manager
Now you may try this instantly and it might not work.  This is most likely because you’ve already tried to connect to this server and stored the fact that you don’t need a username or password.  A reboot or sign-out/in will fix that as long as the item stays in the Credential Manager.  You can also open the command prompt and type in “net use * /d” to delete all active connections which will force Windows to re-open new ones, using the Credential Manager.

For reference, here is the official Windows Help topic on this.

Tuesday, January 24, 2012

Wiki your way to Small Business Server knowledge & Best practices

The Home and Small Business Server team has posted a forum post with links to the separate Wiki articles they are maintaining to help you get the most out of your server platform.  The Forum post with all the links (looks like it’s being updated over time too!) is here.

What appears to be currently missing from this article is the Router Wiki links

Other items are copied below for your ease of browsing (note this might be outdated, check the actual link for an up-to-date version)

Server Deployment and Platform Configurations

  1. Troubleshoot Windows Small Business Server 2011 Essentials, Windows Home Server 2011, and Windows Storage Server 2008 R2 Essentials Installation Issues (June 2011) - http://social.technet.microsoft.com/wiki/contents/articles/3342.aspx
  2. How to repair certificate issues in Windows Small Business Server 2011, Windows Home Server 2011 and Windows Storage Server 2008 R2 Essentials (July 2011)
    - http://social.technet.microsoft.com/wiki/contents/articles/3940.aspx
  3. Default input language is set to English on the Spanish versions of Windows Small Business Server 2011 Essentials, Windows Home Server 2011, and Windows Storage Server 2008 R2 Essentials - http://support.microsoft.com/kb/2639424
  4. How to Change the Password Policy in Windows Small Business Server 2011 Essentials - http://social.technet.microsoft.com/wiki/contents/articles/6829.how-to-change-the-password-policy-in-windows-small-business-server-2011-essentials.aspx

Client Deployment

  1. Troubleshooting Client Deployment Issues when using Windows Small Business Server 2011, Windows Home Server 2011 and Windows Storage Server 2008 R2 Essentials (July 2011)
    http://social.technet.microsoft.com/wiki/contents/articles/3941.aspx

Remote Web Access

  1. Manually install existing SSL certificate into Small Business Server 2011 Essentials
    http://social.technet.microsoft.com/wiki/contents/articles/manually-install-existing-ssl-certificate-into-small-business-server-2011-essentials.aspx
  2. Remote Web Access Deployment Guidance - http://social.technet.microsoft.com/wiki/contents/articles/remote-web-access-deployment-guide.aspx

Media and Workgroup (Windows Server Storage Server 2008 R2 Essentials and WHS 2011 only)

  1. Media streaming known issue and workaround with Windows Home Server 2011 and Windows Storage Server 2008 R2 Essentials (August 2011)
    http://social.technet.microsoft.com/wiki/contents/articles/media-streaming-known-issue-and-workaround-with-windows-home-server-2011-and-windows-storage-server-2008-r2-essentials.aspx
  2. How to change workgroup name on Windows Home Server 2011 and Windows Storage Server 2011 R2 Essentials (August 2011)
    http://social.technet.microsoft.com/wiki/contents/articles/how-to-change-workgroup-name-on-windows-home-server-2011-and-windows-storage-server-2011-r2-essentials.aspx

Data Protection (Server and Client Backup)

  1. Server Backup FAQ (August 2011) -
    http://social.technet.microsoft.com/wiki/contents/articles/faq-for-windows-home-and-small-business-server-backup.aspx
  2. The "Recover your server wizard" crashes in Windows Small Business Server 2011 Essential, Windows Home Server 2011 or Windows Storage Server 2011 Essential
    - http://support.microsoft.com/kb/2639956
  3. How to fix the Server Backup Service exception "One or more services are not running” for SBS 2011 Essentials, WHS 2011 and WSS 2008 R2 Essentials -
    http://social.technet.microsoft.com/wiki/contents/articles/6828.how-to-fix-the-server-backup-service-exception-one-or-more-services-are-not-running-for-sbs-2011-essentials-whs-2011-and-wss-2008-r2-essentials.aspx

Office 365 integration

  1. Error message when an SBS 2011 Essentials user signs in to Office 365 after they change the password for their user account: "Microsoft Online Services ID or password is incorrect" - http://support.microsoft.com/kb/2652040
  2. The Office 365 Integration Module for SBS 2011 Essentials does not work as expected - http://support.microsoft.com/kb/2652021

Extensibility

  1. How to list your applications on Microsoft Pinpoint? How to make your applications discoverable - http://social.technet.microsoft.com/wiki/contents/articles/6886.listing-your-applications-for-discovery-in-microsoft-pinpoint-for-small-business-server-windows-home-server-and-windows-storage-server-2008-r2-essentials.aspx (Posted here last week)

Friday, January 20, 2012

Developers! How to List your Small Business Server and Windows home Server Apps on Microsoft Pinpoint

Are you a developer or developer firm that’s built an application for SBS 2011 Essentials, SBS 2011 Premium Add-on, Windows Storage Server 2008 R2 Essentials, and Windows Home Server 2011? Then you should list your application in Microsoft Pinpoint. Listing here will give you greater awareness of your application to your target audience.

For example, these links are inside the product:

Over on the Small Business Server Wiki, there is a how-to guide on how to go about doing this.  You can find that link here.

Before you can begin listing your applications:
  1. You must join the Microsoft Partner Network. Before you can begin listing your applications on Pinpoint, you must create an account with the Microsoft Partner Network (MPN) and create a descriptive overview for your company. It can take up to five business days for your new account to activate in Pinpoint after establishing your membership in the Microsoft Partner Network.
  2. Already a member? If so, then you can proceed to create your profile in Pinpoint. If you are already a partner but are not listed on Pinpoint and believe you should be, contact the Pinpoint team.

Microsoft Pinpoint

  • Sign-in using your MPN LiveID
  • Click on the Dashboard in the upper right hand corner
  • Click on Add or Edit Profiles in the nav bar
  • Click on the Apps + Services tab
  • Click the New button
  • Follow the rest of the wizard to create your listing
  • Wait for the application to be published in the marketplace

What are you waiting for? The complete guide is here, and you can jump to Pinpoint here.

Tuesday, January 17, 2012

How to Enable Auto-Logon for your Server

WARNING: This Post reduces the physical security of your server, leaving the server open for anyone for a brief period of time after reboot.

So, you are still reading after the warning above.  Excellent.  Unless you are physically controlling access to your server, and aren’t worried in the least about theft or any other loss of server, or access to server, then please continue reading.

Last year, I wrote a post about using my Home Server for more than just storage, backup and remote access.  This is not condoned by Microsoft or supported for Windows Home Server, as Windows Home Server licensing doesn’t enable you to run Line of Business Applications on your server, just security type applications.  This also depends on your EULA you’ve entered with your hardware OEM as well as Microsoft, so be careful you’re not voiding a warranty or locking yourself out of support here.  That might be more important to you than this little hack.  You should also see if your application can be run as a service, either by contacting the app provider, or by testing with the SRVANY.EXE command you can find from here. This wouldn’t reduce the security of your server, but still get you the end result.

Now that we’re through all the warnings, let’s get started.

I have some end-user applications that I want to run (as the different, non-admin user), that aren’t services.  This means that if the box reboots for patches, or a power-outage, the apps don’t start until I connect into the server and kick them off.  Naturally I put all the apps that need to start in the start-up group, this includes my iOS printing app, among others.  So ultimately I just need to log-in, and then I’m good to go. 

But… I can automate the logon with the System Internals (sysinternals). 

STEP 1: I simply download the AutoLogon tool.  When I launch it, I elevate it to the administrator account (ie UAC), and then accept the EULA.  I’m then presented with the simple UI:

Autologon - Sysinternals

I simply enter the username, domain and password I want to auto-login as, and hit enable. To disable this in the future, run the tool again and hit disable.image

STEP 2: This is the most important step, to secure things again.  It’s super simple, you simply enable the screensaver (I chose the “Blank” screen saver), and On resume, display logon screen is checked, and the screen saver will come on after 1 minute.

This of course will get irritating if you’re working on the server.  So in those cases I change the wait time up to 15 minutes, and then back down to 1 minute when I’m finished working.  I never turn off the screensaver, because if I forget to turn it back on, then the server will be indefinitely unlocked, which is bad of course. 

That’s all there is to it.  Use this wisely and only if needed.  You’d also be wise to see if your application can be turned into a service.  Microsoft has a tool for that too, it’s called SRVANY.EXE.

Tuesday, January 03, 2012

How to use your Home Server as an AirPrint server for only $10

As I move more and more of my computing and data to the Cloud with services like SkyDrive.  I am reducing the amount of computing power I have in my house.  I have an iPad (v1), a Laptop, and of course my Windows Home Server.

As I’ve mentioned before, I’m looking for more ways to take advantage of my low-powered Home Server to do more for me as an *always* on device.

Over the holiday’s we had a few visitors, which of course means printing boarding passes prior to leaving for the airport.  It was frustrating to have to take out the laptop when the iPad is just right there.  But without a compatible AirPrint printer, you can’t print from the iPad….

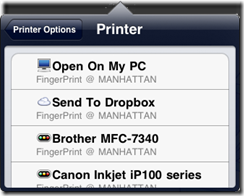
Or can’t you?FingerPrint

I found an application for Windows (and Mac OS) that installs on your computer that shares almost any printer connected to the computer, to the AirPrint service. 

There was an old version that doesn’t work with iOS5 that is free.  But obviously, I have iOS5 on all my devices, so that wasn’t an option.  I’m also not a big fan of Jail-Breaking (I guess I know too much about security to allow a hacker full access to my device).

This application, called FingerPrint by Collobos Software, will share out any connected printer, as well as DropBox locations to the AirPrint service.  I started with the trial to make sure it worked first.

To get it set up, I downloaded the FingerPrint installer, copied it to the desktop of my Home Server and installed it. Then of course ran FingerPrint on the server.  I also had to add my network printer to a printer on my Home Server, just by going to Control Panel and adding a printer as I normally would on any Windows machine.

However, it didn’t initially work.  I had to make two changes to the configuration for it to work, probably specific to my network.  I’ll share them here incase you have the same problems.

Enabling Multicast on my router

First, I discovered that my DLink DIR-655 router wasn’t allowing Apple’s discovery service, Bonjour.  This is not always the case with routers.  But I discovered that I can enable MultiCast, on the router, which seemed to allow it.  I did this on the DIR-655 by going to Advanced, then Advanced Network, and at the bottom, selecting to Enable Multicast Streams:

MultiCast Streams

This required a router reboot, which took down my network for 30 seconds, and then it took another approximately 5 minutes for my iPad to discover the services running.

This enabled me to see the list of printers connect to my Home Server

Opening an Additional Port on the server

Per Collobos support page, I had to manually open the port 6631 on my Home Server to allow AirPrint to send the document to FingerPrint.  To do this I simply:

  1. Logged into the Home Server
  2. Clicked Start, then Run, and ran the wf.msc firewall configuration utility
  3. I clicked on New Rule
  4. In the wizard that opened, I selected Port, and clicked Next.
  5. The port is a TCP port which was the default, and I typed in the specific port of 6631
  6. I also chose to Allow the connection even if it’s unsecure (this might not be available in SBS 2011, in which case you’d also need to make a group policy change)
  7. On where does this rule apply, I ensured that it only apply to Private networks, meaning that I unchecked Domain (which doesn’t apply to WHS anyways) and Public. (Note for SBS 2011, you’d have to select Domain)
  8. Finally, I gave it a friendly name.  I used FingerPrint Port 6631 so I could easily find it in the list again if I ever wanted to remove FingerPrint, and clicked Finish.

At this point, the printing just started! woo hoo!  Of course I can play around with this for 7 days on trial, then I’ll have to get a license key for FingerPrint.

Additional Bonus!

As an additional bonus, you can manage all the documents printing from the Home Server’s print queue.  So I think it’s worth the $10 to be able to print directly from the iPad.  Plus Collobos has support if you ever get stuck.

As a final note, I have noticed that you don’t want your iPad to go to sleep before the print has happened, and it’s not exactly the fastest thing/

[Note: This is untested on Small Business Server 2011, but I don’t see why it wouldn’t work, changes are noted above, leave a comment if you try and have modifications]

Thursday, November 10, 2011

Home Server and SBS Add-in to Automate Client Backup of your MAC

One of the most popular posts on my blog is how to enable Apple’s Time Machine backup to backup to your Windows Home Server 2011 or Windows Small Business Server 2011 Essentials.  As it turns out, a company named Orbital Technologies has decided to build an add-in that enables this functionality without the need for you to walk through the steps of creating those confusing sparse files.

UWHS - Orbital Backup Configuration for MacThat add-in has been reviewed over on the famous UsingWindowsHomeServer blog, specifically in a blog post here, covering the preview of the Orbital Backup Configuration for Mac.  They additionally covered the add-in again when it was available.

Simply install the add-in, open up the dashboard on the MAC client and go to add-ins, Orbital utilities and follow along.  All you  need to know is your username and password to the server.  easy right? also free!

Keep in mind that you can still do the manual steps provided in my post if you prefer not to install anything as all this add-in does is the configuration pieces for you.

You can download the add-in directly from the Using Windows Home Server Forums, or We Got Served forums. The add-in should work fine on Windows Home Server 2011, Windows Small Business Server 2011 Essentials, and also Windows Storage Server 2008 R2 Essentials.  If you’re using any other Windows product, the manual steps are for you.

Tuesday, November 01, 2011

Using your Home Server for more than Storage, Backup and Remote Access

Back in 2006, I was without power for 4 days in November.  It was cold, but I had friends, and an offline Small Business Server 2003 R2.  Of course I ran everything out of my house, why wouldn’t I?  Being offline my server started sending NDRs and I didn’t have access to anything, as it was all offline.  While I had been toying with adopting the cloud for the amount of spam I was getting, this pushed me over the edge.  It was at that time I decided to adopt the cloud.  My email and most things that I own are all hosted in various cloud services so if the power goes out at my house, my stuff keeps running. 

Trust me, I did a cost benefit analysis and in order to keep things running for me at home, I’d have to pay for hosting services anyways, and given I was running a “business class” server, I was forced into “business class” prices.  I am not a business, I am a consumer.

However, there are certain things that I don’t trust the cloud for, and hence I want my own cloud storage that I run and have total control over.  Enter Windows Home Server stage left. Home Server has been my personal cloud storage location since 2007, I now run WHS 2011.

Enter Cloud computing.

My Windows Home Server is perfect device to do computing for me, and it can just chug away on it all the time.  The one draw back is that there is only one account “Administrator” that has total access to the server.  this obviously isn’t good computing practice, so let me show you how to create a working account that you can have do things for you.

First step, let’s create a new user account on the server.  We’ll do this using the normal Add User Wizard in the dashboard.  I’ll call the user Working User.  I gave the user access to the shared folders it needed access to (where I can interact with Working User’s storage), and nothing more.  I didn’t even give this user remote access.

Now, by default all users created don’t have access to log into the server, we need to grant this permission.  This will make the user a standard user on the server, so it will have access to do things the same as a standard user would have access on a client PC (running applications, a /user folder with full control, and access to those folders you gave it.  it won’t be able to mess with the OS or install things.  PERFECT!

  1. On the server console, click Start, then Run, and type in gpedit.msc to edit the local policy on the server
  2. Expand down Local Computer Policy, Computer Configuration, Windows Settings, Local Policies, and click on User Rights Assignment
  3. Scroll down the list on the right until you find Allow log on locally and double click to open the property page
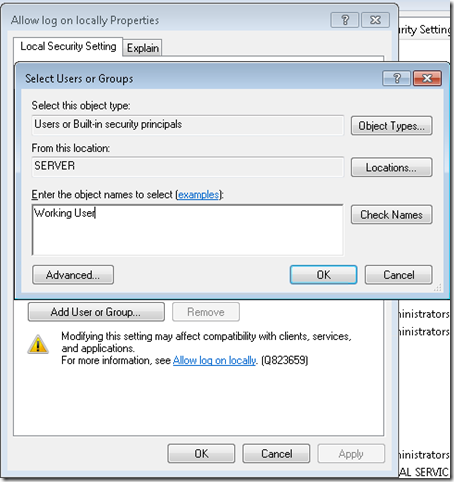
  4. Click the Add User or Group… button and type in the username that you created in the first step inside the Add User Wizard. Allow Log on Locally Properties Page
  5. Click OK and then OK again and close the local group policy editor.

Now this Working user has access to log in to the server locally.  Of course it can’t do any administration of the server as it’s not a member of the administrators group.

Next I want to use something as this user, say the command prompt.  I simply use a command line like the following: C:\Windows\System32\runas.exe /USER:SERVER\Working /savecred "C:\Windows\System32\cmd.exe"

The /savecred will save the credentials you typed in as Working User (alias “working” in the above) and will remember it for future runs.  I actually just created a shortcut with this command in.  Now that you have a command prompt open, anything you run from this command prompt will run as the Working User.  So you can load up any application and have it work in the context of this non-administrative user.  So if you do hit something that wants to modify your system, you’ll get a UAC pop-up or an access denied (I haven’t hit anything like that yet in my set up).

Just be careful what you do, because there is no free Anti-virus for your server, and I highly recommend getting an anti-virus for your server if you plan on connecting this user up to the Internet to do anything directly on the server.  I have Antivirus on my system.

Thursday, September 08, 2011

Thank you BizTech Magazine – SeanDaniel.com is listed in their top 50 Must Read IT Blogs

I was rather surprised last night to be browsing my @Mentions on Twitter only to find out that @BizTechMagazine listed me as one of the “50 Must-Read IT Blogs”. I first saw it when I was mentioned in their tweet. Today I was able to visit BizTech Magazine’s blog post to see that I’m not even at the very bottom!

It’s a great honour to even get a mention in a top 50!

Tuesday, June 14, 2011

Windows Phone 7 Add-in for SBS 2011 Essentials and WHS 2011 (Release Candidate)

Today the Release Candidate of the Windows Server Solutions Phone Connector for Small Business Server 2011 Essentials (aka Integrating Windows Phone 7 with your SBS 2011 Essentials Server) is available

clip_image001

The purpose of this Add-in is to enable Remote Server Management tasks for SBS 2011 Essentials including

Alerts

After you complete the authentication steps with the server that you are trying to connect to, an alerts listing is the first panorama item that the application launches into. This feature brings the Alert Viewer that you know from the server, to the phone.

If an alert is displayed white, it is active and included in the alert count. If an alert is dimmed, that means the alert is disabled, and it is not included in the alert count. Any alert item can be clicked to view the full alert text just as on a computer. Contextual menu options include enabling or disabling an alert, and performing a repair action if one was assigned to this alert.

Users

The user-panorama item performs basic user management tasks, including:

  • Viewing user account details
  • Enable or disable a user account
  • Change a user account password

If you disable a user account, that is a reversible action. The moment a user account gets disabled, it causes the same effect as it would if you disable it by using the dashboard. The user’s access to Remote Web Access, the phone application, and any server resources is turned off.

Devices

“Devices” is a panorama item that lets you:

  • View server-joined computer and Mac details.
  • View the backup status that every device last reported to the server.
  • Start or stop a backup for any computer or the server (from the contextual menu).

Live Tile Support

clip_image002
If you pin the application to the home screen of your Windows Phone 7, you will be able to see a variety of at-a-glance information without launching into the application. An opt-in using the settings menu is required.

The at-a-glance information includes:

  • Count and type of network health alerts.
  • Percentage of storage use of your main disk.
  • Server name sending this information.

The Windows Phone 7 application requires both a server sided add-in to be installed on the SBS 2011 Essentials Server, as well as Windows 7 Phone application downloadable via marketplace.

If you end up getting the Windows Home Server version, you’ll also get live media streaming

Media Support (Home Server Only)

The Media panorama lets you discover and view streams of media elements that you stored on your server in the appropriate shared folders (such as Music, Video and Picture shares).

clip_image010Music

MP3 non-Digital Rights Management-protected songs will be streamed directly from the server to your phone. Album art is also transported. Your library is searchable and can be organized in different views to help find what you want fast.


clip_image012Pictures

“Pictures” has a variety of functions:

  • Discover all .png and .jpg images that are stored in the Pictures shared folder on the server. Subfolders are recognized.
  • Open a picture full-screen to view it on the phone.
  • Save a copy of the picture to the phone, using its original dimensions and resolution  (to be viewed later in the built-in Pictures hub of any Windows Phone 7).
  • Take a picture with the phone’s camera and upload it to the server.
  • Upload any picture that is stored in the Pictures hub of the phone to the server.

clip_image014Videos

The “Videos” feature allows you to discover and view videos that are stored on your server in the Videos shared folder.

Even though discoverable by this feature, the variety of video formats is high and not all formats can be streamed. For details about which video formats can be streamed from the server and accepted by the phone, see Supported Media Codecs for Windows Phone.


For further information, and access to the downloads to start testing today please visit the SBS Connect Site, or WHS Connect site depending on your product.

Please note this is a release candidate and as such is for testing purposes only.  Link Back to the Official SBS Blog Post.

Monday, May 16, 2011

Windows Home Server saves the day…

Being in my position, I often come across people wishing Windows Home Server was this way, or had this, or didn’t do that.  I suppose it’s the nature of the job to focus on what needs improvement, but every once in a while it’s nice to reflect on what works really really well.

On an internal discussion alias for Home Server, we had a fellow Microsoft employee leverage Windows Home Server to remotely assist his father, and I wanted to share that story here.  This same sort of story can show you what you can do with SBS 2011 Essentials as well.  Here is the story:

My parents recently moved down to NC. My father is an avid golfer and recently retired from State Farm after 25 years which explains why NC. Prior to the move south they lived about 40 minutes from me in north eastern Pennsylvania. I first installed a WHS in their home after getting tired of hitting numerous issues trying to setup remote control of their machines with the constant external IP changing. WHS solved that issue for me since it did dynamic updates in order to host the remote access webpage. I was happy for many months being able to log into the remote access webpage and then remote control their machines from the available computers connections tab. On a few occasions while they lived in PA minor issues happened that WHS was the savior but nothing major usually only saving a few hours of time for each incident.

Fast forward to last night around 9:30 at night when my father calls me in a panic stating that my mom is going to kill him for being on “her” computer. All he wanted to do was quickly check some Pittsburgh Steelers news site that he frequents. Well that site had a link to another site that my dad decided to check out and BLAM virus! We have all dealt with viruses before, some worse than others but this one was really annoying and pretty well thought out if I do say so myself. The virus somehow watched for any .exe file to be run and then popped up a dialog saying the .exe you ran contained a virus and to pay $39.99 to remove the virus. I tried all the usual tools to help me get rid of viruses in the past taskmgr, cmd, regedit and msconfig none of them would launch, I even got frustrated and tried sol, spider and chess also blocked.

The last course of action was to walk my dad through booting into safe mode and see if we figure out what is kicking off the virus and stop it from running. I checked the usual auto run locations and nothing fishy was there. I was stumped and without being able to remote control the machine I was in serious trouble. My next idea was to use my “dads” machine to download from my WHS the DART tools .iso which includes a version of system sweeper to scan for the virus. Well my dad convinced me to forget the DART disk and just make sure the virus was gone by going to the WHS and applying the backup from Monday at 3:00am. I remoted my dad’s machine and downloaded the restore CD from the Microsoft site [restore CD provided in box, later discussed on thread] and then walked my dad through the restore wizard. I got lucky that the network driver was built into the CD so no issues there and before we knew it the restore was off and running. I got an email from my parents this morning about how excited they were to have their PC back and they didn’t need to waste time and money shipping it back and forth.

I have since upgraded their browser to IE9 and installed any outstanding important updates on their PC to help stop this from happening again but if it does I know the fastest and easiest way is to have WHS save my bacon!

Friday, April 08, 2011

Using the KeepVault Connector to backup Roaming Client Computers

Previously, I covered the basics of Proxure’s KeepVault Online Backup, as well as what you got if you went Pro.  With the release of the RC of KeepVault for, I noticed I didn’t cover the KeepVault Connector, which is a separate add-in for Windows Home Server 2011, and Windows Small Business Server 2011 Essentials than the original KeepVault add-in. 

This add-in allows you to do the incredible.  Back up roaming computers via a “Sync” while the computer is connected to the Internet, anywhere.  Now I use Windows Live Mesh to sync most of my items between my computers and the cloud, but there are some things that I don’t.  For example, if I’m travelling and I process photos, those don’t get into my Mesh, but I still worry about them.  This solution solves that.

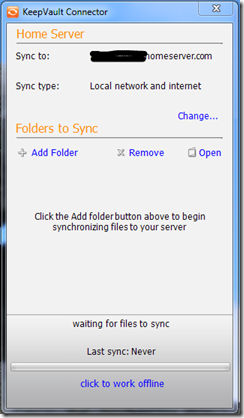
Simply download and install the KeepVault Connector for Mac & PC.  Make sure you choose the WHS/SBS 2011 version, and not the WHS Original.  Once installed, and the dashboard restarted, you’ll notice that KeepVault has an extra tab

KeepVault Connector

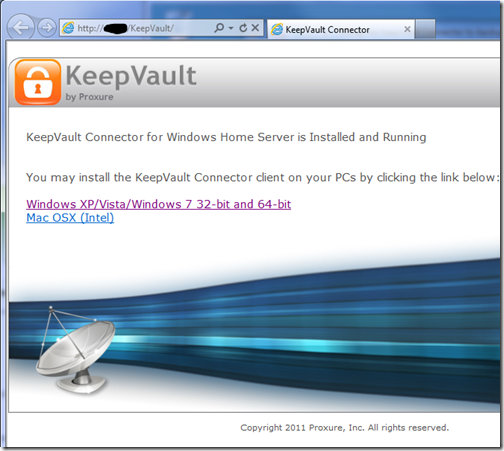
This add-in installs into the dashboard and adds a \KeepVault directory to your default website.  It also reads your servername (orange above), your remote access domain name (blue above) and provides an extremely secure recommended password (yellow above).  Simply click the link to Download and install the client setup.  This downloads the client component directly from your server:

KeepVault Client Download

KeepVault Connector Client ApplicationOnce installed, just find the KeepVault Connector in the start menu, or in your system tray, and load up this fancy little “Sync” application and click the Add Folder button.  This will allow you to to pick a local folder on your client computer which will perform the backup. 

For me I created a “backup to home server” folder as a test, and dropped a few files in there.  While I’m local on the network, the backups are SUPER quick, but away from the network they’ll be throttled by my connection speed back to my server.

You can also choose to modify the backup locally only, or over the Internet.  Given that the built in Client Backup functionality runs when you’re local, you might not use this.  However, it’s some nice flexibility if you use a tethered 3G connectivity, so you can choose to sync when you’re on wi-fi and by default not always.  Speaking of Sync, you’ll notice at the very bottom you can click the hyper-link to work offline, so if you end up tethering your PC to your cell phone and then dumping a ton of pictures in there, you can click that and work offline, and prevent the backup from happening over your 3G connection, if you valued cost of data over loss of data.  :o)

If I had a gripe with this system, it’s only that the KeepVault connector isn’t also available to launch directly from Launchpad via the Add-ins area.  As you can see AWIECO does take advantage of this, it’d be great to see “KeepVault Connector” in here:

Launchpad with Add-ins

Add ins

I’ve heard on a few occasions that the road warrior doesn’t like the stop in the office to do a much needed backup, perhaps this solution can help.  Backups can be done from home, or coffee shops, or in my case, at work to my home!

Tuesday, April 05, 2011

Now Available! New Online Help Sites for Windows Small Business Server 2011 Essentials and Windows Home Server 2011

With the availability of both Windows Small Business Server 2011 Essentials, and Windows Home Server 2011, you probably want to make sure you have some help documentation right?  Well, our Information Experience (aka documentation team) has something for you to look at while you’re waiting for your download to finish, or stuck at the office and can’t wait to get home to play with the bits.

Online Help

Monday, April 04, 2011

How To Install Windows Home Server 2011 on your MediaSmart or DataVault Hardware

Well, I’m positive this is something that HP will not support, so don’t even think of calling them if you go down this road, but I figured it’d be fun if you wanted to continue to use the same hardware. I took this opportunity to get an HP ProLiant MicroServer, plus it does at least RAID1 (Mirror) where the MediaSmart or DataVault servers cannot do any form of RAID. But it’s still a cute little form factor. Also, I think the MicroServer is quieter than the MediaSmart (at least the ex475 that I had)

Additionally you’ll have to use the EX490/495 or DataVault as Vail requires at least 2GB of RAM, which aren’t in earlier models of the MediaSmart servers (e.g. EX470/475). So if you’ve got the grey top, you’ve got a lot more work to do that isn’t covered here. (I hear it works on the ex48x, but I only tried the ex49x)

Creating the Bootable Thumb Drive

SanDisk DataTraveler 8GB

The first step here will be to prepare your media, usually on your client computer. The image is slightly bigger than 4GB, so I had to step up to an 8GB thumb drive. I’m actually using the Data Traveller by Kingston. First you’ll need to format it and make it bootable. I already have instructions on how to do that here. Next up you’ll have to copy the Windows Home Server 2011 DVD to the root of the disk. This makes the Thumb drive and the DVD look identical in Windows Explorer. You’re almost there. As you probably know, the MediaSmart or DataVault server doesn’t have a video input, so you’re going to need to do the install via an “unattend file”. The unattend file is called cfg.ini, and needs to also be in the root of the thumbdrive with the WHS 2011 DVD image on it.

Inside the cfg.ini, you’ll need to answer questions, so design your file like this:
[WinPE]
InstallSKU=SERVERHOMEPREMIUM
ConfigDisk=1
CheckReqs=0
WindowsPartitionSize=61440

[InitialConfiguration]
AcceptEula=true
ServerName=VAILSERVER
PlainTextPassword=Passw0rd
PasswordHint=some password hint
Settings=All

Where VAILSERVER is the name of the server, Passw0rd is the server password and some password hint is the hint to remind you of what you set your password to.

Erasing the Primary OS Hard Drive

In order to have the MediaSmart or DataVault boot off the Thumb Drive for installation, you’ll need to completely erase the primary hard drive (the lowest one in the MediaSmart/DataVault server).

Remove the drive from the server and attach it to another PC (I used Windows 7) and then erase the primary partition. When you’re finished, place the drive back into the MediaSmart or DataVault server.

Installing Windows Home Server 2011

HP MediaSmart ServerThis is where the fun starts. Installation without feedback. Please note that this will erase the ENTIRE primary hard disk on your server, so make sure you have a backup of ALL your data, and customization. While you can most likely do a factory reset to bring back WHS v1 and get access to your data on other disks in the system, I don’t cover that detail on this blog, and don’t recommend taking that sort of risk with your data.

I recommend putting the box up on the desk where you can see the Health LED light and also listen to the hard drive(s). So let’s get started:


  1. Connect your MediaSmart or DataVault server to power, and network.

  2. Insert the USB drive into the bottom-rear USB port and disconnect all other USB devices. It needs to be the bottom-rear USB port.

  3. Power on the server. The server should automatically boot off the USB key, format the drive and install all of the operating system files. The health LED will blink the aqua through the BIOS bootup, then aqua/red during the OS installation. The OS installation takes ~ 8-10 minutes. You should hear the hard drives during this phase. I also constantly refreshed my router DHCP list so I could see when the server obtained an IP address.

    1. While the Answer file should take you all the way through setup, once you find your server get’s an IP address you can browse to http://<ip address> and you should see a webpage for WHS 2011 to download and run the wizard. I’d just leave it use the answer file, but if you left out the [Initial Configuration] piece out of the answer file above, you could also just run setup from here.

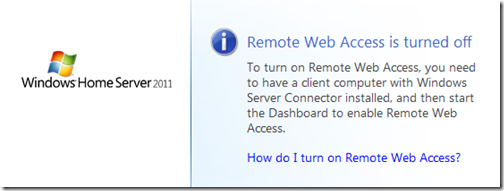
  4. The installation of the rest of the server took ~20-25 minutes for me. The LED light stopped blinking aqua/red and just went back to blinking aqua when it was done. Also, when I went to http://<ip address>, I saw the remote access site being turned off: Remote Access Disabled

  5. At this point I used “MSTSC” or Remote Desktop to connect to the server. clicking Start, then Run, and typing in MSTSC /V VAILSERVER, or whatever name you called it in the file above. When you log in using the VAILSERVER\Administrator, and the password you created in the cfg.ini file, you’ll see that the server is indeed setup and ready to roll: Your Server is now ready to use

I wouldn’t say the MediaSmart or DataVault server is as fast as my MicroServer, and it certainly is lacking 4GB of RAM, but it runs reasonably well:

Windows Task Manager

That’s all there is to it. Now just plug in your USB Backup drive, and set it up however you like.

Troubleshooting


  • Make sure you choose a name for your server that doesn’t conflict with another name on the network, this will halt the unattended configuration

  • Make sure you have at least 2GB of RAM, this will halt the unattended configuration.

  • Make sure you clean the system hard drive, otherwise it won’t boot to the USB disk.

Kudos to MediaSmartServer.Net

While I did these instructions myself, I was struggling at the location of having to format the hard drive, so kudos to the folks over at MediaSmartServer.net for the help here. Their steps helped get me over that hump, although I noticed that their cfg.ini file is a beta version, which has since been updated. My cfg.ini file is the correct one for the RC2 and RTM releases of Windows Home Server 2011. They also go into details about using the EX47x series that I don’t cover here.

Installing Windows Small Business Server 2011 Essentials

I targeted this post to Windows Home Server, as it’s more likely to have enthusiasts in the consumer space try this than in the business space. Businesses typically want the hardware RAID functionality that the DataVault or MediaSmart doesn’t offer. Additionally, being able to see what’s going on in a hardware failure is critical to a business, so the lack of a video card of a headless device is a show-stopper. HOWEVER, if you’re the type that wants to run SBS in your house, or you want to take this risk on to leverage this hardware, the same steps above work for SBS 2011 Essentials as well. The cfg.ini file is different though as it has more required fields:


[WinPE]
ConfigDisk=1
CheckReqs=0
WindowsPartitionSize=61440

[InitialConfiguration]
AcceptEula=true
CompanyName=Some Company Name
ServerName=SERVER
NetbiosName=COMPANY
DNSName=COMPANY.local
UserName=Admin
PlainTextPassword=Passw0rd
StdUserName=SomeUser
StdUserPlainTextPassword=Passw0rd
Settings=All

You’ll want to replace the bold items above with your own. Also, you’ll notice that you can use the cfg.ini file to change the .local of your internal domain name to whatever you want. We recommend .local, or .lan, or .internal work well too. DO NOT choose the same DNS name that you plan on using for your Remote Web Access website. For example, if you plan to use remote.contoso.com as your URL, do not use contoso.com as your DNS name for your internal network. Contoso.lan or Contoso.local is recommended. Or, while I haven’t tested this with SBS 2011 Essentials, I think you can choose internal.contoso.com if you absolutely must. Just don’t make them the same.

Thursday, March 31, 2011

How to Re-Install RTM on an RC version of Windows Home Server 2011

Windows Home Server 2011 has been announced as reaching RTM, and you’re excited because you took the time to download to evaluate the final release version of Windows Home Server 2011, and even though Microsoft told you not to install it in production, you did anyways, because rules really aren’t your thing.  Now you want to seamlessly move to RTM without having to copy *all* of your data off the server, and copy it *all* back on. 

You can do this from the RC2 —> RTM.  WARNING:This is not an upgrade, this is a re-install. This process will kill any custom configuration or add-in installations and will need to be re-done.  Please keep in mind that this is steps from me, and aren’t necessarily supported by Microsoft, or the support department.  As I mentioned above, the RC was never sanctioned for production use.  Use at your own risk!

In order to do this, you are required to have multiple disks (not partitions, disks!) in your system.  The Windows Home Server 2011 setup will totally erase the first disk (that’s the primary disk), that’s the entire spindle, that’s all partitions on the primary physical disk.  That’s data loss if you have any data on the first/primary physical disk.  (Have I made myself clear?)

The Re-Install

BEFORE you re-install, verify (and double verify) that your first disk is clear of personal data that you don’t want to lose.  To do this, verify inside the native Disk Manager which volumes live on the first disk:

  1. On the server, Click Start, then right-click on Computer and choose Manage.
  2. In the Server Manager that opens, expand Storage and select Disk Management.
  3. Record the drive letters (in this example, C: & F:) that exist on Disk 0.  The client backups cannot be re-connected to because the certificates all completely miss match after an install, so it’s ok to blow those away as you’ll have to re-configure them anyways.  So there is no data on this drive I want or can keep.Disk Management
  4. Make sure you have a backup of all of your critical data in case you miss read, or mess up.
  5. Finally, remove any external USB disks (extra storage, or server backups) or turn them off/un-plug them, as Setup may get confused with these disks attached and fail.
  6. There is no action to take for your .homeserver.com domain name, be sure you know you’re LiveID and password that matches this domain though.
  7. If you store your add-in folders on the server, ensure they are on a drive that isn’t erased.
  8. Write down any customizations you did and enjoy

Now that you are ready and confident that you have no data you care about on Disk 0, you can get started on the re-install.

  • Place your install media (I used a USB thumb-drive) into the server and reboot and choose to boot off that media.
  • You should go ahead and install as you would normally do.  You’ll get to a scary page that talks about formatting disks really early on.  At first I was scared too, but if you notice on this page it calls out the Primary Disk, and the warning says that ONLY the primary disk will be formatted.  This is where that pre work comes in handy now doesn’t it?

Once setup finishes, you can open up the dashboard and it looks like a clean install, but if you open up Windows Explorer, you’ll see a clean C: and a clean F: (in my case), and your data will be on your other drives.  What you will see is a bunch of default shares (in my case pointing to F:\ServerFolders\….) that are empty.  These include “Documents”, “Music”, “Videos”, “Recorded TV”, etc.  For me, I don’t want this data on this drive, I want it on another drive, actually, the drive it was on previously.  The Built-in Move data wizard doesn’t allow you to move to an existing location, so I went through Windows Explorer and added a “2” to the end of all my folders (alternatively, you could add a “2” to the end of “ServerFolders”, in which case they’d be in a different directory).  Then I ran through the Move Folder Wizard to move all the default empty folders so they are side by side.  Here is what mine looks like.  You’ll notice the ones with the lock icon are shared out and those are my default folders:

image

To find the Move Folder Wizard, you can on the Dashboard, from Server Folders and Hard Drives, and then the “Move the Folder” link. 

At this point, you just copy (using Windows Explorer on the Server) the data from “Documents2” to “Documents”, from “Music2” to “Music” and so on until you can erase all the old folders using the new (and default) folders you just moved to that drive.

For any custom folders, it’s even easier, just click the Add A Folder icon on the Server Folder Tasks under the Server folders and shares wizard, and point the Location to your shared folder, give it a name and if you want a description, then permissions and go!

Re-Configuring Your Settings

This is the painful part where an upgrade would be nice, but none exist.  Once your data is consolidated back into the shared folders, now you just start the process of re-configuring, that includes:

  • Adding Users
  • Opting into Microsoft Update (always a good thing)
  • Configuring Server Backup (I rotate my backup disks as I have two of them and keep my previous backup from the previous install until I’m comfortable with the new one)
  • Configuring Media again
  • Re-setting up the Remote Web Access (be sure to use “I already own a domain” and type in your “foo.homeserver.com” and provide the same LiveID and Password and it will just work.  You will also have to make any customizations to your RWA that you had made
  • Re-Adding all the add-ins. you had previous
  • Any other customization to the OS you did

This all has to be done from scratch.  If you’re like me, you do this over time

Reconnecting your Client Computers

To reconnect your client computers, simply go to the Control Panel on each client and choose to un-install the Windows Home Server 2011 Connector. Once that’s done, simply go to http://server/connect and re-join the computer to the network.  Since most of the rebooting required is to install the .NET frameworks and other software packages, no reboot is required to simply remove and re-add the computer to the network.

That’s it! Now you’re on a clean install of Home Server 2011 with all of your data, only needing to re-install your add-ins and make your other customizations.

These steps will also work with Windows Small Business Server 2011 Essentials, but they will ERASE your Active Directory.  From the client side, it’s not as simple as un-installing the software and re-installing it, you have to also remove the client from the domain and re-add it.  In fact, I wouldn’t use these steps at all in a domain environment that isn’t a test environment.  You should really consider doing a Migration to new hardware.  Microsoft will have these steps available to you before the product is available generally. If you want to stay on the same hardware, I highly encourage the Swing Migration method.

Tuesday, March 29, 2011

Windows Small Business Server 2011 Essentials & Windows Home Server 2011 RTM!

Wa hoo! Another set of great products out the door from the Windows Server Solutions team.  Both Windows Small Business Server 2011 Essentials and Windows Home Server 2011 have released to manufacturing!  Remember that RTM means that we, the product team have finished with the product.  Now we hand over a master image to the big DVD publishing engines at Microsoft, as well as online places like TechNet and MSDN or even Eval, OEM and other channels.  It takes some time (they all work at their own pace) before you can get your hands on it.  Check out the blogs below for further information on release timetables.

Windows Small Business Server 2011 Essentials

Windows Small Business Server 2011 is the ideal first server for small businesses with up to 25 users, providing a cost-effective, easy to use solution for protecting, organizing and accessing company data from anywhere.  With LoB support you have a platform for the small business that can connect to online services for e-mail, collaboration and other applications.  Small businesses can now backup their PC and Mac computers without having Home Server running on site.

You can talk back to the product team or amongst yourselves at the SBS forums, or the SBS Facebook sites.  For more details on availability and language support, visit the Official SBS website.

Windows Home Server 2011

Windows Home Server 2011 is a great addition to any home wanting to backup their PC and Mac computers, provide media streaming both locally and remotely, among other great features.

You can talk back to the product team or amongst yourselves at the WHS Forms, or on the WHS Facebook sites.  For more details on availability and language support, visit the Official WHS website.

Friday, March 18, 2011

Going “Pro” using Proxure’s KeepVault Pro for Windows Home Server 2011

If you read my post from Tuesday of this week, on using Proxure’s KeepVault for Windows Home Server 2011 or Windows Small Business Server 2011, and when you got to the bottom, you thought to yourself.  Heck yeah I’m going Pro! Then this I post is for you. 

If you are running Windows Small Business Server 2011 Essentials, then this post will simply show you the features before you buy, because you had to get KeepVault’s pro version for your version of Windows Small Business Server. 

First, the upgrade process: If you have Windows Home Server 2011, and you’ve been enjoying the standard features KeepVault has to offer, but want to upgrade because one or more features in my previous blog post were appealing, here is how you do it:

  1. From the Launchpad, click on the Dashboard link and type in your Home Server Password to load up the Dashboard.
  2. Navigate to the KeepVault tab already installed in your Dashboard
  3. On the My Online Backup Job tab, click the link your account name.  For me it’s my email address to go to KeepVault’s website.
  4. Log into KeepVault’s website (you’ll need that subscription ID again) and follow the instructions to upgrade to Professional.
  5. Now you have to make the software aware that you’re running pro.  I remembered that the “Restore Files” link had an upgrade option, so I used that: Upgrade KeepVault Backup for Windows Home Server
  6. Since I already did the upgrade on the web, I just clicked Apply Upgrade, but you could also skip the first few steps and  have the Purchase Upgrade take you to KeepVault’s website.  When you’re finished upgrading the back end, you get this: Welcome to KeepVault Backup Pro
  7. Wow, I don’t even have to close the File Recovery wizard, I instantly have another option to selectively download from other computers I might backup. Selective Download
  8. I cancelled the above wizard, and I’m still in KeepVault Pro

You’ll now notice little changes throughout the UI like the above recovery option, for example, if you flip over to the My Local Backup Job tab, you’ll see in the drop down list that you can add a network drive to backup locally to:

Add a Network Drive ...

Sub Users and roaming backups

In addition, the Pro account now gives me access to add “Sub Users”.  Brilliant!  So now I can just install the Windows 7 version of KeepVault on my wife’s computer, and have her files and folders backed up directly to the cloud while she roams around with her laptop.  Or better yet, in Windows Small Business Server 2011, you often have roaming sales people or people who are away from the office for long periods of time (perhaps even satellite offices?) you can simply install KeepVault on their PC, sign them up as a sub-account and have them back up directly to the cloud.  Need a file from them? Then simply restore it to the server. 

Adding a Sub User Account

Accessing your Backup through the Web Portal

When you click on your account name (in my case my email address) in the My Online Backup Job and log in with your subscription ID, you can click on the Web Access tab.  It’ll prompt you for a web access password (I skipped this because I was so excited about Sub Users, If you’re like me, simply disable web access and enable web access and it will prompt you again).  Once you have your password in place, you can click the Open Now web link to jump right into your online backup.

Web Access Tab

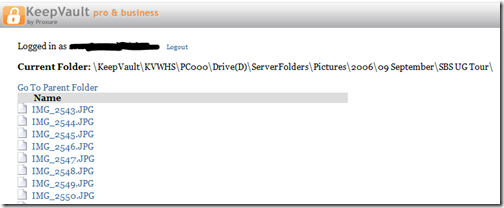
If you don’t want to log in with your Subscription ID, there is a quick jump to http://web.keepvault.com, which will jump you right to your web view of your backup.  Which by the way is raging fast, even though it’s reading encrypted files.  For example, if I wanted to download files from my 2006 User SBS Group Tour, I can simply browse to the folder, click the file and download:

KeepVault Backup Web Access

Retention Policy

As mentioned in my previous post on KeepVault, you also get a retention policy of 5 versions of files.  To restore previous versions of the files, simply do a Selective Restore, and when you get to the file, right-click it and choose the version of the file you want.  If there is no context menu, you only have one version (the latest) backed up.

From the Web Access, if you click on a file (screenshot above), you see all the versions of the file available to download.  You should keep in mind the following:

  • If you delete a protected file from KeepVault, it deletes all versions
  • File versions younger than 48 hours are never deleted (if you save a word document 10 times for example in the same day and backup is configured to “automatic”
  • The oldest 5 versions of a file are pruned (read recovered storage space) after the 10th version of a file is successfully uploaded

So as it turns out, it’s pretty easy to go Pro, if that suites you, and Small Business Owners, now you have details of all the Power Pro gives you at your finger-tips.

Tuesday, March 15, 2011

Online Backup using Proxure’s KeepVault for Windows Home Server 2011 and Windows Small Business Server 2011

As I’ve mentioned before, being a photographer, my photos are my most critical piece of data that lives on my Home Server.  When using Windows Home Server v1, I had found an Online Backup solution that I previously reviewed on this blog.  While I still think it’s a good solution, it has some draw-backs depending on the Amazon S3 back-end.  Like the cost of Amazon S3 is about as expensive as it gets, and signing up for Amazon S3 was probably one of the more confusing processes I have ever done.

While at SMB Nation 2010 in Las Vegas, I had ran into a company called Proxure who build a solution called KeepVault.  I watched a demo of their solution run and it seemed reasonable, at least to check out.  I thought it was pretty cool that they offer versions for Windows XP, Vista, Windows 7, Standard Server (03 & 08 via their Professional version), and most importantly for me: Windows Home Server.

KeepVault Add-In

While this blog covers KeepVault on Windows Home Server 2011 (codename “Vail),  the same add-in offers cloud storage to both the Windows Small Business Server 2011 Essentials (codename “Aurora”) and the Windows Storage Server 2008 R2 Essentials.  However, for these business products, you need to get KeepVault Pro.  The steps and UI, aside from the color of the dashboard, is identical.  KeepVault Pro can also be used on Windows Small Business Server 2011 Standard (codename “SBS7”), although that UI is not shown in this blog post.

Back to the review: The first thing I notice was KeepVault doesn’t bill you for what you use, they bill you for storage space in chunks (40Gb, 80GB, 130GB, 200GB … 3.5TB!).  So if you’re only backing up a very small amount of data, you could end up over paying, but if you compare to Amazon’s 15cents/GB (up to the first TB), you really see a cross over at about 15GB.  Once you get over 15GB, Proxure seems to win hands down on cost.  Plus when you hit the top mark, you click a link and you can bump up your storage. 

The Setup Process

Using the AWIECO Drive Info add-in, I determined I wanted to back up my Pictures and Documents, the things that I really care about.  That came out to about 117GB, so I signed up for the 130GB plan from Proxure.  You don’t need the AWIECO add-in, but it made it a “glance” to compute.

Installing the add-in is just as painless as installing any add-in.  Just double click on it on the server, or on any server-joined client, read and accept the EULA, and then Install it.  You’ll have to re-start the Dashboard to have it appear in the global tabs.

Proxure KeepVault Add-In

The initial page doesn’t look intimidating at all.  Simply click on the Order a KeepVault Backup for Windows Home Server Subscription Now button and sign up. I thought it was pretty slick you could pay via PayPal or with a standard credit card. I’m all for yearly payments too, so I got to save my 10%!! Within 5 minutes I was emailed my subscription ID. Typing that in, with my email ID and I’m good to go.

Choosing an encryption key I can type one in myself, or KeepVault will randomly generate one for me.  If you generate one yourself, you have a risk that you forget your key and now your cloud backup is useless.  If you’re like me, you’ve installed WHS 2011 on new hardware and it’s probably a while before that fails, so you might forget it.  If you don’t want this cumbersome task, you can let KeepVault choose one for you.  The interesting thing here is that they generate the key based on your ID and subscription numbers (as its computer agnostic).  To me that means that someone at KeepVault *could* decrypt your backup.  Although my suspicion here is that you are still safe because our data is stored in blobs and because KeepVault has more than one customer, it’ll be hard for the lay-man IT person at KeepVault to match this up to your backup.  For what it’s worth, I went with “Let KeepVault choose one for me”.

I like how KeepVault really focused on the simplicity of the solution.  With the previous solution I reviewed I could create multiple backup jobs and multiple schedules, which was nice, because parts of my collection barely every change, I just wanted them backed up.  But it was overwhelming at first.  KeepVault’s “Always/Real Time” schedule by default and the single “Job” configuration removes any daunting thoughts you might have.  The only confusion on the whole page for me was enabling the protection on the shares.  I didn’t realize the grey bar across the page were actually buttons, as most of the WHS 2011 console they are just “headers” of columns.  So once you realize that you can just click on Enable Protection to add that shared folder to the cloud backup, it was all good.  As any good add-in, you can also right-click on a Share in the list and select to enable or disable it from the context menu.

Enable Protection for Shared Folders

Using the Add button you can also add any folder you wish on the system, so it doesn’t have to be shared out to the network in order for you to back it up.  You’ll also notice in the screenshot above that I have changed the schedule to be between midnight and 6am.  This is because I am uploading 115GB of data, and I work from home, so from 8am-6pm I use my bandwidth for work, and from 6pm-midnight, I use it for entertainment.  By default, KeepVault will Encrypt and Compress your data on the box before it sends it over the wire.  Nifty…

KeepVault Job and Setting Options

The only feature that I think is missing from the Job scheduler is the ability to run 24/7 but use less bandwidth during the day, and all of it at night.

Looking at the other options, you can always pause the backup, view and delete your protected files online (ie. if you want to permanently delete some files, you can delete the file locally, and use this task to delete it from the cloud as well), view the protection/upload history, configure a proxy if your ISP requires one, and most importantly (the reason we all do backups), Recover Files.

The Event Log is KeepVault’s own list of events (like service start/stop, etc events).  Messaging (while somewhat confusing of a name, maybe “Job Notifications” or “Job Alerts” might be better, is actually really well done.  You can receive emails or SMS alerts (via your carriers E-Mail to SMS service) based on your backup failure rates.  KeepVault obviously has some mail service on the back-end that they allow you access too, because unlike the WHS 2011 Built-in Alerts, they don’t ask you to configure an SMTP service.

When the backup eventually kicks off, if you’re backing up as much data as I am, even with the 1900kbps as advertised in my standard version of KeepVault, I’m in for a long wait…  This is the same with every cloud solution the first time you back-up.  The progress is good, you get both global progress as well as file level progress
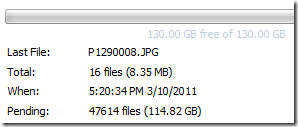
Global Progress of Upload

From 5pm to 9am (~16 hours) on a Thursday night over my cable connection, I backed up 5.1GB to KeepVault’s cloud.  Not quite as fast as the Amazon S3 solution, but then again, I don’t have a Pro account with KeepVault.

Once your data is uploaded, it lives in Proxure’s Data-Center, encrypted for only you to download in the event of a disaster.  Fingers crossed that this is just an insurance policy, and never used.

KeepVault Local Backup

You may have noticed in the above screenshots there was another sub-tab called My Local Backup Job.  Yes, KeepVault can back up to a local disk.  In the Standard version, it’s similar to the built in WHS 2011 Backup in the fact that it can only backup to hard drives attached to the system (the recommendation is still for USB for offsite storage).  If you have KeepVault’s Premium version, you can also back up to SMB Share (i.e. \\NAS\Share), so if you have another device on your network, you can back up to another share on your network.

Also, you’ll notice that this tab also allows you to compress or encrypt.  So if you’re taking that disk offsite, the encryption piece might be something you want to consider for safe storage of that disk should it be compromised.  If you don’t encrypt it.  Files are stored in “explorer friendly” format so a restore on any computer without KeepVault installed is possible.  In comparison, WHS 2011 backup is stored in VHD format, which requires you to first mount the VHD before you can actually do the restore of files.

Recovery of Files

File Recovery

The One-Click Recovery, really is just that.  Let’s say that you have a little child at home, and their favorite past time was to go into your prized photo library and use the delete button, just randomly through your collection.  Or maybe you were searching for your favorite files, and then miss-clicked and deleted your favorite files across your 100GB collection.  Restoring that can be painful.  This One-Click Recovery makes that a breeze.  As *soon* as you click next (i.e., one click), the service will compare the cloud to the local box, and recover all missing files.  If the file exists, the restore will be skipped, preferring the local file over a recovery.  So you can recover all those files our child deleted randomly, yes with one-click.  Obviously this is how you would go on a new server, because none of the files exist.

Selective File Recovery DialogThe Selective Recovery is more of the natural way we think about recovering.  You get your standard tree-view and you can drill into your cloud backup and select different files to recover.

This way is not a single-click restore, but a selective restore.  On the left-hand side if you select a folder, you can select files and folders on the right-hand side for restore.  So if you’re restoring a whole folder, select the folder above it, and then check the box next to the folder you want to restore. If you’re restoring all but a few files in a folder, that can take a few extra clicks.  Thankfully you can use the CTRL or SHIFT Keys to multi-select as you need (similar to Windows Explorer). Before moving on, you need to select if you want to over-write existing files.  This was weird to see on this dialog, because I figured it would be a sub-option on the recovery location which is next.

Once you’re comfortable with the set of files you’re going to restore (and if you want to over-write files), you next choose if you want to restore the files to the original location, or another location.  Unless I’m restoring a completely new server, I’d probably always choose another location to make sure that I’m getting what I expected.  Once you’ve chosen the folder for the location of the restore, I hit “Recover”, and just wait for the software to download the files and put them in the appropriate place.

Recovery Progress

The restore is in fact pretty painless, and yes, my photos came down in-tact…

Test Restore Thumbnail View

Why Go Pro?

As you saw above, KeepVault has two versions, Standard (which they just call “KeepVault”) and Professional (or “KeepVault Pro”).  As a home user, you  might not ever need the Pro version, but it’s certainly something you need for businesses.  So what do you get if you go Pro?

  • Support for Server solutions (aside from the WHS).  For example, the Windows Small Business Server 2011 Essentials, Standard and Windows Storage Server 2008 R2 Essentials.  Also, if you have additional servers in your environment, you can back them up to the same account (Standard Server 2008 and Standard Server 2003).
  • A much faster upload rate (5250kbps instead of 1900kbps).  This comes in handy with that first backup.  The faster you get the files to the cloud, the sooner you are protected!
  • Local Backup to UNC share.  Meaning you can back up your server to a local server share as well.
  • Higher encryption levels (256-bit encryption can be chosen instead of 128-bit)
    • This reminds me.  If you backup a file with the pro version, and then downgrade, your standard client can’t understand the 256-bit encryption and thus can’t restore the files.  It does work the other way around though.  So just be careful which way you go!
  • More Access to your data (Web Access, cross device access for restore) and other administration features.  Notice my screenshot under “Restore” above, if I had the pro version, I could backup files and folders from other computers, right to this single computer.  This means I could support cloud backup on my client computers, and then restore this to the server in the event that the client was dropped while out on a trip!  Another brilliant business feature.
  • If you’re using a management solution, error notification includes system events, so you can track errors in your online backup with your monitoring tools.
  • 5 version retention policy.  If you are with KeepVault standard, you only have the latest version stored on the internet, with Pro it keeps up to 5 versions so you can go back in time when you wish to restore.

As a business user, you’ll have to use the Professional version to get the add-in installed.  As a Home User, you should review the features above and gauge how critical they will be for you. 

If you’re still debating having a Cloud Backup solution for your most prized data, you should approach it like an insurance plan.  You have one for your house, you have one for your car.  You cross your fingers every day that you don’t need to use it, but when you do, it’s there for you.  If your hard-drive fails, recovery of such drives can often cost $1,000s, with no guarantee you can get your data back.  If you’re house burns down, like my uncle’s, this sort of thing is priceless.

I’m using KeepVault, what are you using?

UPDATE: Want to learn more about KeepVault Pro? Check out my Going Pro with Proxure’s KeepVault blog post.