Showing posts with label Trouble Shooting. Show all posts

Tuesday, January 07, 2014

How to fix Outlook's Jump Lists

I'm a big fan of the Jump Lists in Windows 7/Windows 8.  I use them a lot to get to key documents and most importantly start a new mail message or new calendar request with Outlook 2013

It's super easy to just right-click, and then select New E-mail Message, and you're off to the races, no need to make Outlook the foreground or anything. 

However, twice now I've found this list corrupted, I right click and there is just the bottom three, and the "task" available is a "mailto:a_lot_of_garbage", and it does nothing.  Productivity drops instantly.  

I did however managed to find this support article on tasks missing once Outlook is pinned to the task bar.  It provides two work arounds, both times the first one worked.  Instead of the backup, I just renamed the "LastUILanguage" key and re-opened Outlook. 

Method 1: Delete the LastUILanguage registry value

To export and delete the LastUILanguage registry value, follow these steps:
  1. Unpin the Outlook 2013 icon.
  2. Exit Outlook 2013.
  3. Use Regedit to export the following registry key:

    HKEY_CURRENT_USER\Software\Microsoft\Office\15.0\Outlook
  4. After you export the Outlook registry key, delete the LastUILanguage registry value.
  5. Start Outlook 2013, and then re-pin the icon.

Method 2: Export and delete the Setup registry key

If method 1 does not resolve the issue, export and delete the Setup registry key. To do this, follow these steps:
  1. Unpin the Outlook 2013 icon.
  2. Exit Outlook 2013.
  3. Use Regedit to export and then delete the following registry key:

    HKEY_CURRENT_USER\Software\Microsoft\Office\15.0\Outlook\Setup
  4. Start Outlook 2013, and then re-pin the icon.
Hopefully this helps you....

Wednesday, June 29, 2011

The Basics of Local DNS for Small Business Server 2011 Essentials

[Post idea courtesy of Robert Pearman, MVP]

If you’ve used Windows Small Business Server in the past, you’ve probably figured out exactly how DNS works. With the SBS 2008 and SBS 2011 the Connect to the Internet Wizard would analyze your network and determine a static IP address to use, and then ensure you like it before making it the server’s IP address. Then as we all know, the DNS server runs on SBS and resolves local network addresses, like “domain.local” or “server” or the internal fully qualified domain (FQDN) “server.domain.local”

Since SBS 2008 and SBS 2011 are DHCP servers by default, that means they hand out IP addresses, and the server’s IP as the DNS server. DNS works flawlessly in such an environment. Internet based addresses (such as Microsoft.com) are first sent to the SBS box for resolution, and then forwarded on to the ISPs DNS servers for name resolution.

Ultimately SBS is a middle man in the peer to peer DNS infrastructure and gives the full power of DNS to the local network

So how is SBS 2011 Essentials Different?DNS!

SBS 2011 Essentials doesn’t assign itself a static IP address, and it doesn’t have a Connect to the Internet Wizard. Essentials will automatically connect to the Internet just like any client computer, using the DHCP assigned address. It does however use its local DNS server to resolve both local and Internet based names by overriding the DHCP assigned IP address to 127.0.0.1 (localhost). If you dig into the DNS settings, you’ll notice that the DNS Server picks up the routers IP as a forwarder. Routers by default will hand out their own IP as the DNS Server and proxy DNS out to the WAN configured (usually DHCP but sometimes services like OpenDNS) DNS servers. This means that if the server were to ask for an Internet based address, like technet.com, it would forward that request to the router, which would intern forward it to the ISP, which could hopefully resolve it for you.

Clients on the network also still need to use the SBS DNS Server in order for Active Directory to work, or to resolve the server and other services on the network (for example, client backup doesn’t work unless DNS is operating correctly). Clients *also* get their IP and DNS Server from the DHCP server, which in Essentials, by default, is the router. This means that the DNS server is the router, essentially skipping the SBS name resolution step. Once the client goes to http://server/connect, a service is installed called LAN Configuration Service. This service monitors client IP address changes, when the client gets a new IP (ie, it turns on, or it changes locations) it immediately sends out a UPnP query looking for the server (note, this only works on single subnet environments). If a server is found, the DHCP assigned DNS address is overwritten by the server’s IP address (obtained in the return call from UPnP). If no server is found, the DHCP DNS assigned address is kept.

This means that client computers get the SBS DNS address within the SBS network, but the DHCP assigned address at a place like StarBucks. Clients can always resolve the Internet, and inside of the SBS network, they can also resolve the SBS server and Active Directory domain.

Now, for those paying attention, you’ll have recalled that the SBS server’s address is also DHCP assigned, which means it can change if the router deems it necessary. There is a similar service on the SBS server that will broadcast when it’s IP address changes, the clients on the network pick this up and update DNS, the clients off the network will just re-do the process above to get the right IP address.

A side-effect/pro of this design over the SBS 2008 or 2011 Standard design is that if the server is down for patching (we all know how long those reboots take), or another reason, the client will revert back to the DHCP assigned address after a short period of time and can continue to resolve the Internet until the server comes back online.

Can I set things up the old way?

Of course you can. SBS 2011 Essentials is still a full blow copy of server, and all the power that you’re familiar with is there. You can just jump into the NIC settings on the server and give it a static IP address of your choice. No problems there.

Additionally, if you absolutely wanted to run DHCP on the SBS Essentials server, no problems there either, simply open up the Server Manager, install the roll and configure DHCP. Don’t forget to turn off DHCP on your router, and away you go. If you’re not familiar with DHCP settings though, I suggest you leave it the way it was.

Tuesday, January 05, 2010

Windows Home Server Remote Access - Understanding ISP Blocking Ports

Oddly enough, over the holiday’s I was working to figure out the remote access for my friend who just recently got a home server.  For all intents and purposes, his router stated the ports were open, yet Home Server would not show that remote access is available.  A quick Bing search lead me to believe from forums that the ISP (Telus in Canada) blocks the required ports for Windows Home Server

Those ports, 80 & 443 used for HTTP and HTTPS access to the server means that you are in a double-NAT environment that your ISP provides for you.  Unfortunately you have no control over the external most NAT device and as a result, remote access won’t work for you.  Here is a video from HomeServerLand that will help you understand this scenario

The options if you find yourself in this situation are:

  • Contact your ISP and see if they will allow these ports through for you.  In many cases, they will, although in this case, Telus required we purchased a monthly static IP address, or a business class DSL line, both rather expensive.
  • Use Home Server on non-standard ports, which is not that easy to do and potentially some of the updates you receive from Microsoft may or may not break this functionality.  Additionally, the ISP may still block these ports.
  • Change ISPs.

Good luck with your ISP, you’ll need it!

Monday, January 04, 2010

Windows Home Server Remote Access - Understanding Double-NAT

Are you having troubles with remote access? Could it be because you have a Double-NAT configuration on your network?  HomeServerLand has a video that explains what a double-NAT is and how you can avoid it. It’s a great 2 minute video that will help you understand this configuration and how to avoid it.

This great video talks about how to determine if you have a double NAT either on your local network, or from your Internet Service Provider.

If you haven’t already, make sure you check out HomeServerLand’s very valuable router configuration support wiki.

Saturday, January 02, 2010

Troubleshooting Remote Access on the Home Server Blog

In a follow up to last weeks blog on Understanding and set up of Remote Access to Windows Home Server, Sean Daniel, Program Manager for Windows Home Server, has provided further information on potential issues that you may experience when setting up your Remote Access, and how to solve the problem.

Once you finish setting up your remote access through Windows Home Server’s Wizard, a final screen will be shown.  In a perfect world, when you click on Details you’ll see all green checks once you have finished this wizard.  However, because there are three components (the home server, the ISP and the router), sometimes there is a snag in the setup. Here is an example of a working domain name with sample data:

image

The first check-box will actually check to make sure you have an outbound connection. This will ensure it can connect to the specific …

Read more at the Home Server team blog.

Wednesday, August 26, 2009

Testing AutoDiscover using Outlook

A while back on this blog, I discussed how Outlook AutoDiscover works and how it aids in mailbox configuration on the client side.  I also went into detail on a service the Exchange team provides to troubleshoot remote connectivity.

But I wanted to inform you of a handy troubleshooting tip that sits right on your desktop (provided you are running Outlook!)

In the notification area of the task bar (near the clock) there is an Outlook Icon( ).  This icon is your access to troubleshooting AutoDiscovery.  Here’s how:
  1. Hold down Control and then right click on the Outlook Icon, you’ll get two new options in the menu that you wouldn’t normally see if you were just simply right-clicking. Those options are Connection Status and Test E-Mail AutoConfiguration. The second one is the one we want, click on Test E-mail AutoConfiguration. Test E-Mail AutoConfiguration
  2. Type in the user you want to check E-Mail address and password and click Test

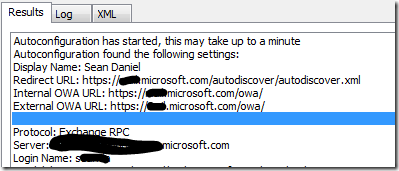
When the test launches you’ll get a bunch of results, reading through the results you’ll be able to determine what’s broken and where.  For example, here is mine that is fully functional:

image

Here is what you might see if the ports aren’t open on your router, or your SRV record is miss configured:

Play around with it, get use to it and use it to troubleshoot what’s going on with your remote Outlook over the Internet connections.

Thursday, June 25, 2009

Windows Live Writer Crashes in Tools/Options

Since the release of Windows Live Writer, I have been using it to update my blog.  It allows me to update my blog offline as well as speeds up the adding of blog posts (such as this one) to my blog.

A little while ago, Windows Live Writer started crashing when I was adding hyper-links into my post.  It didn’t matter if I used CTRL+K, or the menus.  I wanted to check out if I had a failing plug-in installed, but going to Options would also crash Writer.

Searching on the Internet, I discovered that Windows Live Writer has issues with a corrupted Glossary.  Essentially it boils down to the glossary XML file having a bad format.  I still haven’t determined *how* this happened, because I’m not updating it manually, I only use Writer to update it.

Anyways, if you check out the Writer Log file (which is at c:\users\<username>\AppData\Local\Windows Live Writer\Windows Live Writer.log), you’ll notice the following:

System.Reflection.TargetInvocationException: Exception has been thrown by the target of an invocation. ---> System.TypeInitializationException: The type initializer for 'WindowsLive.Writer.HtmlEditor.Linking.GlossaryManager' threw an exception. ---> System.Xml.XmlException: The 'entry' start tag on line 3 does not match the end tag of 'glossary'. Line 76, position 3.

Essentially this will point you to the fact that your Glossary Manager is having problems.  Your glossary XML file is at “c:\users\<username>\AppData\Roaming\Windows Live Writer\LinkGlossary\linkglossary.xml"

I took a different approach to fixing the problem than my source, I ended up renaming the file to linkglossary-old.xml, and then re-opening Writer.  Writer will create a new file for you.  I opened the new file in Notepad and noticed that it only contained a single <glossary> tag.  I hit enter and added a </ glossary> tag, then copied one by one all the "<entry></entry>” blocks out of the old file into the new file.  Once I found one that didn’t work, I just deleted it (since I can always re-create it if I want).

Tuesday, April 28, 2009

Connect to the Internet Wizard Won't Finish in SBS 2008

2487423236_9bc5fbb705_o[2]

I got forwarded an issue the other day where in Windows Small Business Server 2008, the Connect to the Internet Wizard will take longer than 5 minutes to finish.  5 minutes is about the maximum this wizard should take (although there are rare cases when it takes longer), but this customer had waited 20 or 30 minutes for the wizard to finish.  The wizard just sits at this page:

clip_image002

If it is taking a long time, and you kill the wizard and check out the log file at c:\program files\windows small business server\logs\ctiw.log, and see the following:

[6208] 090421.222228.6798: CoreNet: New random IPv6 Address is fe80::51db:7007:45d6:ada1
[6208] 090421.222228.6798: CoreNet: Checking the IP conflicts for new address.
[6208] 090421.222233.6803: CoreNet: New random IPv6 Address is fe80::8e85:4dd0:e65d:e1d6
[6208] 090421.222233.6803: CoreNet: Checking the IP conflicts for new address.

The IPv6 network discovery on your network is not working.  This could be a number of items, including networking components you have on your network.  A nice work around is to choose one of the IPv6 addresses recommended in the log file, and ping it to verify it’s not in use, then if it’s not in use, simply set it as a static IP address and re-run the Connect to the Internet Wizard.

Don’t disable IPv6, there are definitely issues with that as well.

Friday, April 24, 2009

Using OpenDNS with Windows Home Server

2987251461_42cd5d626c_o[1]


I recently started using OpenDNS on my networks, because I like to track DNS stats, and prevent bad sites from resolving.  OpenDNS has cataloged over 5 million sites into buckets, and you can either block a specific site, like limeware.com, or block a group of sites, like “P2P file sharing” sites.  I also love that you can add and customize multiple networks, so I can have my grandfather’s network more locked down than my site.

Once I made this adjustment on my network, I noticed that my Home Server stopped responding to the home server client when I wanted to connect to the server.  It showed the error:

This computer cannot connect to your home server. Check your network connection and make sure your home server is powered on. If your home server has recently restarted, try again in a few minutes.

The problem is that the router is passing every name resolution to the DNS servers.  With normal DNS servers, they ignore single hosts such as “SERVER”.  With Open DNS, they go ahead and slap the ISPs domain name on it and resolve it for you (e.g. SERVER.comcast.net), and of course your console wouldn’t connect to that.

You can simply work around this issue by making your internal LAN a “VPN” network.  The OpenDNS community asked the question, which pointed me OpenDNS KB Article.  The steps are simple:

  1. On your client computer, run ipconfig /all, and copy down the domain name
  2. Sign in to your Open DNS account.
  3. Add a network, if you haven't already.
  4. Go to the Settings tab.
  5. Click Advanced Settings.
  6. Click Manage under Manage VPN Exceptions in the Domain Typos section.
  7. Add your internal domain(s) to this list, which was copied down in the first step
  8. Wait 3 minutes (worst case) and all should be well.

That’s all there is to it.  Home Server starts acting like a Home Server again.

Tuesday, February 24, 2009

How to Synchronize the DSRM password with a Domain User

[This post courtesy of Paul Fitzgerald]

If you have a disaster and you need to recover, are you going to be able to log into your system?  When using the Directory Service restore Mode (DSRM) Administrator password, you may not be able to remember it!  This could lead to a whole whack of problems, as great as not having access to log into your machine to recover data!

In Windows Small Business Server 2003, the product itself kept the DSRM Administrator password in sync with the Administrator account on the system.  So whenever that password was changed, so was the DSRM password.  Making things super easy for you.

With Windows Small Business Server 2008, the built in administrator account is disabled, so this functionality was never implemented.   However, a new feature is available for download for you to choose which account the DSRM password is sync’d with.  KB Article 961320 talks about what’s needed to download.  You can download the patch by clicking on the:

  image

icon (it will probably be included in Server SP2), and then the command line that you need to run to choose which domain account to sync it too.

That’s all there is to it!

Friday, February 20, 2009

Keys to Success in SBS 2003-2008 Migrations

The Official SBS blog has put out some notes on how to make sure you’re migration from SBS 2003 to SBS 2008 is successful.That blog post is here.

From my own experience, the documentation, is very very complete, and very thorough.  The catch of course is, this isn’t like normal SBS documentation where you can skip steps, every part of every step is crucial.  If you’re not reading every word and doing every step, then your failed migration on your head.  READ and then READ again!

Check out the Official Blog post.

Wednesday, January 14, 2009

More Troubleshooting & Repair documentation Live

The User Assistance folk are continuing to crank out some great documentation.  Live today are some additional repair documentation available on the Technet Website here.

Much more documentation is planned to go live as soon as it’s ready, so keep your eye on this location.

Friday, January 09, 2009

Recovering SBS 2003 data to SBS 2008

Once you make the jump to SBS 2008, you’ll wonder if those old .BAK files from NTBackup can be read.  I mean what if you want to recover some files from your 2003 backups to your 2008 server?

Never fear, the Windows NTBackup Restore Utility is here!  Yes it works for Small Business Server.

Brief Description

Utility for restoring backups made on Windows XP and Windows Server 2003 to computers running Windows Vista and Microsoft® Windows Server® 2008.

Monday, November 17, 2008

Home Server with Multiple Subnets

I may be a little out of the norm with Home Server, but I have a home network with 2 subnets.  The reason is because I run a Sonicwall as my home router.  The wired LAN runs in 192.168.1.x and the wireless WLAN runs in 192.168.2.x .  This allows me to do guest wireless, and quite frankly, a business class router such as a Sonicwall just provides much more reliability, which is very important to me.

Ok, so now for how I got my WLAN clients to access the home server.  First of all, Home Server has a dynamic IP address, so because I’m a server guy, I just changed it to a static IP address on the LAN for the Sonicwall.  Next I went into the Windows Firewall on the Home Server

image

For each exception, I needed to verify that it allowed more than the Class-C subnet through the firewall.  I decided for simplicity, it was easier to change it from a class-C to a class-B subnet allowance (i.e. instead of 192.168.1.x through the firewall, it allows 192.168.x.x through the firewall).  This is slightly less secure, but it’s my home, and I have a pretty good WPA key on my wireless network.

Here are the steps to change each exception:

  1. Select an Exception, you’ll have to do this for all exceptions that are scoped to My Network (subnet) only, and choose Edit.
  2. On the Change Scope page, select Custom List, and place your cursor in the box
  3. For the subnet, type the static IP address of the server followed by a “/” and then the subnet for class-B networks (e.g. “192.168.1.2/255.255.0.0”) and choose OK.

That’s one exception that allows the WLAN clients into the home server.  Now go through all the exceptions and make this change, the WLAN clients just “popped” online without making a change on the client side.

Friday, October 31, 2008

Connecting computers to the SBS Network

[This post courtesy of Steven Goddard]

This post goes over the different ways to join a client to the SBS 2008 network and differences.

HTTP://Connect

This method replaces the http://server/connectcomputer method. http://connect is a simpler url to remember, you don’t need to know or remember the server name. The goal of the web page is to do some pre requirements checking and guide the user through the experience before the Connect Computer program start. If we can detect the OS and browser version, specific instructions to that configuration are shown are shown on the web page to guide the user through the series of prompts they will see before the Connect Computer program starts. If we can’t detect that, a general set of instructions are presented.

Once you select “Start Connect Computer Program”, the wizard will start.

Note: see KB957708 if you the client machine can’t get to http://connect.

Portable Media

The second method involves creating portable media. Via the SBS 2008 Console, you can copy the Connect Computer launcher to portable media like a USB key. Then you can walk to each machine, plug in the USB key, and start the program (launcher.exe) that will download and start the Connect Computer wizard.

The wizard to do this is called “Connect Computers to your network” on the Getting Started Tasks and on the Network.Computers page. The wizard is a quick wizard. After the first page, you will need to select “Copy the program to portable media”.

image

Then, select the location to put the program.

image

Followed by the confirmation and the instructions how to run the program.

image

What is different between http://connect and the portable media method? They both launch the Connect Computer wizard (to be covered in a forthcoming post). However, if you can’t get to http://connect due to networking issues (lets say you are still getting DNS info via the router), you will get page not found. Running launcher locally, if it can’t get to the server, it will do a repair network. This will include doing an ipconfig release and renew. At this point, the client machine should get an IP from the SBS server, and able to get to the package to download the connect computer wizard.

Native domain join

You can always still natively domain join computers. The Connect Computer program only supports XP SP2 and above, Vista. So for older OS’s or server SKU’s, you will have to natively join them to the domain.