Showing posts with label Macintosh. Show all posts

Thursday, November 10, 2011

Home Server and SBS Add-in to Automate Client Backup of your MAC

One of the most popular posts on my blog is how to enable Apple’s Time Machine backup to backup to your Windows Home Server 2011 or Windows Small Business Server 2011 Essentials.  As it turns out, a company named Orbital Technologies has decided to build an add-in that enables this functionality without the need for you to walk through the steps of creating those confusing sparse files.

UWHS - Orbital Backup Configuration for MacThat add-in has been reviewed over on the famous UsingWindowsHomeServer blog, specifically in a blog post here, covering the preview of the Orbital Backup Configuration for Mac.  They additionally covered the add-in again when it was available.

Simply install the add-in, open up the dashboard on the MAC client and go to add-ins, Orbital utilities and follow along.  All you  need to know is your username and password to the server.  easy right? also free!

Keep in mind that you can still do the manual steps provided in my post if you prefer not to install anything as all this add-in does is the configuration pieces for you.

You can download the add-in directly from the Using Windows Home Server Forums, or We Got Served forums. The add-in should work fine on Windows Home Server 2011, Windows Small Business Server 2011 Essentials, and also Windows Storage Server 2008 R2 Essentials.  If you’re using any other Windows product, the manual steps are for you.

Friday, April 08, 2011

Using the KeepVault Connector to backup Roaming Client Computers

Previously, I covered the basics of Proxure’s KeepVault Online Backup, as well as what you got if you went Pro.  With the release of the RC of KeepVault for, I noticed I didn’t cover the KeepVault Connector, which is a separate add-in for Windows Home Server 2011, and Windows Small Business Server 2011 Essentials than the original KeepVault add-in. 

This add-in allows you to do the incredible.  Back up roaming computers via a “Sync” while the computer is connected to the Internet, anywhere.  Now I use Windows Live Mesh to sync most of my items between my computers and the cloud, but there are some things that I don’t.  For example, if I’m travelling and I process photos, those don’t get into my Mesh, but I still worry about them.  This solution solves that.

Simply download and install the KeepVault Connector for Mac & PC.  Make sure you choose the WHS/SBS 2011 version, and not the WHS Original.  Once installed, and the dashboard restarted, you’ll notice that KeepVault has an extra tab

KeepVault Connector

This add-in installs into the dashboard and adds a \KeepVault directory to your default website.  It also reads your servername (orange above), your remote access domain name (blue above) and provides an extremely secure recommended password (yellow above).  Simply click the link to Download and install the client setup.  This downloads the client component directly from your server:
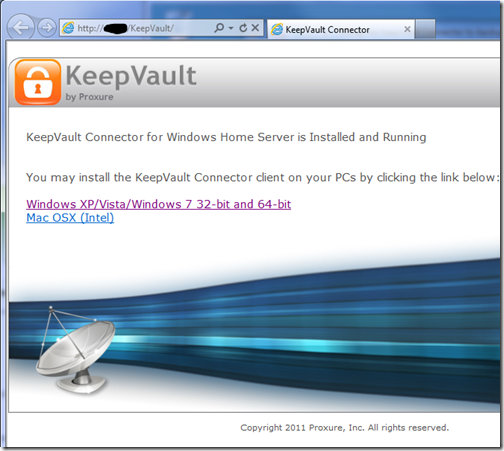
KeepVault Client Download

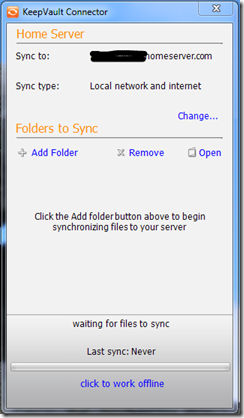
KeepVault Connector Client ApplicationOnce installed, just find the KeepVault Connector in the start menu, or in your system tray, and load up this fancy little “Sync” application and click the Add Folder button.  This will allow you to to pick a local folder on your client computer which will perform the backup. 

For me I created a “backup to home server” folder as a test, and dropped a few files in there.  While I’m local on the network, the backups are SUPER quick, but away from the network they’ll be throttled by my connection speed back to my server.

You can also choose to modify the backup locally only, or over the Internet.  Given that the built in Client Backup functionality runs when you’re local, you might not use this.  However, it’s some nice flexibility if you use a tethered 3G connectivity, so you can choose to sync when you’re on wi-fi and by default not always.  Speaking of Sync, you’ll notice at the very bottom you can click the hyper-link to work offline, so if you end up tethering your PC to your cell phone and then dumping a ton of pictures in there, you can click that and work offline, and prevent the backup from happening over your 3G connection, if you valued cost of data over loss of data.  :o)

If I had a gripe with this system, it’s only that the KeepVault connector isn’t also available to launch directly from Launchpad via the Add-ins area.  As you can see AWIECO does take advantage of this, it’d be great to see “KeepVault Connector” in here:

Launchpad with Add-ins

Add ins

I’ve heard on a few occasions that the road warrior doesn’t like the stop in the office to do a much needed backup, perhaps this solution can help.  Backups can be done from home, or coffee shops, or in my case, at work to my home!

Thursday, February 10, 2011

How to Enable TimeMachine Backup for your MAC to your Windows Small Business Server 2011 Essentials or Windows Home Server 2011

Well, I don’t often dabble around with a MAC, I just can’t get used to the single mouse button and pressing a key on the keyboard for a simple context menu.  I’ve quite possibly been assimilated to Windows.  However,  protecting your data is important, even if you are on a right-click less product.

As you probably know by now, the Release Candidate of both Windows Small Business Server 2011 Essentials, and Windows Home Server 2011 is now live. Which means you can download and install them!!  You should take a moment and do that now.  I’ll wait.

Once you have these installed, you can easily add your Windows based PC to the server and to the PC backup by simply going to http://server/connect on your client PC.  Click the install for Windows PC button and follow the instructions.  Windows PC’s are automatically added to the backup which takes place in a round robin style nightly.  When you’re on a Mac, it’s the same thing, but you click “Install for Mac”, you end up with a launch pad and access to the server, but no default backup.

It has to be possible right? I mean everyone knows that a MAC is really a *nix box with a really fancy UI (and no right-click).

Poking around on the Internet, you can find some steps, like how to get unsupported volumes to appear to the TimeMachine engine, with the help of a friend (thanks Fabian & Craig) we’ve managed to put together these steps, which work for both Home Server 2011, and SBS 2011 Essentials:

  1. First, create an SMB share on your server using the share permissions wizard, let’s call it Mac Backups.  Make sure the users who are on a Mac have Read/Write access.
  2. Change the Mac TimeMachine to show unsupported Network Volumes by going to Finder, then Applications, Utilities, Terminal.
  3. Inside the Terminal, type this command defaults write com.apple.systempreferences TMShowUnsupportedNetworkVolumes 1.  This sets the showing of unsupported network volumes to TRUE.

 Showing Unsupported Network Volumes

  1. Obtain the MAC’s MAC Address. A MAC Address is the hardware address of the local network card.  It’s important to choose the MAC address of the built in wired connection.  To obtain this, you can run the command from the terminal: ifconfig | grep en0.

 Finding the MAC Address

  1. Next (and this is the confusing part, so bare with me) we need to create a sparse file on the MAC and copy the server share.  A sparse file is a file that you define a CAP size, but it will probably take up much less (we’ll define it as 200GB in this example).  This file creation process is a little tricky.  To do this, type in to the same terminal above: command ‘hdiutil create –size 200g –fs HFS+J –volname “<CLIENT_NAME> Backup” <CLIENT_NAME>_<MAC_ADDRESS>.sparsebundle’ Where the MAC client is called <CLIENT_NAME> and the MAC Address on the primary wired connection to the MAC is <MAC_ADDRESS>.  This means if you’re client name was OSX, and your MAC address is 00:00:1F:12:82:92, then your command would be: command ‘hdiutil create –size 200g –fs HFS+J –volname “OSX Backup”  OSD_00001F128292.sparsebundle’  .  Here is what it looks like this client is called “macmini2” and has a MAC address of 34:15:9E:09:00:94


Sparse File Created

  1. Copy this file to “\\SERVER\Mac Backups\” that you created earlier on the server. As you probably know if you are a MAC user, you have to mount the volume:

 Mount the Server Share on the MAC

  1. Load up the Time Machine settings from within System Preferences, and the sparse file you created above should be in the list.  Select this as the target for your backups.  This will have every TimeMachine backup backup directly to a share on the server:

 Configuring TimeMachine to use the sparse file

  1. Repeat for all your Mac computers on your network.

Once you have completed these steps, your MAC will start using the Windows Home Server 2011 or Windows Small Business Server 2011 Essentials as the backup TARGET.  This means it will back up over the network using the built in timeline functionality, on the schedule you define inside timeline.

What is also cool, is while the MAC won’t show a percentage complete like the PC does when performing the client backup, it will tell you the status right in the console, which of course falls through to the alerts.

Mac Backup Successful:

Mac Backup Successful

Mac Backup Unsuccessful:

Mac Backup Unsuccessful

So there you have it, How to backup a MAC to a Windows Home Server 2011 (aka Vail) or Windows Small Business Server 2011 Essentials (aka Aurora) Server.

For reference, here is the team reference for WHS v1