Showing posts with label Social Media. Show all posts

Monday, July 09, 2012

Get Cloud Services working for you, even when you’re not!

As the saying goes, a user will do things over and over and over again, but a developer will automate it and never touch it again (until something breaks of course).

I am not a developer, but I do have a developer education, and that makes me want to automate stuff.  Why do something over and over again that a computer can handle just fine?  I do this sort of thing on a client computer, and often write scripts using AutoHotKey.  I wrote about it earlier, now’s a good time to check it out. 

I’m now excited to say that I’ve found a way for things to happen for you, without you doing anything.  Getting those beloved Cloud services working for you.IFTTT

Have you heard about If this then that? or IFTTT (pronounced “lift” without the “L”)

IFTTT is an online “batch” file service that allows you to set a trigger (“if this”), and have an action take place on your behalf (“then that”).  You can learn more about it here.

It’s my new favorite service.  Supporting all kinds of existing services including: Bit.ly, Blogger, Buffer, Craigslist, Date & Time, Delicio.us, Dropbox, Email, Evernote, Facebook, RSS feeds, Flickr, Foursquare, GMail (and almost all of Google’s services that I don’t use), Instagram, Last.fm, LinkedIn, SMS, Stocks, Twitter, Vimeo, Weather, Belkin power, Wordpress, Youtube, and more!

You can then simply create what they call “recipes”, which allows you to set some trigger on some service, and then have a action take place when that trigger happens.  For example, this is a popular one:

AutoSave Instagram Pictures to DropBox

It’s that easy, you set up your trigger actions and define your reactions.  In just a day, I’ve created a few recipes:

  • I save all my tweets to Evernote (easy and fast searching of historical tweets)
  • I automatically tweet blog posts (like this one), and then re-tweet them again later using BufferApp.com
  • I have an email alert set up for my favorite stocks
  • I automatically blog my Instagram shots on my photoblog.
  • I’m going to tweet exactly at Midnight on new years to wish everyone a great new 2013!

Security

What I like most about IFTTT is I never have to give it any of my passwords for my other sites/services, it just simply gets granted access, and I can always revoke it from the target service if I want.

So if you like automation, and you find yourself repeating the same actions over and over again, try out IFTTT

This blog post was automatically tweeted by IFTTT

Wednesday, October 05, 2011

How to remove G+ and add proper sharing buttons to your Blogger Blog like Facebook, and Twitter!

If you’re not one of the few that uses Google+, then Google’s Sharing defaults inside of Google Blogger aren’t necessarily for you.  The scream Google sharing only.  The e-mail button is an icon of GMail, Google+ is the biggest sharing button.  Sure you can get to the others, but they are little buttons.  Don’t you want to be mainstream?

Here’s how I changed it with a little help from A Consuming Experience.

Getting your sharing code snippets

First, before I even touched my blog, I went to the appropriate sites to obtain my sharing buttons.  For me, that was the Facebook Like Button, Twitter’s Tweet Button, and LinkedIn’s Share Button (although I don’t use this one on my photo blog).  From these pages, you should use the UI to decide how you want the button to look for your site.  Make sure you specify a URL to Like, Tweet, or Share, this is a temporary URL, I used http://foo.bar.com. This is a placeholder for later.

I saved each of these code snippets into Notepad for copy/paste later.

Adding the sharing code to the Blogger blog

Inside your Blogger Dashboard, select the blog you wish to add your sharing buttons to, then click the “template” modification and choose to Edit the HTML:

Templete / Edit HTML

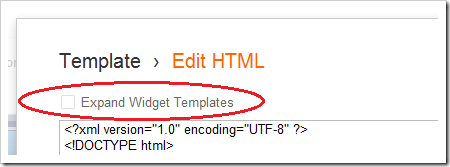
Choose to Proceed when you edit the HTML, and then make sure you select Expand Widget Templates that’s at the top:

Expand Widget Templates

Scroll down until you find the <b:include id=’shareButtons’ var=’post’> tag.  I deleted everything between that tag, and </b:includable> and replaced it with my own sharing code.

This is where things get fun. 

You need to replace that http://foo.bar.com with the URL of the blog post.  Google puts that information into a variable and replaces it at the time the page is rendered.  So we simply need to do this as well.  Let’s take a look at the twitter code, because it’s the simplest. 

Here is what Twitter gave me:

<a class='twitter-share-button' data-count='horizontal' data-via='seandaniel' data-url=”http://foo.bar.com” href='https://twitter.com/share'>Tweet</a><script src='//platform.twitter.com/widgets.js' type='text/javascript'/>

note that I have bolded the temporary URL we need to replace with the URL of the blog post.  With the help of the above website, this is what I changed it to:

<a class='twitter-share-button' data-count='horizontal' data-via='seandaniel' expr:data-url='data:post.url' href='https://twitter.com/share'>Tweet</a><script src='//platform.twitter.com/widgets.js' type='text/javascript'/>

Note I have added the expr: phrase which tells Google there is something to replace after the “=” sign.  I then put in the URL variable data:post.url, and also changed the quotes from double quotes to single quotes.  Google interprets that code and inserts the actual URL of the individual blog post.  Thus if they tweet on the main page with all the posts, they still only tweet the one that they are intending to, instead of the entire feed of posts.

So yeah, a little harder than their previous format where you had just put in <$BlogPostPermanentURL$>, but not too difficult all the same. 

Now on my blog you can see the following at the bottom of each post, without having to put that Google + link there.

Sharing Buttons

Cleans things up and standardizes them all in one.  Enjoy.