Showing posts with label Windows 7. Show all posts

Thursday, November 27, 2014

Help! I have a Virus!

I get this question a lot.  I wanted to write something up on how you can self heal your Windows 8 PC (although most of this also works for Windows 7), or at least get you started in the right direction. Let’s dive right into figure out what’s going on.  Let’s quickly talk about what a “virus” is:

  • A virus is actually software that is harmful to you or others running on your computer.  Something that erases or corrupts files or potentially participates in international denial of service attacks at an attackers whim.  These are terrible, and programs like Windows Defender, built right into Windows, if updated, will protect you against any of these.
  • Spyware is software that tends to steal from you, capture credit card information, your password etc, also bad, and again Windows Defender will capture most of these, but not all
  • Bloatware is software that that is trying to help you do something, but something you probably don’t need.  There are two types of Bloatware
    • Non signature PCs come with extra software your computer provider installs in hopes to make extra money from software vendors who want to get their software in front of users, so they pay the computer provider. (as a side note this is why I always format and re-install these computers, if you have the technical know how)
    • Software you install.  Yes, getting emoji’s at the bottom of your email, or the “music downloading app”, the list goes on.  All the little programs YOU install on your computer, some of them are bloatware, and some of them come with bloatware.

So let’s get to fixin’ that “virus”.

Step 1 – Let’s make sure it’s not a known virus

First, let’s get Windows Defender up to date, and scanning. 

  1. Hit the start button on your keyboard, or swipe out the charm menu and hit start.
  2. just start typing “Defender” and you’ll see the “Windows Defender” appear.  Tap or Click on it to drop into the desktop and you’ll see this window:
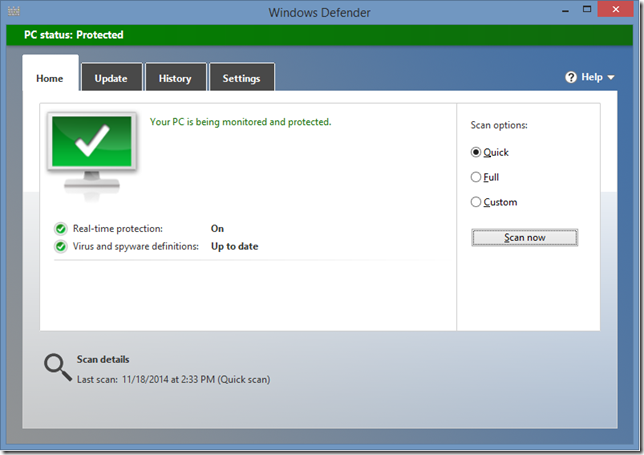
 Windows Defender

This is what a healthy PC looks like.  If your PC is unhealthy, it’ll tell you on screen what you should do.  Which is most likely download the most recent updates, and then scan your PC.  It’ll quarantine/delete any files it detects that are a virus.  Easy Huh?  You don’t need any other Anti-virus program, as Windows Defender does it all.  If someone says you need something like McAfee, Symantec, or a paid Antivirus solution, you don’t.  Those applications provide additional security, but the base prevention of viruses is included with Windows 8.

IMPORTANT WINDOWS 7 NOTE: if you’re on Windows 7, then Windows Defender doesn’t do anti-virus, you’ll need to get Microsoft Security Essentials, which is a free download. Same comment on the other antivirus solutions, they aren’t necessary and cost money for features you most likely won’t use.

Step 2 – What the heck is running on that PC of yours?

Computers only have so much memory, probably barely any if you bought your computer for under $1000, and you want to keep the programs running down to the ones you need not the ones that have just decided you need them.  While there is probably a number of things running on your computer at this very moment, what you want to prevent is things from starting that you won’t use.  Here is how

  1. Let’s crack open the Task Manager, the fast keys are CTRL+SHIFT+ESC, or you can right-click on the task bar in the desktop and choose Task Manager.
  2. Flip over to the Startup tab.  Here is what you see:

Task Manager

As you can see, I have a pretty short list.  I’ve disabled what I don’t use EVERY time I reboot my computer.  Chrome, my browser does a tone of things for me, so I allow it to load in the background, I obviously want sound, so I leave my Realtek device enabled.  I print, so I leave the HP one enabled, but I use iTunes or my life experience camera, or send to one note, or Spotify only sometimes, or not at all.  I want to load those manually if I need them, so they are disabled.  Disabling things that are of high startup impact will make your computer boot faster.

Next, let’s trim some fat.  Out with the programs you don’t need!

  1. Hit the Start page up again with the start key, or the swipe for the charms, and then the start button
  2. On the start page, type in the word control, and you’ll see the Control Panel come up
  3. Launch that by taping or clicking on it, and you’ll end up in the Control Panel on the desktop
  4. Under Programs, click the Uninstall a program link, it should look like this:
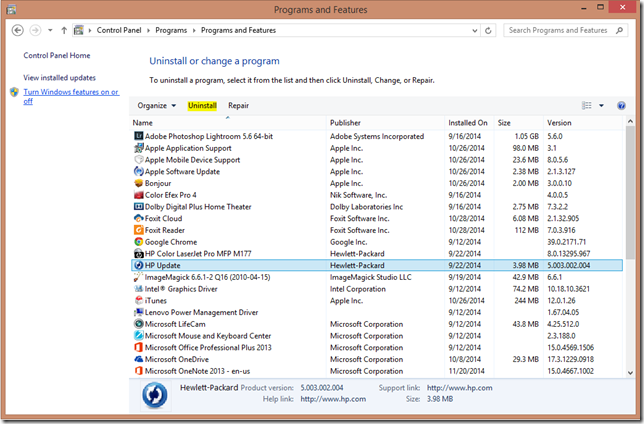
 Control Panel - Programs and Features

This is where the fun begins, you want to go through program by program, and uninstall the ones you don’t use using the highlighted Un-install button.  You’ll find that some have unnecessarily hard un-install programs, these are probably the bloatware programs you’re loathing.  I often do a Google Search for “How to Uninstall %insert program name%” and then see what the internet says.  Ultimately you want to un-install anything that you’re not using. After this step you’ll likely have to reboot your computer, when it comes up, it’ll probably already be running faster.

This next step is not for the layman.  In fact, you can SERIOUSLY mess up your computer in this step, so skip it if you don’t feel comfortable, or better yet, take a screenshot and send it to someone you trust (yes family, you can send it to me).

Let’s get into the registry

  1. On the start menu type in RegEdit or press WIN+R and type Regedit.
  2. Agree to the access prompt allowing the app to open
  3. we’re going to need to navigate to two places here to see what’s else is loading
    • HKEY_CURRENT_USER\Software\Microsoft\Windows\CurrentVersion\Run
    • HKEY_LOCAL_MACHINE\SOFTWARE\Microsoft\Windows\CurrentVersion\Run

You’ll want to take a screenshot of each of these locations and send them to your trusted advisor.  Here is what the second one looks like for me:

Registry Editor

You will see a similar list (probably more technical) to the Task Manager above.  If you do wish to edit this.  You delete the ones you don’t want BUT BUT BUT!!!! make sure you export the key first as a backup, and know which ones you’re deleting and why.  The above are actually my audio drivers, so I want them to run, but they look uber geeky right?  So be careful here!

Step 3 – Browser Extensions

Many of the “Help I have a Virus!” emails I get always have screenshots of browsers, and said browser is saying stuff like “you’re internet is slow, you have a virus, run this program!”.  Please please please don’t run this program.  Anything windows *should* run, is already running for you.  My friends at Microsoft have done this for you. They don’t tell you what you should run, it’s just running!  So don’t run anything, or pay any money to run something.  A browser should open take you to your home page, and let you get on the Internet.  The browser isn’t going to tell you about the health of your computer, or want to collect money from you.  Let’s look at two browsers

Chrome

Let’s find the browser extensions and remove what we don’t need, unless you just installed it, then there aren’t any to worry about.

  1. Open Chrome and click on the three lines in the top right hand corner of the window
  2. click on Settings, then on the left hand side, click on Extensions.

You’re presented with a list of all the extensions.  Go through one by one and hit the trashcan to delete any you don’t use.  If you aren’t sure what one does, uncheck the Enable, and then close Chrome and open it and see if there are any differences. If there aren’t, chances are you want to delete that one anyways, so go back and delete it.

Internet Explorer

Let’s get killin’ extensions

  1. Click on the gear icon in the upper right of the browser window (under the “X” to close IE)
  2. Click on Manage Add-ons and you’ll see this:

IE Manage Add-ons

Now go through all the Toolbars and Extensions, and disable the ones you don’t use.  Also check out the Accelerators and remove the ones you don’t use as well.

When you’re done these, close the browser and re-open it. 

Step 4 – Getting more insight

Last but not least, I wanted to tell you a tool that gives you more insight on the stability/reliability of your computer.  It tells you when you did things, like install apps that cause problems.  It’s the Reliability Monitor.  Let’s open it up

  1. Get to the start page (press the start key, or use the start button on the charm fly-out)
  2. Type in the word Reliability, and select the Reliability Monitor.   You’ll end up back in the desktop seeing this page:

Reliability Monitor

You can click on each yellow warning triangle, or blue informational icon and see what happened on that day. The blue bar (across the very top of the graph at #10 for me) is your reliability monitor.  That bar may not be at the top for you, but you can follow that bar back in time to see when it dropped from a 10/10 score to a lower one, and you can see the event that took place.  My guess it’s the one day that you decided to install something because you were in a rush, and you picked a bad program.  It gives you more insight to what’s going on with your computer, and what the history was and why things are probably broken.

Anyways, if you’re a family member, and ask me to connect into your computer to fix your virus. These are the steps that I’m going to follow, so now you can too!

On a last note, I’m always told “oh, aren’t you going to defrag my hard drive?”.  Defragging is so 2008… with Windows 8 this happens automatically for you, but you can validate it’s enabled simply by

  1. Going to the start page
  2. Typing in defrag, and selecting the Defragment and Optimize your drives. 
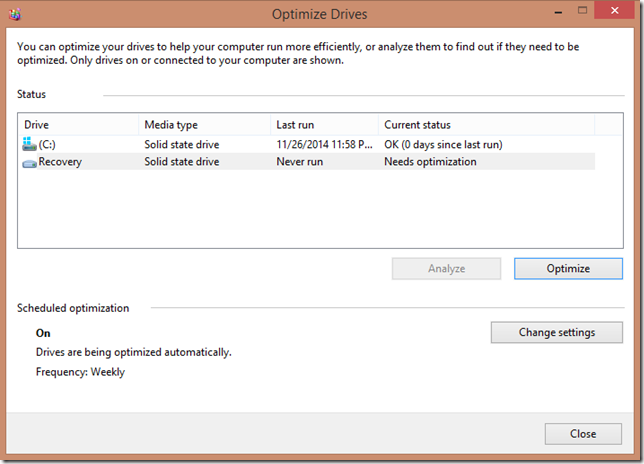
Optimize Drives

Just click the Optimize button, or see when it was last run.  Note that the older “hard drives” need defragmenting, and the newer and faster SSDs need trimming.  Totally different technology, but Windows will handle both for you.

Good luck with your “virus”… and stop installing programs that you don’t need with bloatware!

Tuesday, January 07, 2014

How to fix Outlook's Jump Lists

I'm a big fan of the Jump Lists in Windows 7/Windows 8.  I use them a lot to get to key documents and most importantly start a new mail message or new calendar request with Outlook 2013

It's super easy to just right-click, and then select New E-mail Message, and you're off to the races, no need to make Outlook the foreground or anything. 

However, twice now I've found this list corrupted, I right click and there is just the bottom three, and the "task" available is a "mailto:a_lot_of_garbage", and it does nothing.  Productivity drops instantly.  

I did however managed to find this support article on tasks missing once Outlook is pinned to the task bar.  It provides two work arounds, both times the first one worked.  Instead of the backup, I just renamed the "LastUILanguage" key and re-opened Outlook. 

Method 1: Delete the LastUILanguage registry value

To export and delete the LastUILanguage registry value, follow these steps:
  1. Unpin the Outlook 2013 icon.
  2. Exit Outlook 2013.
  3. Use Regedit to export the following registry key:

    HKEY_CURRENT_USER\Software\Microsoft\Office\15.0\Outlook
  4. After you export the Outlook registry key, delete the LastUILanguage registry value.
  5. Start Outlook 2013, and then re-pin the icon.

Method 2: Export and delete the Setup registry key

If method 1 does not resolve the issue, export and delete the Setup registry key. To do this, follow these steps:
  1. Unpin the Outlook 2013 icon.
  2. Exit Outlook 2013.
  3. Use Regedit to export and then delete the following registry key:

    HKEY_CURRENT_USER\Software\Microsoft\Office\15.0\Outlook\Setup
  4. Start Outlook 2013, and then re-pin the icon.
Hopefully this helps you....

Monday, March 26, 2012

Extreme Make-Over–Take 2: Cincinnati Housing Partners Increase Efficiency

Well, Microsoft and HP are at it once again, performing an extreme make-over of a not-for-profit company.  In this case they are helping lower income families get their first home, Cincinnati Housing Partners.  Once again, Microsoft came together with HP lots of awesome technology including Windows Small Business Server 2011 Essentials running on an HP Proliant Microserver and Windows MultiPoint Server running on an HP ML110. as well as some other great hardware from HP (Printers and UPS devices!). 

Check out the video:

Find the Official HP Blog post here, and the Case Study here.

If you were wondering for previous Extreme Makeovers, you can see the first one here.

Learn more about Kevin Royalty and his company here.

Monday, January 16, 2012

Sean’s Top 10 Recommended iOS apps for Productivity

Before the slew of Windows 8 tablets come out, most folks have an iPad or iPad 2. If you go online looking for popular apps, you’ll either get a list of games or a list of apps without a description of what they do.. I’ve spend a lot of time trying to figure out the best way to use my iPad, and not just for games.. Below is my list of non-game apps and why I like them.
  1. iTap RDP – iTAP RDP allows me to get to Windows clients via RDP.  Sure there are free ones like iRDesktop, but this was the only one that did TSGateway so I can get to clients behind a proxy from outside the network.  I also think that with the different mouse modes and special keys that come up on this app, this is the most functional. 
    1. You could compare this to CloudOn, which allows you to get to your MS Office apps, which uses DropBox to get to your documents.  Pretty good solution, if you trust DropBox.
    2. There is also OnLive, which let’s you RDP to a hosted version of Windows 7, but using a web browser to upload and download files seems hoaky to me.  Plus with it being free, how are they making money? what are they selling?
  2. mWOL – Mocha WOL is a free app in the iTunes store.  It isn’t anything other than a Wake-On-LAN client, I picked it over the other ones because it’s free.  The end.  My laptops have an aggressive sleep schedule to keep power consumption down.  My Home Server is the always on PC.  Unfortunately this won’t wake up my clients if I’m out of my home.
  3. Buzz Player – Buzz Player is a Media player and media copier.  I like it because all of that media that I have sitting on my Home Server, this app can stream it to me when I’m in my home.  That’s 2TB of videos and music that I can just use anywhere on my LAN.
  4. Lync Mobile – Lync Mobile is Microsoft’s Lync IM client, on the iPad.  Given that these days I don’t take my laptop to the couch for after hours surfing, this client allows me to stay in touch with co-workers that are world-wide.  I can answer a quick question from Shanghai.
  5. OneNote – Microsoft OneNote is another essential Microsoft app.  If you use OneNote on your PC, and I do extensively, then this gives you access to any notes stored on your SkyDrive.  This has revolutionized how I manage my soccer teams.  I simply create the notes on my PC, and then update them on the phone or iPad
  6. Grocery IQ – Grocery IQ is really only useful if you also have the app on your phone.  My wife and I sit down with the iPad and make our grocery list and what we’re going to eat for the week.  Then, because we have the same Grocery IQ account, when we hit the grocery store, the list is just in our pocket on our phone.
  7. Feedler – Feedler is a less popular RSS reader that syncs with Google Reader. As far as I can tell, Reeder is the most popular app for this, and certainly is more beautiful looking; but it’s missing a key feature: mark older than X days read.  I get to my RSS feeds as often as possible, and for the most part, I read them in entirty, although trying to catch up on Mashable, or Engadget, after being away for a week is next to impossible, but I do want to read a few days worth.  Hence Feedler is my preference over Reeder for RSS reading
  8. Kindle – The Kindle app is handy because it means on business trips, I only need the one device, and long plane waits etc, I can just continue on my book.
  9. Skype – Skype I am only looking forward to.  Sure I can use it on my iPad 1 for text chatting, but without a camera it kind of sucks.  I sure do love it on my phone though, and can’t wait for this communication powerhouse to become fully operational once I get an updated iPad 3!
  10. BlogPress – BlogPress is my mobile blogging app.  Blogging from the PC is my preferred method, and I actually use the combination of the first two apps in this list to do 90% of my blogging, but if I’m travelling, it’s a secondary way for me to get the data out to the web, without having to wait.
Those are my top 10 favorite, non-game, iPad applications to boost your productivity and enjoyment of the iPad aside from a $700+ gaming tablet.

Update: I just recently discovered Office 2 HD for the iPad, which I had to add to this list.  It's a little spendy at $8, but allows you to do more with Word, Excel and PowerPoint than you can do with the Apple apps (like Pages).  For example, I'm able to comment on documents and send them back via email now.  They support a variety of cloud services, like SkyDrive and DropBox or even just Box (and more)!

Tuesday, January 03, 2012

How to use your Home Server as an AirPrint server for only $10

As I move more and more of my computing and data to the Cloud with services like SkyDrive.  I am reducing the amount of computing power I have in my house.  I have an iPad (v1), a Laptop, and of course my Windows Home Server.

As I’ve mentioned before, I’m looking for more ways to take advantage of my low-powered Home Server to do more for me as an *always* on device.

Over the holiday’s we had a few visitors, which of course means printing boarding passes prior to leaving for the airport.  It was frustrating to have to take out the laptop when the iPad is just right there.  But without a compatible AirPrint printer, you can’t print from the iPad….

Or can’t you?FingerPrint

I found an application for Windows (and Mac OS) that installs on your computer that shares almost any printer connected to the computer, to the AirPrint service. 

There was an old version that doesn’t work with iOS5 that is free.  But obviously, I have iOS5 on all my devices, so that wasn’t an option.  I’m also not a big fan of Jail-Breaking (I guess I know too much about security to allow a hacker full access to my device).

This application, called FingerPrint by Collobos Software, will share out any connected printer, as well as DropBox locations to the AirPrint service.  I started with the trial to make sure it worked first.

To get it set up, I downloaded the FingerPrint installer, copied it to the desktop of my Home Server and installed it. Then of course ran FingerPrint on the server.  I also had to add my network printer to a printer on my Home Server, just by going to Control Panel and adding a printer as I normally would on any Windows machine.

However, it didn’t initially work.  I had to make two changes to the configuration for it to work, probably specific to my network.  I’ll share them here incase you have the same problems.

Enabling Multicast on my router

First, I discovered that my DLink DIR-655 router wasn’t allowing Apple’s discovery service, Bonjour.  This is not always the case with routers.  But I discovered that I can enable MultiCast, on the router, which seemed to allow it.  I did this on the DIR-655 by going to Advanced, then Advanced Network, and at the bottom, selecting to Enable Multicast Streams:

MultiCast Streams

This required a router reboot, which took down my network for 30 seconds, and then it took another approximately 5 minutes for my iPad to discover the services running.

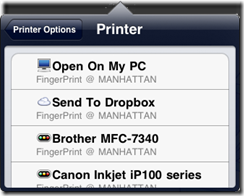
This enabled me to see the list of printers connect to my Home Server

Opening an Additional Port on the server

Per Collobos support page, I had to manually open the port 6631 on my Home Server to allow AirPrint to send the document to FingerPrint.  To do this I simply:

  1. Logged into the Home Server
  2. Clicked Start, then Run, and ran the wf.msc firewall configuration utility
  3. I clicked on New Rule
  4. In the wizard that opened, I selected Port, and clicked Next.
  5. The port is a TCP port which was the default, and I typed in the specific port of 6631
  6. I also chose to Allow the connection even if it’s unsecure (this might not be available in SBS 2011, in which case you’d also need to make a group policy change)
  7. On where does this rule apply, I ensured that it only apply to Private networks, meaning that I unchecked Domain (which doesn’t apply to WHS anyways) and Public. (Note for SBS 2011, you’d have to select Domain)
  8. Finally, I gave it a friendly name.  I used FingerPrint Port 6631 so I could easily find it in the list again if I ever wanted to remove FingerPrint, and clicked Finish.

At this point, the printing just started! woo hoo!  Of course I can play around with this for 7 days on trial, then I’ll have to get a license key for FingerPrint.

Additional Bonus!

As an additional bonus, you can manage all the documents printing from the Home Server’s print queue.  So I think it’s worth the $10 to be able to print directly from the iPad.  Plus Collobos has support if you ever get stuck.

As a final note, I have noticed that you don’t want your iPad to go to sleep before the print has happened, and it’s not exactly the fastest thing/

[Note: This is untested on Small Business Server 2011, but I don’t see why it wouldn’t work, changes are noted above, leave a comment if you try and have modifications]

Friday, September 16, 2011

HP/Microsoft do an Extreme Make-Over of a Not For Profit Organization

Earlier this year, I had the pleasure to be able to participate in a very heart warming story.  Families For Effective Autism Treatment of Washington (or FEAT WA), was the first winner of the HP & Microsoft Extreme technical make-over.  FEAT really does a lot of work for children with autism, and were struggling with their hobbled together IT infrastructure. 

Microsoft and HP came together to set up the IT Infrastructure backbone running Microsoft Windows Small Business Server 2011 Essentials on a maxed out HP ProLiant MicroServer. And for the children and office workers, Microsoft Windows MultiPoint Server 2011 Premium on an HP ML 110 G7; to be connected to with the HP t5749e thing clients and HP EliteBook 8460p Notebooks. HP also improved their networking infrastructure with the HP ProCurve 1810G-24 switch.

It was so awesome to meet and help out Brenne and Amanda at FEAT of WA to do their job and help children with autism.  Check out the video:

Friday, July 29, 2011

Learn about how Multi-Point 2011 Premium works with SBS 2011 Essentials on HP/Microsoft Coffee Coaching

I managed to finally get my schedule coincided with the HP/Microsoft Coffee Coaching filming crew. When I was with them I managed to create my first video which talks about how awesome MultiPoint 2011 Premium server is when you have Small Business Server 2011 Essentials already running in your network (details here). Check it out, it’s only 6 minutes of your time.

Thursday, June 16, 2011

SMB MVP Community Roadshow

HP and Microsoft have joined together with our Most Valuable Professionals (MVPs) to visit 66 cities in Canada, Australia, Europe and of course the United States.  They are touting it as a real-world experience and advice talk by the MVPs who live and breath the product ever day.  No marketing talk!

Kevin and Dana give it to you straight.

Kevin Beares and Dana Epp talk about SMB MVP Community Roadshow

These guys brought down the house in Vancouver, BC tonight.  Tomorrow night they hit up Victoria, BC.  Then are out to talk to you, in the rest of the world!

Register for the roadshow nearest you

Monday, May 16, 2011

Windows Home Server saves the day…

Being in my position, I often come across people wishing Windows Home Server was this way, or had this, or didn’t do that.  I suppose it’s the nature of the job to focus on what needs improvement, but every once in a while it’s nice to reflect on what works really really well.

On an internal discussion alias for Home Server, we had a fellow Microsoft employee leverage Windows Home Server to remotely assist his father, and I wanted to share that story here.  This same sort of story can show you what you can do with SBS 2011 Essentials as well.  Here is the story:

My parents recently moved down to NC. My father is an avid golfer and recently retired from State Farm after 25 years which explains why NC. Prior to the move south they lived about 40 minutes from me in north eastern Pennsylvania. I first installed a WHS in their home after getting tired of hitting numerous issues trying to setup remote control of their machines with the constant external IP changing. WHS solved that issue for me since it did dynamic updates in order to host the remote access webpage. I was happy for many months being able to log into the remote access webpage and then remote control their machines from the available computers connections tab. On a few occasions while they lived in PA minor issues happened that WHS was the savior but nothing major usually only saving a few hours of time for each incident.

Fast forward to last night around 9:30 at night when my father calls me in a panic stating that my mom is going to kill him for being on “her” computer. All he wanted to do was quickly check some Pittsburgh Steelers news site that he frequents. Well that site had a link to another site that my dad decided to check out and BLAM virus! We have all dealt with viruses before, some worse than others but this one was really annoying and pretty well thought out if I do say so myself. The virus somehow watched for any .exe file to be run and then popped up a dialog saying the .exe you ran contained a virus and to pay $39.99 to remove the virus. I tried all the usual tools to help me get rid of viruses in the past taskmgr, cmd, regedit and msconfig none of them would launch, I even got frustrated and tried sol, spider and chess also blocked.

The last course of action was to walk my dad through booting into safe mode and see if we figure out what is kicking off the virus and stop it from running. I checked the usual auto run locations and nothing fishy was there. I was stumped and without being able to remote control the machine I was in serious trouble. My next idea was to use my “dads” machine to download from my WHS the DART tools .iso which includes a version of system sweeper to scan for the virus. Well my dad convinced me to forget the DART disk and just make sure the virus was gone by going to the WHS and applying the backup from Monday at 3:00am. I remoted my dad’s machine and downloaded the restore CD from the Microsoft site [restore CD provided in box, later discussed on thread] and then walked my dad through the restore wizard. I got lucky that the network driver was built into the CD so no issues there and before we knew it the restore was off and running. I got an email from my parents this morning about how excited they were to have their PC back and they didn’t need to waste time and money shipping it back and forth.

I have since upgraded their browser to IE9 and installed any outstanding important updates on their PC to help stop this from happening again but if it does I know the fastest and easiest way is to have WHS save my bacon!

Tuesday, May 10, 2011

Small Business Server 2011 Hands On Labs

imageToday on the Official SBS Blog, the SBS 2011 Hands on Labs are released.  Recently attending the HTG Summit, we debuted these hands on labs for both Standard and Essentials. 

The labs are pretty awesome, they are all hosted on the Internet and you can launch into Virtual environments where you can play with an SBS 2011 Standard or SBS 2011 Essentials network before you buy it, or walk through a scenario after you bought it to make sure you have it ironed out. You can even send it to your employees to train them, or if you’re brave, your customers!  You can even walk through setup.  Close the VM and it’s back ready for the next person to try.

Windows Small Business Server 2011 End-End Scenarios

Access videos, Interactive HOL’s and click-thru demonstrations of the end-end demo’s for SBS 2011 Essentials and SBS 2011 Standard

Windows Small Business Server 2011 Essentials Technical Training

This technical training course provides you with the knowledge and skills to install, configure, administer and troubleshoot a Windows Small Business Server 2011 Essentials infrastructure. The course focuses on deployment, configuration and administration using the SBS 2011 Essentials Server, Management Dashboard, and add-in extensions.

Access this entire 6 HOL training today online

Download the partnering Training PowerPoint’s (you can also download the HOL click-thru’s for each of these modules below in the click-thru section)

Windows Small Business Server 2011 Standard Technical Training

This technical training course provides you with the knowledge and skills to install, configure, administer and troubleshoot a Windows Small Business Server 2011 Standard infrastructure. The course focuses on deployment, configuration and administration in the SBS 2011 Standard console, and SBS 2011 Premium Add-on.

Access this entire 6 HOL training today online

Download the Training PowerPoint’s, Videos and Click-Thru’s for this training

Friday, April 08, 2011

Using the KeepVault Connector to backup Roaming Client Computers

Previously, I covered the basics of Proxure’s KeepVault Online Backup, as well as what you got if you went Pro.  With the release of the RC of KeepVault for, I noticed I didn’t cover the KeepVault Connector, which is a separate add-in for Windows Home Server 2011, and Windows Small Business Server 2011 Essentials than the original KeepVault add-in. 

This add-in allows you to do the incredible.  Back up roaming computers via a “Sync” while the computer is connected to the Internet, anywhere.  Now I use Windows Live Mesh to sync most of my items between my computers and the cloud, but there are some things that I don’t.  For example, if I’m travelling and I process photos, those don’t get into my Mesh, but I still worry about them.  This solution solves that.

Simply download and install the KeepVault Connector for Mac & PC.  Make sure you choose the WHS/SBS 2011 version, and not the WHS Original.  Once installed, and the dashboard restarted, you’ll notice that KeepVault has an extra tab

KeepVault Connector

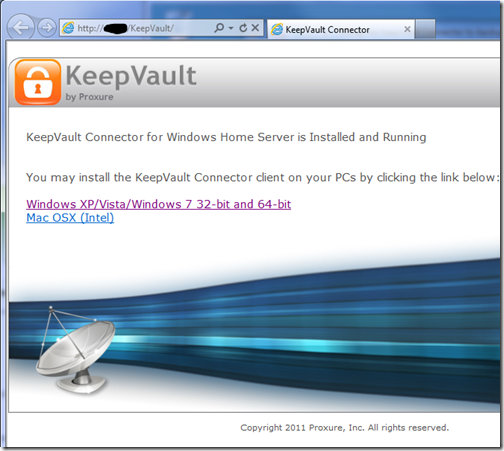
This add-in installs into the dashboard and adds a \KeepVault directory to your default website.  It also reads your servername (orange above), your remote access domain name (blue above) and provides an extremely secure recommended password (yellow above).  Simply click the link to Download and install the client setup.  This downloads the client component directly from your server:

KeepVault Client Download

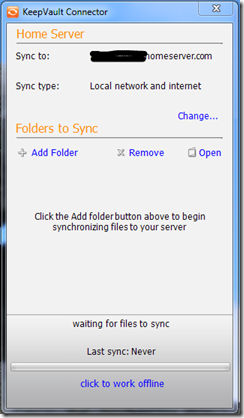
KeepVault Connector Client ApplicationOnce installed, just find the KeepVault Connector in the start menu, or in your system tray, and load up this fancy little “Sync” application and click the Add Folder button.  This will allow you to to pick a local folder on your client computer which will perform the backup. 

For me I created a “backup to home server” folder as a test, and dropped a few files in there.  While I’m local on the network, the backups are SUPER quick, but away from the network they’ll be throttled by my connection speed back to my server.

You can also choose to modify the backup locally only, or over the Internet.  Given that the built in Client Backup functionality runs when you’re local, you might not use this.  However, it’s some nice flexibility if you use a tethered 3G connectivity, so you can choose to sync when you’re on wi-fi and by default not always.  Speaking of Sync, you’ll notice at the very bottom you can click the hyper-link to work offline, so if you end up tethering your PC to your cell phone and then dumping a ton of pictures in there, you can click that and work offline, and prevent the backup from happening over your 3G connection, if you valued cost of data over loss of data.  :o)

If I had a gripe with this system, it’s only that the KeepVault connector isn’t also available to launch directly from Launchpad via the Add-ins area.  As you can see AWIECO does take advantage of this, it’d be great to see “KeepVault Connector” in here:

Launchpad with Add-ins

Add ins

I’ve heard on a few occasions that the road warrior doesn’t like the stop in the office to do a much needed backup, perhaps this solution can help.  Backups can be done from home, or coffee shops, or in my case, at work to my home!

Friday, March 18, 2011

Going “Pro” using Proxure’s KeepVault Pro for Windows Home Server 2011

If you read my post from Tuesday of this week, on using Proxure’s KeepVault for Windows Home Server 2011 or Windows Small Business Server 2011, and when you got to the bottom, you thought to yourself.  Heck yeah I’m going Pro! Then this I post is for you. 

If you are running Windows Small Business Server 2011 Essentials, then this post will simply show you the features before you buy, because you had to get KeepVault’s pro version for your version of Windows Small Business Server. 

First, the upgrade process: If you have Windows Home Server 2011, and you’ve been enjoying the standard features KeepVault has to offer, but want to upgrade because one or more features in my previous blog post were appealing, here is how you do it:

  1. From the Launchpad, click on the Dashboard link and type in your Home Server Password to load up the Dashboard.
  2. Navigate to the KeepVault tab already installed in your Dashboard
  3. On the My Online Backup Job tab, click the link your account name.  For me it’s my email address to go to KeepVault’s website.
  4. Log into KeepVault’s website (you’ll need that subscription ID again) and follow the instructions to upgrade to Professional.
  5. Now you have to make the software aware that you’re running pro.  I remembered that the “Restore Files” link had an upgrade option, so I used that: Upgrade KeepVault Backup for Windows Home Server
  6. Since I already did the upgrade on the web, I just clicked Apply Upgrade, but you could also skip the first few steps and  have the Purchase Upgrade take you to KeepVault’s website.  When you’re finished upgrading the back end, you get this: Welcome to KeepVault Backup Pro
  7. Wow, I don’t even have to close the File Recovery wizard, I instantly have another option to selectively download from other computers I might backup. Selective Download
  8. I cancelled the above wizard, and I’m still in KeepVault Pro

You’ll now notice little changes throughout the UI like the above recovery option, for example, if you flip over to the My Local Backup Job tab, you’ll see in the drop down list that you can add a network drive to backup locally to:

Add a Network Drive ...

Sub Users and roaming backups

In addition, the Pro account now gives me access to add “Sub Users”.  Brilliant!  So now I can just install the Windows 7 version of KeepVault on my wife’s computer, and have her files and folders backed up directly to the cloud while she roams around with her laptop.  Or better yet, in Windows Small Business Server 2011, you often have roaming sales people or people who are away from the office for long periods of time (perhaps even satellite offices?) you can simply install KeepVault on their PC, sign them up as a sub-account and have them back up directly to the cloud.  Need a file from them? Then simply restore it to the server. 

Adding a Sub User Account

Accessing your Backup through the Web Portal

When you click on your account name (in my case my email address) in the My Online Backup Job and log in with your subscription ID, you can click on the Web Access tab.  It’ll prompt you for a web access password (I skipped this because I was so excited about Sub Users, If you’re like me, simply disable web access and enable web access and it will prompt you again).  Once you have your password in place, you can click the Open Now web link to jump right into your online backup.

Web Access Tab

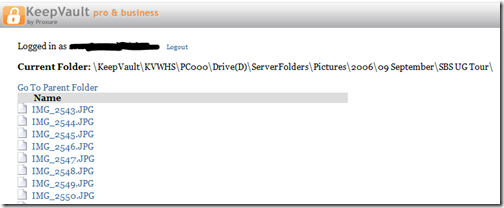
If you don’t want to log in with your Subscription ID, there is a quick jump to http://web.keepvault.com, which will jump you right to your web view of your backup.  Which by the way is raging fast, even though it’s reading encrypted files.  For example, if I wanted to download files from my 2006 User SBS Group Tour, I can simply browse to the folder, click the file and download:

KeepVault Backup Web Access

Retention Policy

As mentioned in my previous post on KeepVault, you also get a retention policy of 5 versions of files.  To restore previous versions of the files, simply do a Selective Restore, and when you get to the file, right-click it and choose the version of the file you want.  If there is no context menu, you only have one version (the latest) backed up.

From the Web Access, if you click on a file (screenshot above), you see all the versions of the file available to download.  You should keep in mind the following:

  • If you delete a protected file from KeepVault, it deletes all versions
  • File versions younger than 48 hours are never deleted (if you save a word document 10 times for example in the same day and backup is configured to “automatic”
  • The oldest 5 versions of a file are pruned (read recovered storage space) after the 10th version of a file is successfully uploaded

So as it turns out, it’s pretty easy to go Pro, if that suites you, and Small Business Owners, now you have details of all the Power Pro gives you at your finger-tips.

Tuesday, March 15, 2011

Online Backup using Proxure’s KeepVault for Windows Home Server 2011 and Windows Small Business Server 2011

As I’ve mentioned before, being a photographer, my photos are my most critical piece of data that lives on my Home Server.  When using Windows Home Server v1, I had found an Online Backup solution that I previously reviewed on this blog.  While I still think it’s a good solution, it has some draw-backs depending on the Amazon S3 back-end.  Like the cost of Amazon S3 is about as expensive as it gets, and signing up for Amazon S3 was probably one of the more confusing processes I have ever done.

While at SMB Nation 2010 in Las Vegas, I had ran into a company called Proxure who build a solution called KeepVault.  I watched a demo of their solution run and it seemed reasonable, at least to check out.  I thought it was pretty cool that they offer versions for Windows XP, Vista, Windows 7, Standard Server (03 & 08 via their Professional version), and most importantly for me: Windows Home Server.

KeepVault Add-In

While this blog covers KeepVault on Windows Home Server 2011 (codename “Vail),  the same add-in offers cloud storage to both the Windows Small Business Server 2011 Essentials (codename “Aurora”) and the Windows Storage Server 2008 R2 Essentials.  However, for these business products, you need to get KeepVault Pro.  The steps and UI, aside from the color of the dashboard, is identical.  KeepVault Pro can also be used on Windows Small Business Server 2011 Standard (codename “SBS7”), although that UI is not shown in this blog post.

Back to the review: The first thing I notice was KeepVault doesn’t bill you for what you use, they bill you for storage space in chunks (40Gb, 80GB, 130GB, 200GB … 3.5TB!).  So if you’re only backing up a very small amount of data, you could end up over paying, but if you compare to Amazon’s 15cents/GB (up to the first TB), you really see a cross over at about 15GB.  Once you get over 15GB, Proxure seems to win hands down on cost.  Plus when you hit the top mark, you click a link and you can bump up your storage. 

The Setup Process

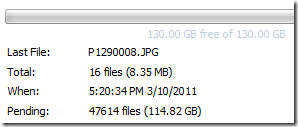
Using the AWIECO Drive Info add-in, I determined I wanted to back up my Pictures and Documents, the things that I really care about.  That came out to about 117GB, so I signed up for the 130GB plan from Proxure.  You don’t need the AWIECO add-in, but it made it a “glance” to compute.

Installing the add-in is just as painless as installing any add-in.  Just double click on it on the server, or on any server-joined client, read and accept the EULA, and then Install it.  You’ll have to re-start the Dashboard to have it appear in the global tabs.

Proxure KeepVault Add-In

The initial page doesn’t look intimidating at all.  Simply click on the Order a KeepVault Backup for Windows Home Server Subscription Now button and sign up. I thought it was pretty slick you could pay via PayPal or with a standard credit card. I’m all for yearly payments too, so I got to save my 10%!! Within 5 minutes I was emailed my subscription ID. Typing that in, with my email ID and I’m good to go.

Choosing an encryption key I can type one in myself, or KeepVault will randomly generate one for me.  If you generate one yourself, you have a risk that you forget your key and now your cloud backup is useless.  If you’re like me, you’ve installed WHS 2011 on new hardware and it’s probably a while before that fails, so you might forget it.  If you don’t want this cumbersome task, you can let KeepVault choose one for you.  The interesting thing here is that they generate the key based on your ID and subscription numbers (as its computer agnostic).  To me that means that someone at KeepVault *could* decrypt your backup.  Although my suspicion here is that you are still safe because our data is stored in blobs and because KeepVault has more than one customer, it’ll be hard for the lay-man IT person at KeepVault to match this up to your backup.  For what it’s worth, I went with “Let KeepVault choose one for me”.

I like how KeepVault really focused on the simplicity of the solution.  With the previous solution I reviewed I could create multiple backup jobs and multiple schedules, which was nice, because parts of my collection barely every change, I just wanted them backed up.  But it was overwhelming at first.  KeepVault’s “Always/Real Time” schedule by default and the single “Job” configuration removes any daunting thoughts you might have.  The only confusion on the whole page for me was enabling the protection on the shares.  I didn’t realize the grey bar across the page were actually buttons, as most of the WHS 2011 console they are just “headers” of columns.  So once you realize that you can just click on Enable Protection to add that shared folder to the cloud backup, it was all good.  As any good add-in, you can also right-click on a Share in the list and select to enable or disable it from the context menu.

Enable Protection for Shared Folders

Using the Add button you can also add any folder you wish on the system, so it doesn’t have to be shared out to the network in order for you to back it up.  You’ll also notice in the screenshot above that I have changed the schedule to be between midnight and 6am.  This is because I am uploading 115GB of data, and I work from home, so from 8am-6pm I use my bandwidth for work, and from 6pm-midnight, I use it for entertainment.  By default, KeepVault will Encrypt and Compress your data on the box before it sends it over the wire.  Nifty…

KeepVault Job and Setting Options

The only feature that I think is missing from the Job scheduler is the ability to run 24/7 but use less bandwidth during the day, and all of it at night.

Looking at the other options, you can always pause the backup, view and delete your protected files online (ie. if you want to permanently delete some files, you can delete the file locally, and use this task to delete it from the cloud as well), view the protection/upload history, configure a proxy if your ISP requires one, and most importantly (the reason we all do backups), Recover Files.

The Event Log is KeepVault’s own list of events (like service start/stop, etc events).  Messaging (while somewhat confusing of a name, maybe “Job Notifications” or “Job Alerts” might be better, is actually really well done.  You can receive emails or SMS alerts (via your carriers E-Mail to SMS service) based on your backup failure rates.  KeepVault obviously has some mail service on the back-end that they allow you access too, because unlike the WHS 2011 Built-in Alerts, they don’t ask you to configure an SMTP service.

When the backup eventually kicks off, if you’re backing up as much data as I am, even with the 1900kbps as advertised in my standard version of KeepVault, I’m in for a long wait…  This is the same with every cloud solution the first time you back-up.  The progress is good, you get both global progress as well as file level progress

Global Progress of Upload

From 5pm to 9am (~16 hours) on a Thursday night over my cable connection, I backed up 5.1GB to KeepVault’s cloud.  Not quite as fast as the Amazon S3 solution, but then again, I don’t have a Pro account with KeepVault.

Once your data is uploaded, it lives in Proxure’s Data-Center, encrypted for only you to download in the event of a disaster.  Fingers crossed that this is just an insurance policy, and never used.

KeepVault Local Backup

You may have noticed in the above screenshots there was another sub-tab called My Local Backup Job.  Yes, KeepVault can back up to a local disk.  In the Standard version, it’s similar to the built in WHS 2011 Backup in the fact that it can only backup to hard drives attached to the system (the recommendation is still for USB for offsite storage).  If you have KeepVault’s Premium version, you can also back up to SMB Share (i.e. \\NAS\Share), so if you have another device on your network, you can back up to another share on your network.

Also, you’ll notice that this tab also allows you to compress or encrypt.  So if you’re taking that disk offsite, the encryption piece might be something you want to consider for safe storage of that disk should it be compromised.  If you don’t encrypt it.  Files are stored in “explorer friendly” format so a restore on any computer without KeepVault installed is possible.  In comparison, WHS 2011 backup is stored in VHD format, which requires you to first mount the VHD before you can actually do the restore of files.

Recovery of Files

File Recovery

The One-Click Recovery, really is just that.  Let’s say that you have a little child at home, and their favorite past time was to go into your prized photo library and use the delete button, just randomly through your collection.  Or maybe you were searching for your favorite files, and then miss-clicked and deleted your favorite files across your 100GB collection.  Restoring that can be painful.  This One-Click Recovery makes that a breeze.  As *soon* as you click next (i.e., one click), the service will compare the cloud to the local box, and recover all missing files.  If the file exists, the restore will be skipped, preferring the local file over a recovery.  So you can recover all those files our child deleted randomly, yes with one-click.  Obviously this is how you would go on a new server, because none of the files exist.

Selective File Recovery DialogThe Selective Recovery is more of the natural way we think about recovering.  You get your standard tree-view and you can drill into your cloud backup and select different files to recover.


This way is not a single-click restore, but a selective restore.  On the left-hand side if you select a folder, you can select files and folders on the right-hand side for restore.  So if you’re restoring a whole folder, select the folder above it, and then check the box next to the folder you want to restore. If you’re restoring all but a few files in a folder, that can take a few extra clicks.  Thankfully you can use the CTRL or SHIFT Keys to multi-select as you need (similar to Windows Explorer). Before moving on, you need to select if you want to over-write existing files.  This was weird to see on this dialog, because I figured it would be a sub-option on the recovery location which is next.

Once you’re comfortable with the set of files you’re going to restore (and if you want to over-write files), you next choose if you want to restore the files to the original location, or another location.  Unless I’m restoring a completely new server, I’d probably always choose another location to make sure that I’m getting what I expected.  Once you’ve chosen the folder for the location of the restore, I hit “Recover”, and just wait for the software to download the files and put them in the appropriate place.

Recovery Progress

The restore is in fact pretty painless, and yes, my photos came down in-tact…

Test Restore Thumbnail View

Why Go Pro?

As you saw above, KeepVault has two versions, Standard (which they just call “KeepVault”) and Professional (or “KeepVault Pro”).  As a home user, you  might not ever need the Pro version, but it’s certainly something you need for businesses.  So what do you get if you go Pro?

  • Support for Server solutions (aside from the WHS).  For example, the Windows Small Business Server 2011 Essentials, Standard and Windows Storage Server 2008 R2 Essentials.  Also, if you have additional servers in your environment, you can back them up to the same account (Standard Server 2008 and Standard Server 2003).
  • A much faster upload rate (5250kbps instead of 1900kbps).  This comes in handy with that first backup.  The faster you get the files to the cloud, the sooner you are protected!
  • Local Backup to UNC share.  Meaning you can back up your server to a local server share as well.
  • Higher encryption levels (256-bit encryption can be chosen instead of 128-bit)
    • This reminds me.  If you backup a file with the pro version, and then downgrade, your standard client can’t understand the 256-bit encryption and thus can’t restore the files.  It does work the other way around though.  So just be careful which way you go!
  • More Access to your data (Web Access, cross device access for restore) and other administration features.  Notice my screenshot under “Restore” above, if I had the pro version, I could backup files and folders from other computers, right to this single computer.  This means I could support cloud backup on my client computers, and then restore this to the server in the event that the client was dropped while out on a trip!  Another brilliant business feature.
  • If you’re using a management solution, error notification includes system events, so you can track errors in your online backup with your monitoring tools.
  • 5 version retention policy.  If you are with KeepVault standard, you only have the latest version stored on the internet, with Pro it keeps up to 5 versions so you can go back in time when you wish to restore.

As a business user, you’ll have to use the Professional version to get the add-in installed.  As a Home User, you should review the features above and gauge how critical they will be for you. 

If you’re still debating having a Cloud Backup solution for your most prized data, you should approach it like an insurance plan.  You have one for your house, you have one for your car.  You cross your fingers every day that you don’t need to use it, but when you do, it’s there for you.  If your hard-drive fails, recovery of such drives can often cost $1,000s, with no guarantee you can get your data back.  If you’re house burns down, like my uncle’s, this sort of thing is priceless.

I’m using KeepVault, what are you using?

UPDATE: Want to learn more about KeepVault Pro? Check out my Going Pro with Proxure’s KeepVault blog post.

Monday, February 21, 2011

Windows MultiPoint Server 2011 has RTM’d!!!

I’ve mentioned Windows MultiPoint Server 2011 on this blog before, like how well it works with Windows Small Business Server 2011, or how it fits into your small business, and how you can leverage it to simplify your client story.  Or if you were at SMBNation Fall 2010 in Las Vegas, or attended the VICE(?) UG talk on SBS 2011 you had ability to actually hear me talk to you about it.

You’ve been patient, you’ve been waiting.  And now the wait is over.  Windows MultiPoint 2011 Server has RTM’d!!

Product Unit Manager of MultiPoint, Dean Paron, and Director of Marketing Sandrine Skinner announced today that MultiPoint is available (get the eval at the download center)!  MSDN and Technet subscribers are expected to receive it in the next week.  With the release of RTM, the hand off to the OEM partners happened earlier this month.


Dean Paron, Product Unit Manager, demos Windows MultiPoint Server 2011, source Brandon LeBlanc on the Windows Blog

More Details on the WMS Blog and SBS blog, but here is a snippit of that:

Volume License(VL) customers will be able to download and purchase Windows MultiPoint Server 2011 on March 1, 2011. Broader, public availability through partners will start mid-April 2011.

And by the way the evaluation version available on the Download Center today can be turned into a full production version when you purchase your VL license of Windows MultiPoint Server 2011- so there is no need for re-installation.

We also would like to take this opportunity to thank all of our beta testers for providing feedback and helping us refine and enhance the experience for this new product release.

There has been a lot of discussions around Windows MultiPoint Server 2011 over the last few weeks: it started at the BETT show, the largest tradeshow of Education technology, that took place in London early January where we first had the opportunity to showcase face to face Windows MultiPoint Server 2011 to customers and partners from around the world.

In our previous blogs around the Beta , we mentioned what’s new in Windows MultiPoint Server 2011 versus the previous release of Windows MultiPoint Server (WMS 2010) in terms of features and functionality.

We would like to also mention what’s new in terms of channel availability and SKU availability for Windows MultiPoint Server 2011:

Standard

Premium

Channel

OEM

VL Open Commercial

OEM (pre-install and ROK)

OEM Academic

VL Open Commercial

VL Academic

Number of simultaneous connected sessions you can run

10*

20*

Domain Join capability

Not supported

Supported

Hyper-V capability

Not supported

1+1 licensing model

*Actual number of connected sessions is based on host computer hardware capacity (CPU, memory, etc.), station hardware configuration (RemoteFX, PCI-E or USB) and usage workloads

As you can see in the table above, we now have 2 editions, Standard and Premium which have the same features and functionality except for the ability to join a domain, and ability to run as Hyper-V host or guest, which are only available in the Premium edition. Also the Premium edition is broadly available to customers and resellers through OEM and OEM Academic as well as through Volume Licensing Open Commercial and Academic.

Again VL customers will have access to Windows MultiPoint Server 2011 on the VL download site on March 1, 2011.

Also worth mentioning, we even had our own famous internal Windows 7 blogger, we’re sure you know him already, Brandon LeBlanc, who’s blogging about his experience with Windows MultiPoint Server 2011: check it out here at this link: http://windowsteamblog.com

We’re so excited about this release as in the WMS team we’re super passionate about delivering technology to help our Teachers and Students thrive and providing them with a Windows 7 experience, even as their school’s or campus’ IT budgets have been slashed.

Here’s the link to the Download Center for your convenience- Happy Windows MultiPoint Server 2011!!!!

Saturday, February 05, 2011

Why I plan on using the new Windows Home Server 2011

I’m sure you have heard by now, that the Release Candidate of the new Windows Home Server 2011 is available for download. It’s a huge milestone, and I’m excited for the final RTM sometime the first half of this year!

Windows Home Server 2011

There has been a lot of negativity around upgrading to the Windows Home Server (version 1) product, to the Windows Home Server 2011 or even using it at all, all due to the Drive Extender removal. I do understand the pain. I do. But I don’t understand why people instantly now hate WHS????

Looking back, we remember that Drive Extender had some initial problems after the v1 release. Some corner case of editing large files that lived on the server, in some rare cases, these large files were corrupt, people wanted to turn Drive Extender off, it scared them. After Power Pack 1 came in to save the day, only then did people start to trust Drive Extender, and yes, they immediately fell in love with it. Easy drive extension with a side benefit of duplicating files on multiple hard drives (“dup ‘em if you got ‘em!”).

Removing DE was a very tough decision, but I ultimately agree with the decision given what I know.

But without drive extender, is the product not awesome? is your data not safe? This blog post is intended to tell you why I think WHS 2011 is still awesome, and still keeps my data safe. I am a new father (she’s 8 months old at the time of writing this) and I’m a hobbyist photographer. My photos are probably the most important digital thing to me, then my countless hours of work I’ve spent on my documents, then my e-mail, then all that other stuff, like ripped CDs and DVDs, and some HD DVDs.

Let’s start with the “Just Awesome” stuff… most of this bucket falls into the Remote Web Access site, so from the outside in we go!

Remote Access is just Awesome!

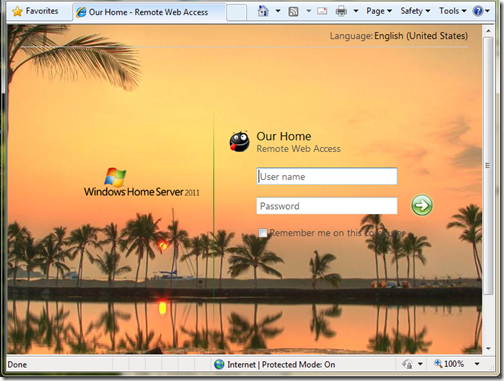
For one, right from the get-go you can customize the RWA about as much as you want:

Customized Logon Page

(This picture can be found on my photoblog here)

Remember, you also still get that free 3rd level web domain and matching trusted web certificate (from GoDaddy.com) on the home server.com domain name. Did I mention free security?

You get remote access to computers behind your network, but this time it’s powered by TS Gateway for Server 2008 R2! Yes, that means you can get dual monitor support, and you can take advantage of better optimization for remote access to your PC and better security using that same web certificate for encryption! Thus no longer using security protocols from 8 years ago.

Remote Silverlight Video Streaming

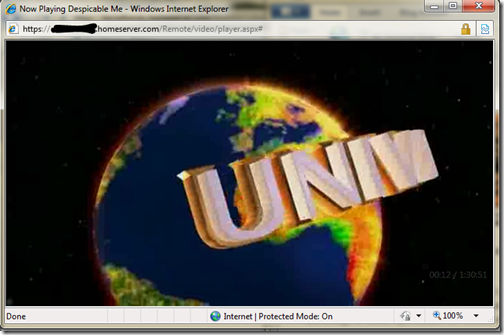
Yes, no more TwonkyMedia chewing up your processor, a built-in, secure, streaming engine based on Silverlight, with (if you put in a fast enough processor) media transcoding:

Silverlight Streaming

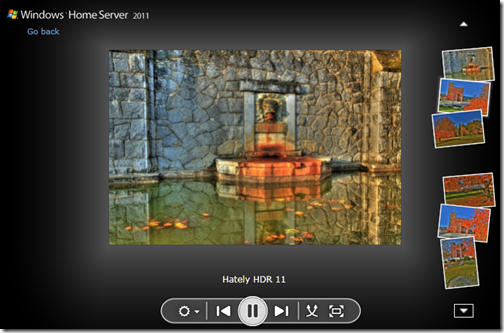
I also just *love* the photo slide shows. Sending access to the folks and letting them just watch 1000s of photos via a slide show, priceless:

Home Server Picture Slideshow

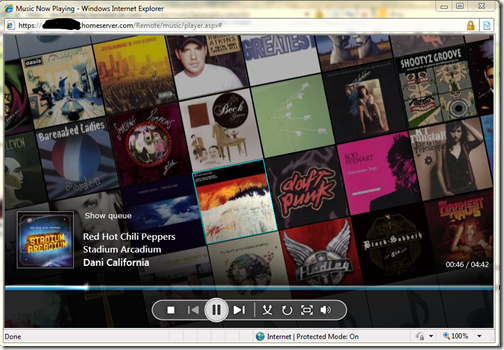
A Silverlight Music Player that you can make, save and use playlists on. which you can quickly switch music around in. I even use this player in my living room when I have get a get together. People just understand how to use it:

Silverlight Music Player

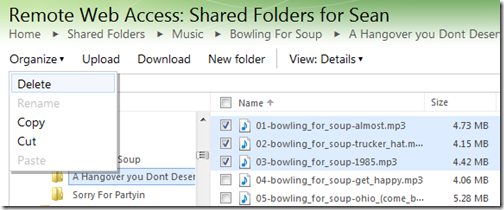
The ability to download or the ability to move files around without having to download. Yes, that’s right, delete, copy, cut and paste things all over the shared folders without actually having to download it.

Organize your Folders Remotely

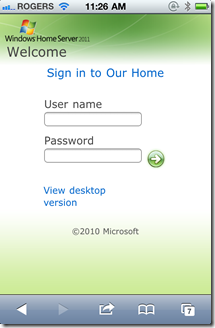
That’s a pretty powerful remote access story, one you won’t find with add-ins that run this flawlessly on the WHS v1 product… oh wait, I’m not finished, check out my iPhone formatted remote access webpage:

iPhone Logon

iPhone Folder and File View

And it looks just as good on an Android and Windows Phone 7!

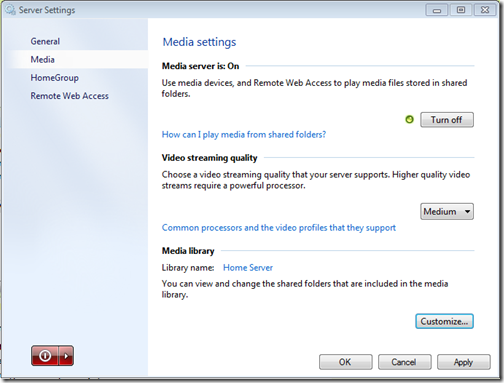
While we’re talking about media, let’s focus on the internal network. With an implementation of DLNA 1.5 open standard for compatible streaming, you can stream to your XBOX 360, Playstation 3, DLNA capable TV, iPad (with application), Windows 7 PC (or slate!) or any other DLNA compliant device. You can also configure which folders participate in the streaming, simply by adding them to the set of defaults.

Media Streaming Settings

If we’re going to talk about handy apps, do you remember that awesome Vista Gadget for WHS v1 by homeserverhacks.com? It was called ShareMaster. Well, now included in WHS 2011, is the Launchpad, which enables you to easily backup your PC, access your Remote Web Access site (without having to know the URL, even if it changes!), Shared folders, and if you’re an admin, the Dashboard. It’s also completely extensible by the SDK, so developers can kick it up a notch and add more functionality:

Client side Launchpad

That’s a whole lot of awesome packed into one box! I want to switch gears now and talk about how WHS 2011 protects my data, and why I think it’s safe. To me, the leading cause of data loss is usually hardware failure, most often then not, it’s a harddrive failure. Although there is the rare instance it can be a natural disaster, which happened to my uncle about this time last year.

Last but not least, is something you can’t see, that excites me the most. The Windows Home Server 2011 SDK (still in beta) is HUGE compared to the v1 product. Moreover, it’s SHARED with both Windows Small Business Server 2011 Essentials, and Windows Storage Server 2008 R2 Essentials. What does that mean? it means that things designed for business, can easily be used in the home (and vice versa). That means lots and lots of add-ins! and high quality ones at that. Nothing like developing for 3 platforms, instead of just one.

Data Protection, Why My Data is Safe on WHS 2011!

Data protection is all about having data on multiple drives. Take a look at RAID configurations. RAID5 is one of the most popular RAID configurations in the small and medium businesses, it’s probably sufficient for a home too, but sometimes it can be challenging to set up. RAID5 is a drive configuration that wastes up to 1 of a set of 3 or more drives to maintain “parity” bits. These parity bits are used to rebuild data on a drive if it’s lost. The system can run in limited capacity as soon as this drive dies without the end user knowing it. All in all, it’s a sweet system, but loose that 2nd drive before you can rebuild the array, and your data is toast!

What does Windows Home Server 2011 do? It keeps the data you choose on a second hard drive. Yep, the data on all your client computers is automatically backed up nightly to the Home Server. That’s up to 10 PCs safely backed up, every night. So now the data on your clients, is also on your server, two hard drives. There is a delay of 24 hours, but it’s there. Even if you get a Facebook Virus, you can roll back to the day before. This is exactly the same functionality as WHS v1, except it’s faster, and more robust.

What about the data on the server? Server’s hold data, isn’t that data safe? Yes of course it is. You can backup that data to an internal, or better yet, external hard drive! Unlike WHS v1, this has HUGE improvements. First, the backup is automated. Automated backups take the human error factor out, and the backup uses snapshots, so even open files are captured. I think I remembered to backup my WHS v1 about once/month. Now I’m getting 2x/day! And you know what, I choose the defaults because the server on my data doesn’t change that often. You can bump this up to as often as every 30 minutes. That’s your data, on another hard drive, 30 minute window of possible loss, but if I can’t trust a hard drive for 30 minutes, I’ve got problems with all the data that DOES change on my client computers, because that backs up every 24 hours! [And you can’t tell me that the purchase of an external hard drive isn’t worth your data backup, especially you, Mr. 22TB WHS v1! With or Without Drive Extender]

And…. if you want to do RAID, you can do RAID, you can do RAID1, RAID5, or even RAID10! If you want to do cloud backup (which I do because I’m too lazy to take the backup hard drive out of my house), you can do that, as a few providers are building add-ins.

So what did I really loose with Drive Extender being gone?

  • In the event of a hard drive failure, all my data isn’t still available until I put in a new hard drive and restore that drive back to its original state, if I didn’t configure RAID.
  • I can’t easily extend my storage when I have a disk that’s running out of space.
  • I can’t grow my share sizes past the size of all the hard drives in the system
  • My server storage responds faster because I’m not using DEMigrate.exe all the time

None of the above actually pertains to data loss. It’s all convenience. It was definitely nice to have in WHS v1, but I don’t think it’s absolutely needed in a server in the home.

Massive Data Collections

Let’s talk about Massive Data Collections quickly. Because WHS v1 made it so easy to grow your data collections, far beyond the size of one disk, without having to worry, “have I locked myself in to only X amount of data?”.

Let’s talk about my photo collection. It’s 80GB right now. That’s still not 1TB. I’m an amateur photographer, one that shoots a lot of photos, with a Canon 5D Mark II (a 21mp camera). I still have tones of space on a single 2TB drive to grow. What if I’m a professional photographer? Well, professional photographers don’t use Windows Home Server, at least I haven’t come across one. A good friend of mine has been interviewing professional photographers for some time, and they work with such large photos, they keep them locally, then archive them, usually via USB. Then if they want to work on them, they just plug them into the computer they are on, and it’s a local picture again. \

Video collections. My Canon 5D Mark II takes 1080p video. I use it a lot, that’s probably what jumped my photo collection from 60-80G in a year… but I’m still within reason. My video collection, is a rip of all my DVDs, and some HD-DVDs, and it’s still only 130GB, that’s still less than 1TB, and I still have all the DVDs in the closet, my music collection is 40GB… still have all the CDs. But I agree these data collections can get quite huge. This is probably the one place folks will actually miss Drive Extender. I couldn’t agree more.

… But maybe it’s time to take a hard look at what data you’re hording on your server. Do you really need to be a digital hoarder and save everything? I mean even Mozy can’t deal with you, as they announced they are killing their unlimited data plan. People save a lot, and it costs money, but do you really need it all? The guys at TechCrunch say “I assure you that you will never print those 10,000 pictures you have stored in iPhoto. Never. Ever.”.

If you absolutely *must* keep all that data, you should have a plan for it anyways. It’s not like if you store magazines for comic books, you don’t put aside space in a closet for them. With a plan, you can easily map out your storage needs, and growth. In fact, a few people even have growth charts of their storage growth from WHS v1, so you *know* the storage you’re going to need! I also suggest turning on File System Resource Manager and cataloging exactly which data is being used. I bet after a year, you use less than 30% of it.

So bottom line, I stay trim with my data (rule #1 of becoming a better photographer is forcing yourself to throw away 70% of your photos), I feel like Windows Home Server 2011 is the right product for me, for simplified access to my data. Simplified Management of my network, and extremely safe data protection plans. Moreover, because it’s Windows, it just works with other things in my house.

I liked Drive Extender too, but the product isn’t dead, in fact, it’s still awesome!