Showing posts with label E-Mail. Show all posts

Thursday, October 16, 2014

Quickly Archiving Mail with Outlook 2013 when using Outlook.com

Third post in a series of posts on how to single-click (or swipe/tap) to Archive mail when using Outlook.com.  The first covered how to swipe-tap to archive in iOS 8, and the second covered on how to set up an Instant Action to mouse over and click to Archive a mail on the web client. 

This post covers the most famous email client of them all: Outlook.  And most specifically Outlook 2013.  As mentioned in the first post, the pre-setup for this one is to create a folder called Archive in your mailbox. I covered how to do this this in the iOS8 post.

With Outlook 2013, there is a Quick Steps box.  You’ve probably never noticed it, it’s at the top, on the ribbon.  Well, it’s a set of customizable actions, where the Outlook team has taken the liberty of defining ones for you, mostly destined for business.  If this is the first time you’ve used these, take a look around, they are really powerful. Even on a personal account.  For example, I have one called “To Wife” which just forwards the email to my wife.  I do this a lot when I get an email on something that she should know, but I digress.  Here is what my personal account looks like:

Quick Steps

Here’s how to set up the Archive one Quick Step

  1. Click on the Create New button in the Quick Steps box (you may have to scroll down using the arrows to see it), it’s depicted above.
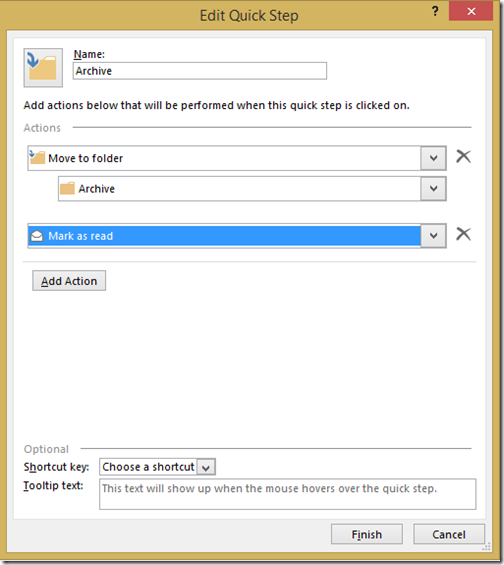
  2. Fill out the Quick Step, with your Name, and any number of actions you want to happen, it’s like a mail macro!  This is how mine is set up.  You can also assign a short cut key if you’re a keyboard kowboy. Edit Quick Step
  3. Click on Finish.

You’re Quick Step is ready to use.  Simply select the email you want to Archive and hit the new Archive Quick Step button, and the mail gets marked as read, and placed into your Archive folder.

Related Posts

Quickly Archiving Mail from the Outlook.com Web Client

In a previous post, I talked about how to quickly archive email in Outlook.com from the iOS 8 mail client. Similar to what you do with GMail, but of course we all don’t do our mail on our phones, we use computers as well! 
In this post I’ll tell you how to configure an Instant Action to do the same thing.  If you haven’t followed that post, then you are missing the pre-step to this one, which is to create a new folder called “Archive” (the name is key for iOS, not for the web client).  So do that first, then jump into these steps!
  1. First, log into your Outlook.com email account
  2. Click on the Settings gear (Settings Gear) in the top right hand corner of the page and select Options.
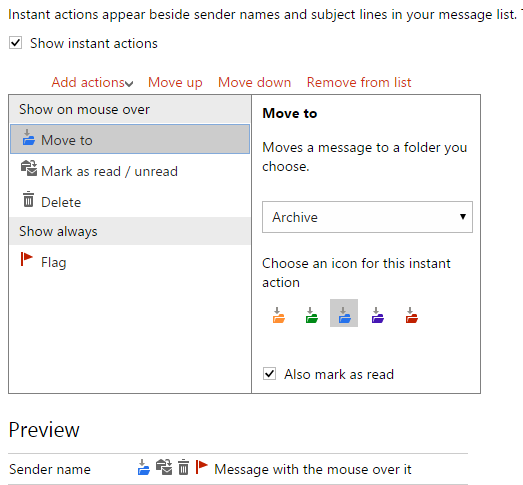
  3. On the Options page, under Customizing Outlook.com, you want to click on Instant Actions, in which you should see this Instant Actions
  4. Click on Add actions and then select Move To, and you’ll notice a Move To item show up in the list “Show on mouse over”. 
  5. In the right hand pane, choose to move a message to the “Archive” folder that you created, give it a coloured icon, and you can also choose to mark it as read if you want.  You can see how i might look in the preview (and how my preview looks above).  If you don’t like it the ordering, you can use Move Up and Move Down to order the list how you want.
That’s all there is to it.  Now when you mouse over the message in the message list, you get the Instant Actions to appear, and the Archiving icon you just created will single click it to the right folder.  Here is what mine looks like on the web:
Move this Message to Archive and mark it as read
Related Posts

Wednesday, October 15, 2014

Quickly Archiving Mail in iOS8 when using Outlook.com

One of my frustrations with Outlook.com, which isn’t configurable is how long it keeps deleted items for: 2 weeks.  That’s it.  2 weeks.  I for one want to have more time than 2 weeks to decide if I have to recover something from my deleted items.  And Outlook.com boasts unlimited storage now, or at least a lot of storage, to compete… so why not Archive email instead of delete it?
My workflow has changed.  Mail from computers, like Air Miles, or ZDNet or Marriott Rewards, after I’ve digested them, the deleted items is a perfect place for them.  But email from friends, family, co-workers, or even receipts and orders that I’ve done.  That mail just gets archived.. searchable.  The challenge I’ve been having is it’s hard to archive email, versus delete it.  I mean every app gives you a delete button, but not all apps give you archive, especially if you aren’t using GMail.
So, here is what I discovered on iOS 8 in order to Archive email on Outlook.com.
  1. Create a folder in your Outlook.com email address called “Archive”, this folder name is important, because iOS8 recognizes it.  In fact, now if you look at your folder list, it will look something like this.  Note the icon next to your Archive folder: Archive Folder Icon
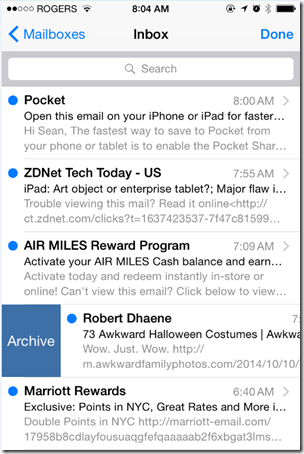
  2. Now that iOS has recognized you have a folder to Archive email to, let’s make it super easy to add mail to it.  While you could just move mail to this folder like any other folder, iOS8 has a “swipe right” in the mail list that you can customize!  So to do that go into Settings, then Mail, Contacts, Calendars, and then Swipe Options.  From here you can simply click on Swipe Right, and choose the action of Archive, thus enabling you to swipe right and Archive that particular message or conversation grouping, and you're ready!: Change Swipe Right to Archive
That’s all there is to it.  Now when you are in your email message list, and you swipe right, you can simply Archive the message into the folder you created.  Check it out:
Swipe and Archive
Related Posts

Wednesday, February 19, 2014

Backing up your Contacts from the Cloud

I can’t stress how important backing up is, I even have a special tag just for tips and tricks with backup, across various technology. 

So you might think, well, my contacts are *in* the cloud, so they are safe right?  Wrong!  If you don’t take backups into your own hands, you can have issues down the road, even with all the resiliency built into these Cloud services, you can loose data, here are just a few ways:

  • The Delete key could get stuck on your wireless keyboard and end up deleting a majority of your contacts in an instant, which then syncs to your service and then instantly to all your devices (this happens in my inbox all the time when my keyboard battery is low). (don’t have this? learn how to set it up here)
  • You could get hacked, be that @Matt or @N style, or simply by a script kiddy (you’ve enabled 2-factor authentication for your account already right? (Outlook.com, GMail.com)
  • You could get a virus that deletes, corrupts or worse (encrypts) your data so you can’t access it
  • You could cause yourself to get locked out of your account, maybe because you broke the Terms of Use?
  • The cloud service can make a mistake and delete your files (although it’s likely they can get it back, this is hours of support calls)

So, it’s in your best interest to do your own backup, and manage your data on your own, even in a cloud service.  I keep my Contacts in the cloud and I backup periodically (manually, but all the same, it’s periodically).  What would be great if these services did this monthly and emailed it to you…. a request in progress!

This is how I do it with Outlook.com

  • Browse on over to https://people.live.com and log in
  • On the title bar at the top, choose Manage and click on Export for use with Outlook.com and other services. People Export
  • This will prompt you to download (or automatically download) a file called OutlookContacts.csv. which is a coma separated values file that contains pretty much every important field that is in your contacts.  This is what you have to save in a safe place.

If you loose your contacts for whatever reason, you can use this file to work on importing them into another app or the same service but different account, etc.

This is how I do it with GMail.com

  • Browse on over to https://www.google.com/contacts/ and log in
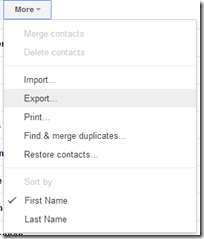
  • On the More drop down, select Export… to start the process Contacts Export
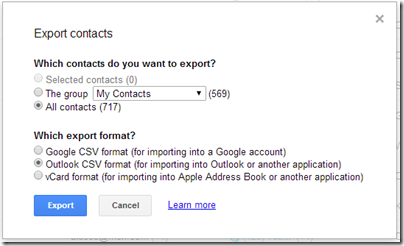
  • Choose the best format that you want to export in.  I think that Outlook CSV is the most widely used format, but you may wish to export in all formats, or specific formats to meet your needs. Export Contacts
  • This will prompt you to download a contacts.csv (or automatically download it), and this is the file you want to keep safe. 

There are multiple ways to import these files if your data is lost… more on that to come, but at least you doing this if only once a year, will save you a lot of hassle if you run into trouble.

Tuesday, January 21, 2014

Checking your sign-in history in Outlook.com

Well, I thought I knew everything about Hotmail..err.. Outlook.com there was to know, but instead I was talking to a friend today who said that a month or so ago, someone tried to access his account from Chili. Wait, what?! how does he know this?

Your Microsoft Account stores all the successful and unsuccessful log in attempts in your profile for you to view at any time.  Simply browse over to https://account.live.com and log in, then click on Recent Activity.  You can scroll through each one if you want, or just scroll until you find an Incorrect Password Entered or a weird Location.  Like this one in my account:

Recent Activity

Wow, someone attempted to log in to my Outlook.com account from Poland, good thing I have 2-factor auth enabled.  So if they did have my password for whatever reason, they’d still need my cell phone to actually get the second auth factor… which I have right here with me… aka, not in Poland.

Kind of nice there is an audit trail.  If one of the successful log ins wasn’t you, you can contest it right there and Outlook.com will help you take evasive action!

Have fun snooping on your snoopers!

Monday, April 29, 2013

Cloud Sharing your Email, Contacts, Calendar Between Different Devices

I’ve come across a lot of people who still struggle with different devices and having to physically plug them into their computer when they want to sync their calendar or contacts.  Sure, Email is a solved problem for them, but not that pesky Calendar or the list of Contacts.  This post is intended to help those people.  But those people have to embrace “the cloud”…

The cloud sounds scary, but it’s not, you’ve been using it for years, it’s just a server on the Internet that’s always accessible. Sure this can be a single mail server that’s been holding your email until you connect it, or it can be a scale-out solution that offers compute, storage, and database needs, but let’s start small.  Your email server, is in the cloud.  Yes, that same one offered to your by your Internet Service Provider (ISV).  That’s “cloud”.  See, you have email, you’re already using “the cloud”.  Your problem is you either (a), have an e-mail only server that uses POP3, or (b), you’re not taking advantage of the features of your server to leverage contacts and calendar.

If you have an e-mail server that only does email (i.e. only offers you IMAP or POP3 access), then you are living in the stone ages.  IMAP and POP3 are to email what rotary dialing is to the telephone.  The first is to switch to something that offers the email, calendar, contact suite of products.  I find it best to switch to the product that your spouse or significant other is using, primarily because it makes it easier to share things like the calendar.  My preference is Outlook.com, but you can also use GMail or Yahoo! Or if you wanted something more powerful, you could choose Office365.  The bottom line is you need to ditch that ISV email server.  Some ISVs leverage the above services for their email solution.  That’s better than POP3, but I still don’t like being tied to an ISV, because if you move or that ISV gets bought by another, things change, but this is your call.  This may or may not require you to get a different email address.  This is by far the most painful part of the process, so you’ll want to do this part once.  If you want to use your own domain name, so your email address never needs to change.  I have instructions on how to do this with Hotmail / Outlook.com.

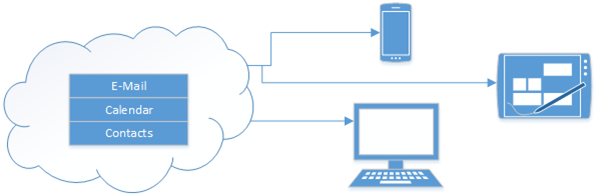
Let’s overview the set up that you’re aiming for:

Cloud to Device


This means that each phone, tablet or computer connects directly to the Internet (or cloud) to get your Email (which it does today) and your calendar and your contacts.  This means that the primary location for your E-mail, Calendar and Contacts is in the cloud.  Your devices and computers are just a “view” into that.  While you probably won’t need this with today’s devices. All of my computers are configured to use Exchange Active Sync (EAS).  Apparently Google is the only service that doesn’t use this anymore.

This works for me, and allows me to share my calendar with my wife, so we can always be in sync (provided she enters her events into her calendar!). 

I have the following devices, that are always up to date and never need to be plugged into a computer for “syncing”.

  • Windows Phone 8
  • Surface RT
  • Windows 8 PC (both built in e-mail client, and Outlook 2013)
  • iPhone
  • iPad
  • Blackberry Playbook

This is the set up you “don’t” want, as you are now dependent on your computer, and if you’re computer crashes, or dies, you loose your calendar and contacts.

Bad Setup

Wednesday, June 06, 2012

How to Subscribe to an ICS calendar in Hotmail

Earlier I posted on how to share your Hotmail calendar between two or more people.  What you might remember if you viewed the screenshots closely, is I had a few more calendar’s in there.  Like a Trip It Calendar. 

As a side note, if you travel at all, and don’t use Trip It, you’re missing out!  Trip it is a website / service that you simply forward your travel itinerary to an email address it builds a trip itinerary for your trip so you can quickly access all the details about your flight, your hotel or rental car, or any other itinerary you have. 

Back to Hotmail calendaring, you can subscribe to any Internet Calendaring Service (ICS) feed, this can be something like your trip-it calendar, the Seahawk’s TV schedule calendar, your FaceBook calendar, the list goes on of sites that support ICS.

To simply subscribe to an ICS Calendar in Hotmail do the following:

  1. Log into Hotmail.com, and click on the Calendar link
  2. Click the Subscribe link above your calendar
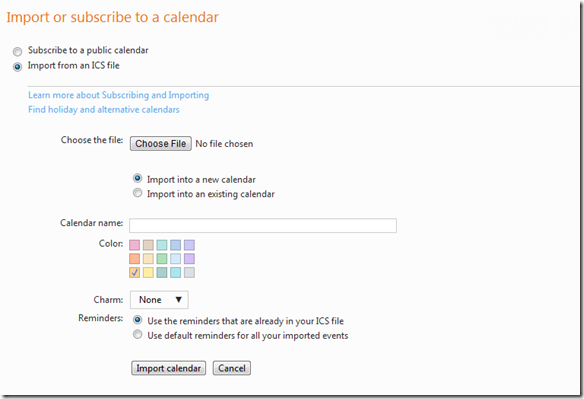
  3. Choose to Import from an ICS file, and provide the linkImport ot Subscribe to a Calendar request
  4. I always choose to import into a new calendar, give it a game, a color and in the case of Trip it, a little airplane charm.

Now once you know where to put the ICS file, you just have to find them.  I only use FaceBook (for those pesky FaceBook events, it’s nice to have them just appear in your calendar) and Trip-it, so airplane itinerary and hotel check-ins just appear in your calendar.

Monday, June 04, 2012

How to Share Hotmail Calendars between two or more people

I’m a huge user of Hotmail. It’s where I store my personal email.  I looked at hosting it in Office 365, but to have to pay for one mailbox or a few mailboxes for personal use is kind of cumbersome.  There is no doubt that Office 365 is better for businesses, but for personal use, Hotmail is just fine for me.

However, there are some features that *just happen* with Office365, that don’t necessarily happen in Hotmail, like Calendar sharing.  I’ve started using my Hotmail calendar for anything personal that I need to track, and then create a calendar request to my work calendar if it’s during business hours (like a Dr’s appointment).  My wife actually uses her Hotmail calendar to track her work schedule.

My wife is bad at remembering to update digital calendars, so once/month, I perform secretary duties, which just makes both our lives easier.  But the key is I update her calendar, from my account.  We can also view each other’s calendar on our PCs, our iPads and our SmartPhones.  Here’s how.

  1. From each account you want to share, go to Hotmail.com, log in, and click on your Calendar.
  2. Click on the Share link above your calendar
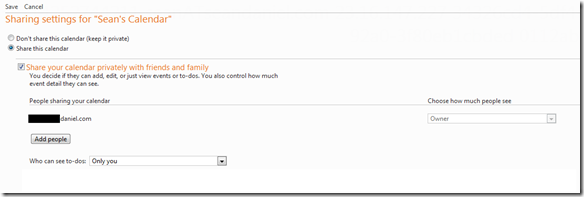
  3. Change the Don’t share this calendar (keep it private) to Share this calendar Share this Calendar
  4. When you select Add People you can select from your address book of people to share from and how much access you want that person to have.  For example, I had my wife give me co-owner access so I could update her calendar once/month with all the items she writes down in her day planner, and I gave her view details:  Calendar Access
  5. Then hit Save all the way down at the bottom of the page.image

The beauty with this is the calendar, with your access level just pops into your calendar list, you can choose to overlay it in your calendar (default), or just uncheck it.  Given that I want to know what my wife and daughter are up to, I just keep it active.  Then at a glance I’ll know if my wife is working on Friday or not and if I can go to soccer practice.

Even further into the beauty of Hotmail calendaring, is now this is accessible from all the different calendar views that you might use.  For example, if you use an iPhone or an iPad as we do in this house, you get your Hotmail calendar’s right there on your phone.

iOS Calendar

Additionally, if you use the Outlook Hotmail Connector (the primary reason I use this is for the calendar), then you can see all of your chosen calendar’s in the single Outlook view.  Which makes it for even easier update, select the calendar you want to update, and then just type into the calendar like you would with any Outlook calendar.

image

And yes, I am anal about my calendar’s, so I even make them all the same colour on all the views/devices.  My work calendar is always blue, my home calendar is always brown, Kendra’s calendar always yellow (except yellow doesn’t look good in the Outlook view).

I highly recommend sharing calendars for people you are with a lot, especially a spouse, it just makes life easier for us to stay in touch and know what’s going on.

As a final note.  If you wanted just do a 1-time send of your free/busy information to someone, Hotmail has you covered there.  I have yet to use this feature, because my personal calendar just isn’t that packed, and not everyone is as religious about their calendars as I am.  But on that same Share tab, Hotmail serves up all the personalized links and you can choose which one to send

Links Only

Thursday, February 09, 2012

How to Configure a Vanity Domain on Hotmail

The Oatmeal, one of my favorite comic sites, has an info-graphic on what your e-mail address says about you.  While I disagree about the @gmail.com and @hotmail.com priority in life, I’m in pretty much agreement on using your own domain for your e-mail.  Especially for business, and quite possibly also for individuals (or *home* e-mail addresses as you might call them.)

Why do you want to have your own domain name for your e-mail address? Because it gives you long term flexibility without having to update your friends.  using my @seandaniel.com email address has helped me over the years as I first obtained it in University.  This meant I could just point the email domain to the university mailbox, then I moved it to my own SBS 2000 box, then SBS 2003, then SBS 2008, and then I moved it to GMail for a short period of time (which I discovered I didn’t like GMail at all), and now I actually have my personal e-mail hosted on Hotmail, and through all that, I didn’t have to notify my friends once about an email address change.

Naturally I get spam on my account, but Hotmail is so good, I never get any in my inbox, it just goes into the junk email folder, which I pay no attention to unless someone tells me to check my junk email folder.

Side note here: I find that with most spam filters these days, they are “learning” filters.  If you abandon your email account, it can’t learn your preferences with new spam so you end up with some in your inbox.  This is the same for Hotmail and GMail.

So let’s get started.  First you need a domain name.  If you’re in the US or Canada, I strongly suggest using eNom Central or GoDaddy.  Both registrars are incredible, but offer different experiences.  eNom is slightly more expensive, but I consider their UX cleaner and easier to understand.  GoDaddy wins for price though, you just have a gauntlet to run to check out.  So it’s up to you which one you choose.  Outside of the US and Canada, these domain registrars are still phenomenal choices, but there are some “local” registrars (particularly in Germany or Australia) that offer more local offerings you might want to check out.

Once you own a domain, you can do all sorts of things with it, but this post is focused on setting up your email address on Hotmail.  Let’s get started:

  1. Navigate over to Domains.Live.com, and sign-in with your LiveID (which is probably an existing Hotmail address)
  2. Click on Add Domain
  3. On the Create a Windows Live Experience for your domain page, type in the domain name you just bought.  For me it was “seandaniel.com”, and ensure that Set up Windows Live Hotmail for my domain is selected, and click Continue.
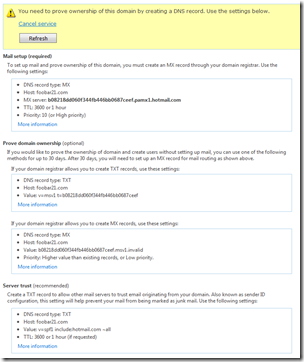
  4. Click I Accept on the agreement…. after you agree of course. :o)setting up foobar21.com

At this point you need to prove ownership of this domain name and you get a page that walks you through all the settings you need to configure in your DNS provider’s website.

This is a screenshot for one that I created called “foobar21.com” which of course I don’t own, this is just an example.

In a different browser window (since you’ll need to copy and paste from this one), you’ll want to navigate to your domain registrar’s website and log in.

Once logged in, you’ll want to find the host record management or Email/MX record management, that’s where you’re going to make the changes to your domain name. 

Since I use eNom Central, this is how I do it.  eNom has the MX (Mail eXchange) or email records separate than the host records

  • Log in, and go to Domains, and then My Domains.
  • I click on the domain that I want to manage, in this case, seandaniel.com
  • on the next page, I click on Email Settings.

Now I’m ready to set up my email record to match the first item in the list on the Windows Live page.  the “@” record is the root of the domain (i.e. if you want your email address to be @seandaniel.com, that’s the root of the domain instead of @mail.seandaniel.com, which would be under the “mail” host name.  Here is how mine looks:
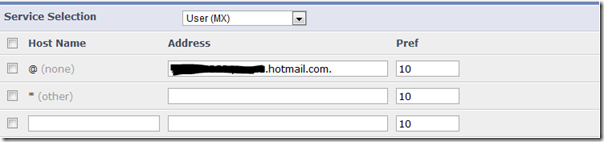
User MX settings

All I did was copy and paste the Live configuration site into the eNom too. Once the MX record is done, I hit Save and move onto the next record in the Live webpage’s list above.  The rest of the items are done on the Host Management page, so I switch to that.  Here is what mine looks like (I have a lot more but I stripped it down to just the mail records to make things easy to understand):

Host Records

Again, just a copy and paste above from the Live site into the eNom or your own GoDaddy tool.  Just a few things to note here

  1. My TXT record above is a standard (mostly adopted by Microsoft is my opinion) that tells mail servers that receive your email, which mail servers have permission to send on your domains behalf.  So you’re telling other servers that hotmail.com can send mail on your behalf.
  2. The SRV record is for using Windows Live Messenger, it’s listed at the bottom of the live page (which is cut off in the screenshot).
  3. The CNAME for mail, is one that I set up myself, which you also have to configure on the domains.live.com (under “custom addresses”), which automatically redirects mail.seandaniel.com to Hotmail’s logon page.  Kinda slick, but not necessary.
  4. The URL Redirect for * isn’t on all domain providers, it’s another neat DNS trick that eNom does, so if you type in FluffySlippers.seandaniel.com it redirects to my webpage.  Also optional.

Make sure you hit SAVE on your domain registrar’s page.

Now, the next part can take some time.  If you have a domain that’s been around for a while, it’s probably going to finish replicating in < 6 hours or so.  If your domain is new, it could take up to 2-3 days for it to get into all the systems around the Internet.  Regardless, you can keep returning to domains.live.com and refreshing to know when it’s complete.

Now that you have your domain set up, let’s create an account!

At this point, you again to to your management console and hit up the Member Accounts link.  This is where you create your mailbox(es) (I have some domains that I host family email on so in those cases I have multiple email addresses).

On the Member Accounts page

  1. Click the Add button to add your first user
  2. Give this user an account name, first name, last name, and a password, you can require them to change this when they log in.

That’s it, the account is created.  Now simply go to www.hotmail.com (or mail.domain.com if you set that up!) and log in as this user account.  The mailbox will be created for you upon log in.  The user will set up their new Hotmail account as if they were setting up a new Hotmail account on @live.com or @hotmail.com, complete with security related questions.

That’s all there is to it.  Mail starts flowing to your new Hotmail account with your own vanity domain name.  Create up to 500 email accounts.

Now when Hotmail adds the ability to add “aliases” to vanity domain names, I’ll be even *that* much more happy with the situation.

Oh, and one more thing, that Hotmail account that you signed into domains.live.com as? be sure to link it in the options to your new Hotmail account, then you can use either to log in.  You can also get the mail from one Hotmail account into another, so you only need to check one place as people learn your new vanity email address!

You can do this with GMail too, but they classify you as a business and I believe charge you $50/year, with Hotmail this functionality is free!  The link to get started on Gmail.