Showing posts with label Best Practices. Show all posts

Thursday, November 27, 2014

Help! I have a Virus!

I get this question a lot.  I wanted to write something up on how you can self heal your Windows 8 PC (although most of this also works for Windows 7), or at least get you started in the right direction. Let’s dive right into figure out what’s going on.  Let’s quickly talk about what a “virus” is:

  • A virus is actually software that is harmful to you or others running on your computer.  Something that erases or corrupts files or potentially participates in international denial of service attacks at an attackers whim.  These are terrible, and programs like Windows Defender, built right into Windows, if updated, will protect you against any of these.
  • Spyware is software that tends to steal from you, capture credit card information, your password etc, also bad, and again Windows Defender will capture most of these, but not all
  • Bloatware is software that that is trying to help you do something, but something you probably don’t need.  There are two types of Bloatware
    • Non signature PCs come with extra software your computer provider installs in hopes to make extra money from software vendors who want to get their software in front of users, so they pay the computer provider. (as a side note this is why I always format and re-install these computers, if you have the technical know how)
    • Software you install.  Yes, getting emoji’s at the bottom of your email, or the “music downloading app”, the list goes on.  All the little programs YOU install on your computer, some of them are bloatware, and some of them come with bloatware.

So let’s get to fixin’ that “virus”.

Step 1 – Let’s make sure it’s not a known virus

First, let’s get Windows Defender up to date, and scanning. 

  1. Hit the start button on your keyboard, or swipe out the charm menu and hit start.
  2. just start typing “Defender” and you’ll see the “Windows Defender” appear.  Tap or Click on it to drop into the desktop and you’ll see this window:
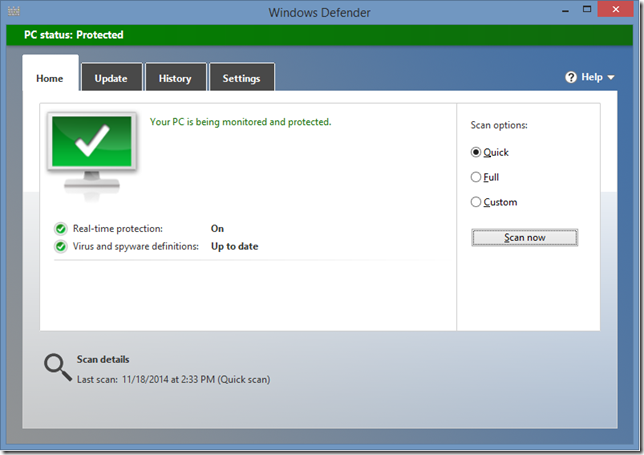
 Windows Defender

This is what a healthy PC looks like.  If your PC is unhealthy, it’ll tell you on screen what you should do.  Which is most likely download the most recent updates, and then scan your PC.  It’ll quarantine/delete any files it detects that are a virus.  Easy Huh?  You don’t need any other Anti-virus program, as Windows Defender does it all.  If someone says you need something like McAfee, Symantec, or a paid Antivirus solution, you don’t.  Those applications provide additional security, but the base prevention of viruses is included with Windows 8.

IMPORTANT WINDOWS 7 NOTE: if you’re on Windows 7, then Windows Defender doesn’t do anti-virus, you’ll need to get Microsoft Security Essentials, which is a free download. Same comment on the other antivirus solutions, they aren’t necessary and cost money for features you most likely won’t use.

Step 2 – What the heck is running on that PC of yours?

Computers only have so much memory, probably barely any if you bought your computer for under $1000, and you want to keep the programs running down to the ones you need not the ones that have just decided you need them.  While there is probably a number of things running on your computer at this very moment, what you want to prevent is things from starting that you won’t use.  Here is how

  1. Let’s crack open the Task Manager, the fast keys are CTRL+SHIFT+ESC, or you can right-click on the task bar in the desktop and choose Task Manager.
  2. Flip over to the Startup tab.  Here is what you see:

Task Manager

As you can see, I have a pretty short list.  I’ve disabled what I don’t use EVERY time I reboot my computer.  Chrome, my browser does a tone of things for me, so I allow it to load in the background, I obviously want sound, so I leave my Realtek device enabled.  I print, so I leave the HP one enabled, but I use iTunes or my life experience camera, or send to one note, or Spotify only sometimes, or not at all.  I want to load those manually if I need them, so they are disabled.  Disabling things that are of high startup impact will make your computer boot faster.

Next, let’s trim some fat.  Out with the programs you don’t need!

  1. Hit the Start page up again with the start key, or the swipe for the charms, and then the start button
  2. On the start page, type in the word control, and you’ll see the Control Panel come up
  3. Launch that by taping or clicking on it, and you’ll end up in the Control Panel on the desktop
  4. Under Programs, click the Uninstall a program link, it should look like this:
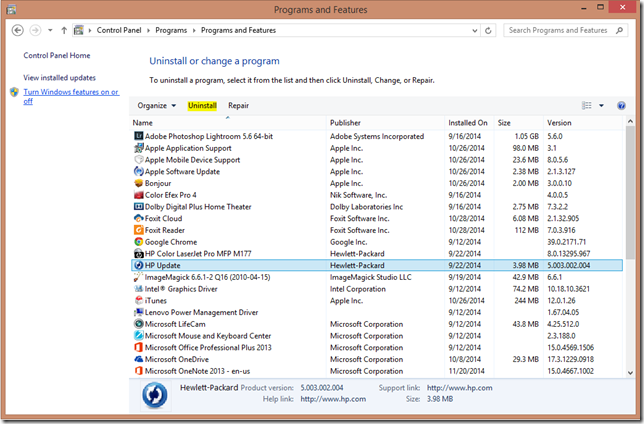
 Control Panel - Programs and Features

This is where the fun begins, you want to go through program by program, and uninstall the ones you don’t use using the highlighted Un-install button.  You’ll find that some have unnecessarily hard un-install programs, these are probably the bloatware programs you’re loathing.  I often do a Google Search for “How to Uninstall %insert program name%” and then see what the internet says.  Ultimately you want to un-install anything that you’re not using. After this step you’ll likely have to reboot your computer, when it comes up, it’ll probably already be running faster.

This next step is not for the layman.  In fact, you can SERIOUSLY mess up your computer in this step, so skip it if you don’t feel comfortable, or better yet, take a screenshot and send it to someone you trust (yes family, you can send it to me).

Let’s get into the registry

  1. On the start menu type in RegEdit or press WIN+R and type Regedit.
  2. Agree to the access prompt allowing the app to open
  3. we’re going to need to navigate to two places here to see what’s else is loading
    • HKEY_CURRENT_USER\Software\Microsoft\Windows\CurrentVersion\Run
    • HKEY_LOCAL_MACHINE\SOFTWARE\Microsoft\Windows\CurrentVersion\Run

You’ll want to take a screenshot of each of these locations and send them to your trusted advisor.  Here is what the second one looks like for me:

Registry Editor

You will see a similar list (probably more technical) to the Task Manager above.  If you do wish to edit this.  You delete the ones you don’t want BUT BUT BUT!!!! make sure you export the key first as a backup, and know which ones you’re deleting and why.  The above are actually my audio drivers, so I want them to run, but they look uber geeky right?  So be careful here!

Step 3 – Browser Extensions

Many of the “Help I have a Virus!” emails I get always have screenshots of browsers, and said browser is saying stuff like “you’re internet is slow, you have a virus, run this program!”.  Please please please don’t run this program.  Anything windows *should* run, is already running for you.  My friends at Microsoft have done this for you. They don’t tell you what you should run, it’s just running!  So don’t run anything, or pay any money to run something.  A browser should open take you to your home page, and let you get on the Internet.  The browser isn’t going to tell you about the health of your computer, or want to collect money from you.  Let’s look at two browsers

Chrome

Let’s find the browser extensions and remove what we don’t need, unless you just installed it, then there aren’t any to worry about.

  1. Open Chrome and click on the three lines in the top right hand corner of the window
  2. click on Settings, then on the left hand side, click on Extensions.

You’re presented with a list of all the extensions.  Go through one by one and hit the trashcan to delete any you don’t use.  If you aren’t sure what one does, uncheck the Enable, and then close Chrome and open it and see if there are any differences. If there aren’t, chances are you want to delete that one anyways, so go back and delete it.

Internet Explorer

Let’s get killin’ extensions

  1. Click on the gear icon in the upper right of the browser window (under the “X” to close IE)
  2. Click on Manage Add-ons and you’ll see this:

IE Manage Add-ons

Now go through all the Toolbars and Extensions, and disable the ones you don’t use.  Also check out the Accelerators and remove the ones you don’t use as well.

When you’re done these, close the browser and re-open it. 

Step 4 – Getting more insight

Last but not least, I wanted to tell you a tool that gives you more insight on the stability/reliability of your computer.  It tells you when you did things, like install apps that cause problems.  It’s the Reliability Monitor.  Let’s open it up

  1. Get to the start page (press the start key, or use the start button on the charm fly-out)
  2. Type in the word Reliability, and select the Reliability Monitor.   You’ll end up back in the desktop seeing this page:

Reliability Monitor

You can click on each yellow warning triangle, or blue informational icon and see what happened on that day. The blue bar (across the very top of the graph at #10 for me) is your reliability monitor.  That bar may not be at the top for you, but you can follow that bar back in time to see when it dropped from a 10/10 score to a lower one, and you can see the event that took place.  My guess it’s the one day that you decided to install something because you were in a rush, and you picked a bad program.  It gives you more insight to what’s going on with your computer, and what the history was and why things are probably broken.

Anyways, if you’re a family member, and ask me to connect into your computer to fix your virus. These are the steps that I’m going to follow, so now you can too!

On a last note, I’m always told “oh, aren’t you going to defrag my hard drive?”.  Defragging is so 2008… with Windows 8 this happens automatically for you, but you can validate it’s enabled simply by

  1. Going to the start page
  2. Typing in defrag, and selecting the Defragment and Optimize your drives. 
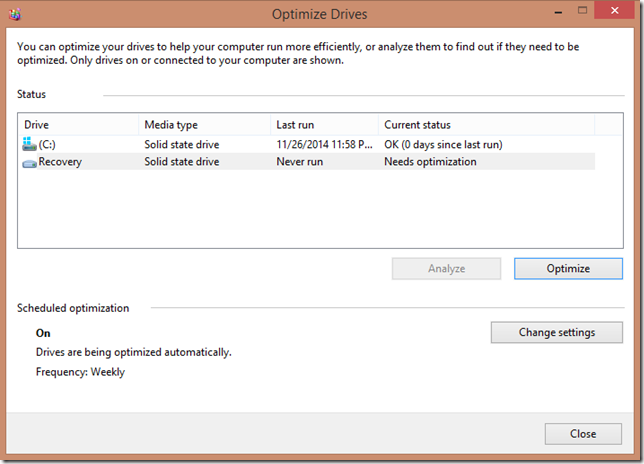
Optimize Drives

Just click the Optimize button, or see when it was last run.  Note that the older “hard drives” need defragmenting, and the newer and faster SSDs need trimming.  Totally different technology, but Windows will handle both for you.

Good luck with your “virus”… and stop installing programs that you don’t need with bloatware!

Wednesday, February 19, 2014

Backing up your Contacts from the Cloud

I can’t stress how important backing up is, I even have a special tag just for tips and tricks with backup, across various technology. 

So you might think, well, my contacts are *in* the cloud, so they are safe right?  Wrong!  If you don’t take backups into your own hands, you can have issues down the road, even with all the resiliency built into these Cloud services, you can loose data, here are just a few ways:

  • The Delete key could get stuck on your wireless keyboard and end up deleting a majority of your contacts in an instant, which then syncs to your service and then instantly to all your devices (this happens in my inbox all the time when my keyboard battery is low). (don’t have this? learn how to set it up here)
  • You could get hacked, be that @Matt or @N style, or simply by a script kiddy (you’ve enabled 2-factor authentication for your account already right? (Outlook.com, GMail.com)
  • You could get a virus that deletes, corrupts or worse (encrypts) your data so you can’t access it
  • You could cause yourself to get locked out of your account, maybe because you broke the Terms of Use?
  • The cloud service can make a mistake and delete your files (although it’s likely they can get it back, this is hours of support calls)

So, it’s in your best interest to do your own backup, and manage your data on your own, even in a cloud service.  I keep my Contacts in the cloud and I backup periodically (manually, but all the same, it’s periodically).  What would be great if these services did this monthly and emailed it to you…. a request in progress!

This is how I do it with Outlook.com

  • Browse on over to https://people.live.com and log in
  • On the title bar at the top, choose Manage and click on Export for use with Outlook.com and other services. People Export
  • This will prompt you to download (or automatically download) a file called OutlookContacts.csv. which is a coma separated values file that contains pretty much every important field that is in your contacts.  This is what you have to save in a safe place.

If you loose your contacts for whatever reason, you can use this file to work on importing them into another app or the same service but different account, etc.

This is how I do it with GMail.com

  • Browse on over to https://www.google.com/contacts/ and log in
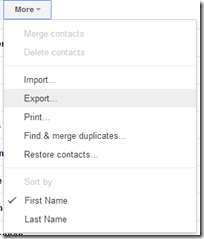
  • On the More drop down, select Export… to start the process Contacts Export
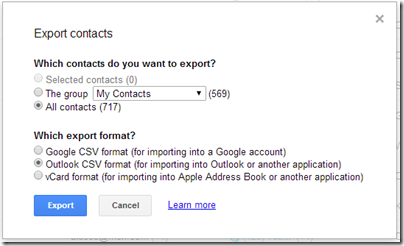
  • Choose the best format that you want to export in.  I think that Outlook CSV is the most widely used format, but you may wish to export in all formats, or specific formats to meet your needs. Export Contacts
  • This will prompt you to download a contacts.csv (or automatically download it), and this is the file you want to keep safe. 

There are multiple ways to import these files if your data is lost… more on that to come, but at least you doing this if only once a year, will save you a lot of hassle if you run into trouble.

Thursday, May 02, 2013

How to Change Your Email Address and Service Gracefully

So you got the Internet, and your Internet Service Provider (ISP) sold you on 5 free email addresses, and you thought: "Free is good!". Then you read my post from a few days ago about how to use email, calendar and contacts across multiple devices, and realized that Free is good, but you need to choose the right free.
So now you want to migrate your email address to an Outlook.com or G-Mail account. Allowing you keep not only your email, but your calendar and contacts as well in "the cloud".
This is not only an invasive change for you, but it's also for your friends, and this post is designed to logically tell you how to gracefully switch to a new e-mail.
  1. Create your account on your new provider.  I would recommend Outlook.com, because, well I'm biased and I really like it.  You'll want to spend some time to get a username you're happy with.  On Outlook.com you can create aliases later on if you don't like your log in, for specific purposes.  So you can create your account as mulletman@outlook.com, but then create an alias of firstname.lastname@outlook.com for your resume, and have both delivered to your inbox.
  2. Once you're happy with your new email address, you can log into it and you'll have no email.  What I did was export all of my contacts as a "CSV" file (Comma Seperated Values) from whatever email program I was using on my computer, then just went to the People tab, and chose Manage, then Add People  You can then choose to Import from file, and import that same CSV file.  (you can also import from Google, Linked In, Sina Weibo, Facebook).  Basically I get my contacts all squared away first (while still checking my old email).
  3. Ideally you want to set up e-mail forwarding from your old account to this new one you set up so when email arrives, it gets forwarded directly.  I can't explain how to do that on this post as each ISV is different.  You can call their helpdesk and ask how to do this.  The other option is to have your new account "check" your old email for new messages and download.  Outlook.com can do this by going to Settings (the gear in the title bar), then More mail settings, then under Manage your Account, click Your email accounts, which allows you to add a POP account for Add a send-and-receive account, and provide your old email address server, username and password.  Then validate that it works by sending email to your old account, and making sure that you eventually see it in your new account (eventually if you chose Outlook.com to check your email, it could take some time for it to hit your new account)
  4. Once you're happy that your old mail is flowing to your new email.  It's time to make the switch to your new account.  You'll want to send an email to ALL of your contacts to tell them of your updated email address.  You'll also want to check any subscriptions you signed up for and unsubscribe from those and resubscribe with your new email address
  5. If you still have friends emailing you at your old address, simply reply from your new address and remind them of your email address update.  After a period of time (on the order of Months) when you feel comfortable that people are using your new email address, you can turn off the old POP account you set up in step 3.
  6. And you're done!
Lots of people ask me why not stay with their ISP.  Here are my reasons:
  1. ISP mail servers typically don't offer calendar and contact service, and are old archaic mail-servers that don't have any features that work with newer devices
  2. The use of POP or IMAP uses your data plan on a schedule to check your email.  That's a bunch of data eaten out of your data plan (on a phone for example) that will probably result in no new messages for you.  Newer protocols only use data when you have email
  3. The use of POP and IMAP run on a schedule and use data, and as a result, they drain your battery faster than newer protocols
  4. ISPs are typically networking experts, they run mail servers because it's common practice for them to offer an email account with your networking.  But it's not their expertise, why not switch to someone who focuses on making these services great?
  5. If you move homes to a house outside of a service area for your ISP, Or if you simply want to switch to get a better "deal", you'll loose your email address as a result, which causes your friends to go through the pain as it is.
  6. If you travel around the world, access to your email account is slow outside of your ISP network and native country.  World-wide enabled companies like Microsoft, Google, or Yahoo, optimize their service to be access world wide and your service will be far better outside of the country.
And if you aren't sure if you want to use Outlook or GMail, why not make it super easy and use your own domain.  I've moved my email account 5 times since I've had my own domain, and none of my friends are the wiser as the email address never changes, just the back-end service.  If you want to do that, I have instructions here.

Monday, April 29, 2013

Cloud Sharing your Email, Contacts, Calendar Between Different Devices

I’ve come across a lot of people who still struggle with different devices and having to physically plug them into their computer when they want to sync their calendar or contacts.  Sure, Email is a solved problem for them, but not that pesky Calendar or the list of Contacts.  This post is intended to help those people.  But those people have to embrace “the cloud”…

The cloud sounds scary, but it’s not, you’ve been using it for years, it’s just a server on the Internet that’s always accessible. Sure this can be a single mail server that’s been holding your email until you connect it, or it can be a scale-out solution that offers compute, storage, and database needs, but let’s start small.  Your email server, is in the cloud.  Yes, that same one offered to your by your Internet Service Provider (ISV).  That’s “cloud”.  See, you have email, you’re already using “the cloud”.  Your problem is you either (a), have an e-mail only server that uses POP3, or (b), you’re not taking advantage of the features of your server to leverage contacts and calendar.

If you have an e-mail server that only does email (i.e. only offers you IMAP or POP3 access), then you are living in the stone ages.  IMAP and POP3 are to email what rotary dialing is to the telephone.  The first is to switch to something that offers the email, calendar, contact suite of products.  I find it best to switch to the product that your spouse or significant other is using, primarily because it makes it easier to share things like the calendar.  My preference is Outlook.com, but you can also use GMail or Yahoo! Or if you wanted something more powerful, you could choose Office365.  The bottom line is you need to ditch that ISV email server.  Some ISVs leverage the above services for their email solution.  That’s better than POP3, but I still don’t like being tied to an ISV, because if you move or that ISV gets bought by another, things change, but this is your call.  This may or may not require you to get a different email address.  This is by far the most painful part of the process, so you’ll want to do this part once.  If you want to use your own domain name, so your email address never needs to change.  I have instructions on how to do this with Hotmail / Outlook.com.

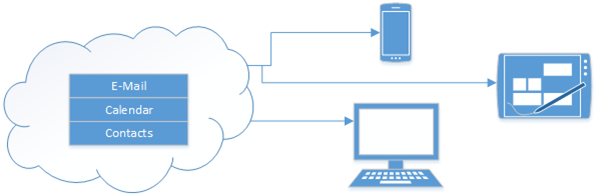
Let’s overview the set up that you’re aiming for:

Cloud to Device


This means that each phone, tablet or computer connects directly to the Internet (or cloud) to get your Email (which it does today) and your calendar and your contacts.  This means that the primary location for your E-mail, Calendar and Contacts is in the cloud.  Your devices and computers are just a “view” into that.  While you probably won’t need this with today’s devices. All of my computers are configured to use Exchange Active Sync (EAS).  Apparently Google is the only service that doesn’t use this anymore.

This works for me, and allows me to share my calendar with my wife, so we can always be in sync (provided she enters her events into her calendar!). 

I have the following devices, that are always up to date and never need to be plugged into a computer for “syncing”.

  • Windows Phone 8
  • Surface RT
  • Windows 8 PC (both built in e-mail client, and Outlook 2013)
  • iPhone
  • iPad
  • Blackberry Playbook

This is the set up you “don’t” want, as you are now dependent on your computer, and if you’re computer crashes, or dies, you loose your calendar and contacts.

Bad Setup

Thursday, October 04, 2012

Beware Social scammers that call pretending to be the Microsoft HelpDesk

On 9/21/2012, I received my first social engineering hacking attack. An attempt to obtain access to my computer and my credit card, leveraging my stupidity and lack of computer skills :o)
I'm outlining what happened here so you can save yourself if you get a similar phone call.

Apparently the FTC is aware of this and is cracking down on these support calls, but I figured I’d post this here as well, because well, the end is hilarious.  Additionally, these folks seem to be blind calling (aside from knowing your surname) as they didn’t realize that I actually worked for Microsoft.  In some cases, they call right into honeypots just waiting for their call.

Please note that the first few minutes of this call, I was confused as I had 3 tickets open with the *internal* Microsoft helpdesk about random stuff related to my job.  I found the conversation hilarious.


This phone call from 206-397-1127, the caller idea was a bunch of numbers. This is how the call went:


Me: Hello?
Caller: Hello Mr. Daniel? (I have no idea how they got my name)
Me: Hi
Caller: This is the Microsoft Help Desk calling, we have seen issues that your browser is infected with a virus and we're calling you to help you fix your computer.
Me: Oh? (At this point I'm thinking it might be the internal Microsoft helpdesk, but the number is wrong, which I'm aware of)
Caller: Yes, I'm calling because I can help you fix this problem. Is your computer on?
Me: Yes it's on, I'm sitting at it
Caller: Well, click the start button in the bottom right hand corner of your screen
Me: There is no start button (I'm running Windows 8, if you recall, there is actually no start button anymore)
Caller: Yes, it is there, in the bottom left of your screen, all the way at the bottom, all the way to the left
Me: I'm looking there, I do not see a Start button
Caller: ok, we will do this another way, do you have a keyboard?
Me: Yes (I wish I was using a Surface at this point, as I wouldn't have a keyboard either!)
Caller: Ok, beside the CTRL button, there is a button with a flag on it, 4 squares in a flag. push that
Me: (trying to hold in my laughter at this point). Nice try, you obviously don't know that i'm running Windows 8, and there is no start button, SCAMMER! <click>

As a Microsoft employee, I'll tell those of you who aren't, that Microsoft will never call you about a virus on your computer in this fashion. They do provide you with FREE antivirus solution called Security Essentials for Windows.

Monday, June 04, 2012

How to Share Hotmail Calendars between two or more people

I’m a huge user of Hotmail. It’s where I store my personal email.  I looked at hosting it in Office 365, but to have to pay for one mailbox or a few mailboxes for personal use is kind of cumbersome.  There is no doubt that Office 365 is better for businesses, but for personal use, Hotmail is just fine for me.

However, there are some features that *just happen* with Office365, that don’t necessarily happen in Hotmail, like Calendar sharing.  I’ve started using my Hotmail calendar for anything personal that I need to track, and then create a calendar request to my work calendar if it’s during business hours (like a Dr’s appointment).  My wife actually uses her Hotmail calendar to track her work schedule.

My wife is bad at remembering to update digital calendars, so once/month, I perform secretary duties, which just makes both our lives easier.  But the key is I update her calendar, from my account.  We can also view each other’s calendar on our PCs, our iPads and our SmartPhones.  Here’s how.

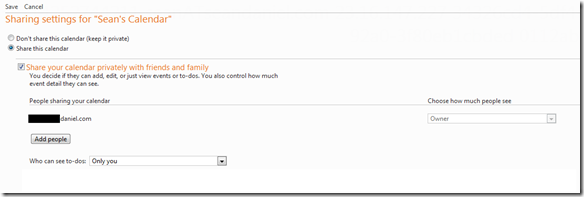
  1. From each account you want to share, go to Hotmail.com, log in, and click on your Calendar.
  2. Click on the Share link above your calendar
  3. Change the Don’t share this calendar (keep it private) to Share this calendar Share this Calendar
  4. When you select Add People you can select from your address book of people to share from and how much access you want that person to have.  For example, I had my wife give me co-owner access so I could update her calendar once/month with all the items she writes down in her day planner, and I gave her view details:  Calendar Access
  5. Then hit Save all the way down at the bottom of the page.image

The beauty with this is the calendar, with your access level just pops into your calendar list, you can choose to overlay it in your calendar (default), or just uncheck it.  Given that I want to know what my wife and daughter are up to, I just keep it active.  Then at a glance I’ll know if my wife is working on Friday or not and if I can go to soccer practice.

Even further into the beauty of Hotmail calendaring, is now this is accessible from all the different calendar views that you might use.  For example, if you use an iPhone or an iPad as we do in this house, you get your Hotmail calendar’s right there on your phone.

iOS Calendar

Additionally, if you use the Outlook Hotmail Connector (the primary reason I use this is for the calendar), then you can see all of your chosen calendar’s in the single Outlook view.  Which makes it for even easier update, select the calendar you want to update, and then just type into the calendar like you would with any Outlook calendar.

image

And yes, I am anal about my calendar’s, so I even make them all the same colour on all the views/devices.  My work calendar is always blue, my home calendar is always brown, Kendra’s calendar always yellow (except yellow doesn’t look good in the Outlook view).

I highly recommend sharing calendars for people you are with a lot, especially a spouse, it just makes life easier for us to stay in touch and know what’s going on.

As a final note.  If you wanted just do a 1-time send of your free/busy information to someone, Hotmail has you covered there.  I have yet to use this feature, because my personal calendar just isn’t that packed, and not everyone is as religious about their calendars as I am.  But on that same Share tab, Hotmail serves up all the personalized links and you can choose which one to send

Links Only

Tuesday, May 10, 2011

Small Business Server 2011 Hands On Labs

imageToday on the Official SBS Blog, the SBS 2011 Hands on Labs are released.  Recently attending the HTG Summit, we debuted these hands on labs for both Standard and Essentials. 

The labs are pretty awesome, they are all hosted on the Internet and you can launch into Virtual environments where you can play with an SBS 2011 Standard or SBS 2011 Essentials network before you buy it, or walk through a scenario after you bought it to make sure you have it ironed out. You can even send it to your employees to train them, or if you’re brave, your customers!  You can even walk through setup.  Close the VM and it’s back ready for the next person to try.

Windows Small Business Server 2011 End-End Scenarios

Access videos, Interactive HOL’s and click-thru demonstrations of the end-end demo’s for SBS 2011 Essentials and SBS 2011 Standard

Windows Small Business Server 2011 Essentials Technical Training

This technical training course provides you with the knowledge and skills to install, configure, administer and troubleshoot a Windows Small Business Server 2011 Essentials infrastructure. The course focuses on deployment, configuration and administration using the SBS 2011 Essentials Server, Management Dashboard, and add-in extensions.

Access this entire 6 HOL training today online

Download the partnering Training PowerPoint’s (you can also download the HOL click-thru’s for each of these modules below in the click-thru section)

Windows Small Business Server 2011 Standard Technical Training

This technical training course provides you with the knowledge and skills to install, configure, administer and troubleshoot a Windows Small Business Server 2011 Standard infrastructure. The course focuses on deployment, configuration and administration in the SBS 2011 Standard console, and SBS 2011 Premium Add-on.

Access this entire 6 HOL training today online

Download the Training PowerPoint’s, Videos and Click-Thru’s for this training

Friday, March 18, 2011

Going “Pro” using Proxure’s KeepVault Pro for Windows Home Server 2011

If you read my post from Tuesday of this week, on using Proxure’s KeepVault for Windows Home Server 2011 or Windows Small Business Server 2011, and when you got to the bottom, you thought to yourself.  Heck yeah I’m going Pro! Then this I post is for you. 

If you are running Windows Small Business Server 2011 Essentials, then this post will simply show you the features before you buy, because you had to get KeepVault’s pro version for your version of Windows Small Business Server. 

First, the upgrade process: If you have Windows Home Server 2011, and you’ve been enjoying the standard features KeepVault has to offer, but want to upgrade because one or more features in my previous blog post were appealing, here is how you do it:

  1. From the Launchpad, click on the Dashboard link and type in your Home Server Password to load up the Dashboard.
  2. Navigate to the KeepVault tab already installed in your Dashboard
  3. On the My Online Backup Job tab, click the link your account name.  For me it’s my email address to go to KeepVault’s website.
  4. Log into KeepVault’s website (you’ll need that subscription ID again) and follow the instructions to upgrade to Professional.
  5. Now you have to make the software aware that you’re running pro.  I remembered that the “Restore Files” link had an upgrade option, so I used that: Upgrade KeepVault Backup for Windows Home Server
  6. Since I already did the upgrade on the web, I just clicked Apply Upgrade, but you could also skip the first few steps and  have the Purchase Upgrade take you to KeepVault’s website.  When you’re finished upgrading the back end, you get this: Welcome to KeepVault Backup Pro
  7. Wow, I don’t even have to close the File Recovery wizard, I instantly have another option to selectively download from other computers I might backup. Selective Download
  8. I cancelled the above wizard, and I’m still in KeepVault Pro

You’ll now notice little changes throughout the UI like the above recovery option, for example, if you flip over to the My Local Backup Job tab, you’ll see in the drop down list that you can add a network drive to backup locally to:

Add a Network Drive ...

Sub Users and roaming backups

In addition, the Pro account now gives me access to add “Sub Users”.  Brilliant!  So now I can just install the Windows 7 version of KeepVault on my wife’s computer, and have her files and folders backed up directly to the cloud while she roams around with her laptop.  Or better yet, in Windows Small Business Server 2011, you often have roaming sales people or people who are away from the office for long periods of time (perhaps even satellite offices?) you can simply install KeepVault on their PC, sign them up as a sub-account and have them back up directly to the cloud.  Need a file from them? Then simply restore it to the server. 

Adding a Sub User Account

Accessing your Backup through the Web Portal

When you click on your account name (in my case my email address) in the My Online Backup Job and log in with your subscription ID, you can click on the Web Access tab.  It’ll prompt you for a web access password (I skipped this because I was so excited about Sub Users, If you’re like me, simply disable web access and enable web access and it will prompt you again).  Once you have your password in place, you can click the Open Now web link to jump right into your online backup.

Web Access Tab

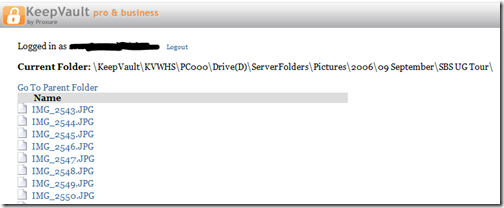
If you don’t want to log in with your Subscription ID, there is a quick jump to http://web.keepvault.com, which will jump you right to your web view of your backup.  Which by the way is raging fast, even though it’s reading encrypted files.  For example, if I wanted to download files from my 2006 User SBS Group Tour, I can simply browse to the folder, click the file and download:

KeepVault Backup Web Access

Retention Policy

As mentioned in my previous post on KeepVault, you also get a retention policy of 5 versions of files.  To restore previous versions of the files, simply do a Selective Restore, and when you get to the file, right-click it and choose the version of the file you want.  If there is no context menu, you only have one version (the latest) backed up.

From the Web Access, if you click on a file (screenshot above), you see all the versions of the file available to download.  You should keep in mind the following:

  • If you delete a protected file from KeepVault, it deletes all versions
  • File versions younger than 48 hours are never deleted (if you save a word document 10 times for example in the same day and backup is configured to “automatic”
  • The oldest 5 versions of a file are pruned (read recovered storage space) after the 10th version of a file is successfully uploaded

So as it turns out, it’s pretty easy to go Pro, if that suites you, and Small Business Owners, now you have details of all the Power Pro gives you at your finger-tips.

Tuesday, March 15, 2011

Online Backup using Proxure’s KeepVault for Windows Home Server 2011 and Windows Small Business Server 2011

As I’ve mentioned before, being a photographer, my photos are my most critical piece of data that lives on my Home Server.  When using Windows Home Server v1, I had found an Online Backup solution that I previously reviewed on this blog.  While I still think it’s a good solution, it has some draw-backs depending on the Amazon S3 back-end.  Like the cost of Amazon S3 is about as expensive as it gets, and signing up for Amazon S3 was probably one of the more confusing processes I have ever done.

While at SMB Nation 2010 in Las Vegas, I had ran into a company called Proxure who build a solution called KeepVault.  I watched a demo of their solution run and it seemed reasonable, at least to check out.  I thought it was pretty cool that they offer versions for Windows XP, Vista, Windows 7, Standard Server (03 & 08 via their Professional version), and most importantly for me: Windows Home Server.

KeepVault Add-In

While this blog covers KeepVault on Windows Home Server 2011 (codename “Vail),  the same add-in offers cloud storage to both the Windows Small Business Server 2011 Essentials (codename “Aurora”) and the Windows Storage Server 2008 R2 Essentials.  However, for these business products, you need to get KeepVault Pro.  The steps and UI, aside from the color of the dashboard, is identical.  KeepVault Pro can also be used on Windows Small Business Server 2011 Standard (codename “SBS7”), although that UI is not shown in this blog post.

Back to the review: The first thing I notice was KeepVault doesn’t bill you for what you use, they bill you for storage space in chunks (40Gb, 80GB, 130GB, 200GB … 3.5TB!).  So if you’re only backing up a very small amount of data, you could end up over paying, but if you compare to Amazon’s 15cents/GB (up to the first TB), you really see a cross over at about 15GB.  Once you get over 15GB, Proxure seems to win hands down on cost.  Plus when you hit the top mark, you click a link and you can bump up your storage. 

The Setup Process

Using the AWIECO Drive Info add-in, I determined I wanted to back up my Pictures and Documents, the things that I really care about.  That came out to about 117GB, so I signed up for the 130GB plan from Proxure.  You don’t need the AWIECO add-in, but it made it a “glance” to compute.

Installing the add-in is just as painless as installing any add-in.  Just double click on it on the server, or on any server-joined client, read and accept the EULA, and then Install it.  You’ll have to re-start the Dashboard to have it appear in the global tabs.

Proxure KeepVault Add-In

The initial page doesn’t look intimidating at all.  Simply click on the Order a KeepVault Backup for Windows Home Server Subscription Now button and sign up. I thought it was pretty slick you could pay via PayPal or with a standard credit card. I’m all for yearly payments too, so I got to save my 10%!! Within 5 minutes I was emailed my subscription ID. Typing that in, with my email ID and I’m good to go.

Choosing an encryption key I can type one in myself, or KeepVault will randomly generate one for me.  If you generate one yourself, you have a risk that you forget your key and now your cloud backup is useless.  If you’re like me, you’ve installed WHS 2011 on new hardware and it’s probably a while before that fails, so you might forget it.  If you don’t want this cumbersome task, you can let KeepVault choose one for you.  The interesting thing here is that they generate the key based on your ID and subscription numbers (as its computer agnostic).  To me that means that someone at KeepVault *could* decrypt your backup.  Although my suspicion here is that you are still safe because our data is stored in blobs and because KeepVault has more than one customer, it’ll be hard for the lay-man IT person at KeepVault to match this up to your backup.  For what it’s worth, I went with “Let KeepVault choose one for me”.

I like how KeepVault really focused on the simplicity of the solution.  With the previous solution I reviewed I could create multiple backup jobs and multiple schedules, which was nice, because parts of my collection barely every change, I just wanted them backed up.  But it was overwhelming at first.  KeepVault’s “Always/Real Time” schedule by default and the single “Job” configuration removes any daunting thoughts you might have.  The only confusion on the whole page for me was enabling the protection on the shares.  I didn’t realize the grey bar across the page were actually buttons, as most of the WHS 2011 console they are just “headers” of columns.  So once you realize that you can just click on Enable Protection to add that shared folder to the cloud backup, it was all good.  As any good add-in, you can also right-click on a Share in the list and select to enable or disable it from the context menu.

Enable Protection for Shared Folders

Using the Add button you can also add any folder you wish on the system, so it doesn’t have to be shared out to the network in order for you to back it up.  You’ll also notice in the screenshot above that I have changed the schedule to be between midnight and 6am.  This is because I am uploading 115GB of data, and I work from home, so from 8am-6pm I use my bandwidth for work, and from 6pm-midnight, I use it for entertainment.  By default, KeepVault will Encrypt and Compress your data on the box before it sends it over the wire.  Nifty…

KeepVault Job and Setting Options

The only feature that I think is missing from the Job scheduler is the ability to run 24/7 but use less bandwidth during the day, and all of it at night.

Looking at the other options, you can always pause the backup, view and delete your protected files online (ie. if you want to permanently delete some files, you can delete the file locally, and use this task to delete it from the cloud as well), view the protection/upload history, configure a proxy if your ISP requires one, and most importantly (the reason we all do backups), Recover Files.

The Event Log is KeepVault’s own list of events (like service start/stop, etc events).  Messaging (while somewhat confusing of a name, maybe “Job Notifications” or “Job Alerts” might be better, is actually really well done.  You can receive emails or SMS alerts (via your carriers E-Mail to SMS service) based on your backup failure rates.  KeepVault obviously has some mail service on the back-end that they allow you access too, because unlike the WHS 2011 Built-in Alerts, they don’t ask you to configure an SMTP service.

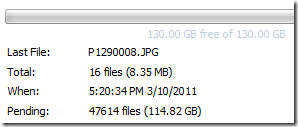
When the backup eventually kicks off, if you’re backing up as much data as I am, even with the 1900kbps as advertised in my standard version of KeepVault, I’m in for a long wait…  This is the same with every cloud solution the first time you back-up.  The progress is good, you get both global progress as well as file level progress

Global Progress of Upload

From 5pm to 9am (~16 hours) on a Thursday night over my cable connection, I backed up 5.1GB to KeepVault’s cloud.  Not quite as fast as the Amazon S3 solution, but then again, I don’t have a Pro account with KeepVault.

Once your data is uploaded, it lives in Proxure’s Data-Center, encrypted for only you to download in the event of a disaster.  Fingers crossed that this is just an insurance policy, and never used.

KeepVault Local Backup

You may have noticed in the above screenshots there was another sub-tab called My Local Backup Job.  Yes, KeepVault can back up to a local disk.  In the Standard version, it’s similar to the built in WHS 2011 Backup in the fact that it can only backup to hard drives attached to the system (the recommendation is still for USB for offsite storage).  If you have KeepVault’s Premium version, you can also back up to SMB Share (i.e. \\NAS\Share), so if you have another device on your network, you can back up to another share on your network.

Also, you’ll notice that this tab also allows you to compress or encrypt.  So if you’re taking that disk offsite, the encryption piece might be something you want to consider for safe storage of that disk should it be compromised.  If you don’t encrypt it.  Files are stored in “explorer friendly” format so a restore on any computer without KeepVault installed is possible.  In comparison, WHS 2011 backup is stored in VHD format, which requires you to first mount the VHD before you can actually do the restore of files.

Recovery of Files

File Recovery

The One-Click Recovery, really is just that.  Let’s say that you have a little child at home, and their favorite past time was to go into your prized photo library and use the delete button, just randomly through your collection.  Or maybe you were searching for your favorite files, and then miss-clicked and deleted your favorite files across your 100GB collection.  Restoring that can be painful.  This One-Click Recovery makes that a breeze.  As *soon* as you click next (i.e., one click), the service will compare the cloud to the local box, and recover all missing files.  If the file exists, the restore will be skipped, preferring the local file over a recovery.  So you can recover all those files our child deleted randomly, yes with one-click.  Obviously this is how you would go on a new server, because none of the files exist.

Selective File Recovery DialogThe Selective Recovery is more of the natural way we think about recovering.  You get your standard tree-view and you can drill into your cloud backup and select different files to recover.

This way is not a single-click restore, but a selective restore.  On the left-hand side if you select a folder, you can select files and folders on the right-hand side for restore.  So if you’re restoring a whole folder, select the folder above it, and then check the box next to the folder you want to restore. If you’re restoring all but a few files in a folder, that can take a few extra clicks.  Thankfully you can use the CTRL or SHIFT Keys to multi-select as you need (similar to Windows Explorer). Before moving on, you need to select if you want to over-write existing files.  This was weird to see on this dialog, because I figured it would be a sub-option on the recovery location which is next.

Once you’re comfortable with the set of files you’re going to restore (and if you want to over-write files), you next choose if you want to restore the files to the original location, or another location.  Unless I’m restoring a completely new server, I’d probably always choose another location to make sure that I’m getting what I expected.  Once you’ve chosen the folder for the location of the restore, I hit “Recover”, and just wait for the software to download the files and put them in the appropriate place.

Recovery Progress

The restore is in fact pretty painless, and yes, my photos came down in-tact…

Test Restore Thumbnail View

Why Go Pro?

As you saw above, KeepVault has two versions, Standard (which they just call “KeepVault”) and Professional (or “KeepVault Pro”).  As a home user, you  might not ever need the Pro version, but it’s certainly something you need for businesses.  So what do you get if you go Pro?

  • Support for Server solutions (aside from the WHS).  For example, the Windows Small Business Server 2011 Essentials, Standard and Windows Storage Server 2008 R2 Essentials.  Also, if you have additional servers in your environment, you can back them up to the same account (Standard Server 2008 and Standard Server 2003).
  • A much faster upload rate (5250kbps instead of 1900kbps).  This comes in handy with that first backup.  The faster you get the files to the cloud, the sooner you are protected!
  • Local Backup to UNC share.  Meaning you can back up your server to a local server share as well.
  • Higher encryption levels (256-bit encryption can be chosen instead of 128-bit)
    • This reminds me.  If you backup a file with the pro version, and then downgrade, your standard client can’t understand the 256-bit encryption and thus can’t restore the files.  It does work the other way around though.  So just be careful which way you go!
  • More Access to your data (Web Access, cross device access for restore) and other administration features.  Notice my screenshot under “Restore” above, if I had the pro version, I could backup files and folders from other computers, right to this single computer.  This means I could support cloud backup on my client computers, and then restore this to the server in the event that the client was dropped while out on a trip!  Another brilliant business feature.
  • If you’re using a management solution, error notification includes system events, so you can track errors in your online backup with your monitoring tools.
  • 5 version retention policy.  If you are with KeepVault standard, you only have the latest version stored on the internet, with Pro it keeps up to 5 versions so you can go back in time when you wish to restore.

As a business user, you’ll have to use the Professional version to get the add-in installed.  As a Home User, you should review the features above and gauge how critical they will be for you. 

If you’re still debating having a Cloud Backup solution for your most prized data, you should approach it like an insurance plan.  You have one for your house, you have one for your car.  You cross your fingers every day that you don’t need to use it, but when you do, it’s there for you.  If your hard-drive fails, recovery of such drives can often cost $1,000s, with no guarantee you can get your data back.  If you’re house burns down, like my uncle’s, this sort of thing is priceless.

I’m using KeepVault, what are you using?

UPDATE: Want to learn more about KeepVault Pro? Check out my Going Pro with Proxure’s KeepVault blog post.

Wednesday, February 23, 2011

Windows Server Solutions Best Practice Analyzer (BPA)

Wow, the new Best Practice analyzer is up and ready for download! This new BPA can be installed on the following products and will show you best practices for each one!

  • Windows Small Business Server 2011 Standard
  • Windows Small Business Server 2011 Essentials
  • Windows Multipoint Server 2011
  • Windows Storage Server 2010 R2 Essentials

So if you’re unsure if you’re doing something right, or want to make sure you’re following best practices, get the BPA installed!


UPDATE: As called out in the comments, you'll also need the Microsoft Baseline Configuration Analyzer 2.0 before installing.