Showing posts with label 2011 Add-in. Show all posts

Friday, January 20, 2012

Developers! How to List your Small Business Server and Windows home Server Apps on Microsoft Pinpoint

Are you a developer or developer firm that’s built an application for SBS 2011 Essentials, SBS 2011 Premium Add-on, Windows Storage Server 2008 R2 Essentials, and Windows Home Server 2011? Then you should list your application in Microsoft Pinpoint. Listing here will give you greater awareness of your application to your target audience.

For example, these links are inside the product:

Over on the Small Business Server Wiki, there is a how-to guide on how to go about doing this.  You can find that link here.

Before you can begin listing your applications:
  1. You must join the Microsoft Partner Network. Before you can begin listing your applications on Pinpoint, you must create an account with the Microsoft Partner Network (MPN) and create a descriptive overview for your company. It can take up to five business days for your new account to activate in Pinpoint after establishing your membership in the Microsoft Partner Network.
  2. Already a member? If so, then you can proceed to create your profile in Pinpoint. If you are already a partner but are not listed on Pinpoint and believe you should be, contact the Pinpoint team.

Microsoft Pinpoint

  • Sign-in using your MPN LiveID
  • Click on the Dashboard in the upper right hand corner
  • Click on Add or Edit Profiles in the nav bar
  • Click on the Apps + Services tab
  • Click the New button
  • Follow the rest of the wizard to create your listing
  • Wait for the application to be published in the marketplace

What are you waiting for? The complete guide is here, and you can jump to Pinpoint here.

Thursday, November 10, 2011

Home Server and SBS Add-in to Automate Client Backup of your MAC

One of the most popular posts on my blog is how to enable Apple’s Time Machine backup to backup to your Windows Home Server 2011 or Windows Small Business Server 2011 Essentials.  As it turns out, a company named Orbital Technologies has decided to build an add-in that enables this functionality without the need for you to walk through the steps of creating those confusing sparse files.

UWHS - Orbital Backup Configuration for MacThat add-in has been reviewed over on the famous UsingWindowsHomeServer blog, specifically in a blog post here, covering the preview of the Orbital Backup Configuration for Mac.  They additionally covered the add-in again when it was available.

Simply install the add-in, open up the dashboard on the MAC client and go to add-ins, Orbital utilities and follow along.  All you  need to know is your username and password to the server.  easy right? also free!

Keep in mind that you can still do the manual steps provided in my post if you prefer not to install anything as all this add-in does is the configuration pieces for you.

You can download the add-in directly from the Using Windows Home Server Forums, or We Got Served forums. The add-in should work fine on Windows Home Server 2011, Windows Small Business Server 2011 Essentials, and also Windows Storage Server 2008 R2 Essentials.  If you’re using any other Windows product, the manual steps are for you.

Thursday, June 30, 2011

Using the new Office365 with SBS 2011 Essentials

Over on the Official SBS blog, they have a new post about how you can use Office365 with SBS 2011 for a better together story.

SBS 2011 was designed from the ground up to work with hosted versions of Exchange and SharePoint, such as Office365, or BPOS. But you don’t need to wait for any integration pieces to be in play, you can get started today. Check out these videos for more details:

What you can do Today

What you can do with the Office 365 integration module


Thursday, June 16, 2011

SMB MVP Community Roadshow

HP and Microsoft have joined together with our Most Valuable Professionals (MVPs) to visit 66 cities in Canada, Australia, Europe and of course the United States.  They are touting it as a real-world experience and advice talk by the MVPs who live and breath the product ever day.  No marketing talk!

Kevin and Dana give it to you straight.

Kevin Beares and Dana Epp talk about SMB MVP Community Roadshow

These guys brought down the house in Vancouver, BC tonight.  Tomorrow night they hit up Victoria, BC.  Then are out to talk to you, in the rest of the world!

Register for the roadshow nearest you

Tuesday, June 14, 2011

Windows Phone 7 Add-in for SBS 2011 Essentials and WHS 2011 (Release Candidate)

Today the Release Candidate of the Windows Server Solutions Phone Connector for Small Business Server 2011 Essentials (aka Integrating Windows Phone 7 with your SBS 2011 Essentials Server) is available

clip_image001

The purpose of this Add-in is to enable Remote Server Management tasks for SBS 2011 Essentials including

Alerts

After you complete the authentication steps with the server that you are trying to connect to, an alerts listing is the first panorama item that the application launches into. This feature brings the Alert Viewer that you know from the server, to the phone.

If an alert is displayed white, it is active and included in the alert count. If an alert is dimmed, that means the alert is disabled, and it is not included in the alert count. Any alert item can be clicked to view the full alert text just as on a computer. Contextual menu options include enabling or disabling an alert, and performing a repair action if one was assigned to this alert.

Users

The user-panorama item performs basic user management tasks, including:

  • Viewing user account details
  • Enable or disable a user account
  • Change a user account password

If you disable a user account, that is a reversible action. The moment a user account gets disabled, it causes the same effect as it would if you disable it by using the dashboard. The user’s access to Remote Web Access, the phone application, and any server resources is turned off.

Devices

“Devices” is a panorama item that lets you:

  • View server-joined computer and Mac details.
  • View the backup status that every device last reported to the server.
  • Start or stop a backup for any computer or the server (from the contextual menu).

Live Tile Support

clip_image002
If you pin the application to the home screen of your Windows Phone 7, you will be able to see a variety of at-a-glance information without launching into the application. An opt-in using the settings menu is required.

The at-a-glance information includes:

  • Count and type of network health alerts.
  • Percentage of storage use of your main disk.
  • Server name sending this information.

The Windows Phone 7 application requires both a server sided add-in to be installed on the SBS 2011 Essentials Server, as well as Windows 7 Phone application downloadable via marketplace.

If you end up getting the Windows Home Server version, you’ll also get live media streaming

Media Support (Home Server Only)

The Media panorama lets you discover and view streams of media elements that you stored on your server in the appropriate shared folders (such as Music, Video and Picture shares).

clip_image010Music

MP3 non-Digital Rights Management-protected songs will be streamed directly from the server to your phone. Album art is also transported. Your library is searchable and can be organized in different views to help find what you want fast.


clip_image012Pictures

“Pictures” has a variety of functions:

  • Discover all .png and .jpg images that are stored in the Pictures shared folder on the server. Subfolders are recognized.
  • Open a picture full-screen to view it on the phone.
  • Save a copy of the picture to the phone, using its original dimensions and resolution  (to be viewed later in the built-in Pictures hub of any Windows Phone 7).
  • Take a picture with the phone’s camera and upload it to the server.
  • Upload any picture that is stored in the Pictures hub of the phone to the server.

clip_image014Videos

The “Videos” feature allows you to discover and view videos that are stored on your server in the Videos shared folder.

Even though discoverable by this feature, the variety of video formats is high and not all formats can be streamed. For details about which video formats can be streamed from the server and accepted by the phone, see Supported Media Codecs for Windows Phone.


For further information, and access to the downloads to start testing today please visit the SBS Connect Site, or WHS Connect site depending on your product.

Please note this is a release candidate and as such is for testing purposes only.  Link Back to the Official SBS Blog Post.

Monday, May 30, 2011

Finding and Listing Add-ins for Small Business Server Essentials

Microsoft PinPoint

Finding Add-ins for Small Business Server Essentials

If you’re looking how you can extend your SBS Essentials software with add-ins designed specifically for the SBS space, then you want to point your browser over at the Microsoft Website to find the SBS Partners.  This allows you to find applications for all the versions of SBS, but to get right into the add-ins for SBS Essentials, you can skip a click and jump right to the PinPoint directory.  PinPoint is an online Marketplace for Microsoft that you can use to find services or software that suite your business.  Simply go here and you can search for the software you want.  Note that WHS 2011 and SBS 2011 Essentials share the same SDK.  As a result you see both SBS and WHS items listed here.

Listing your Add-in in the PinPoint directory

So you’re an Independent Software Vendor (ISV) and you want to list your add-in in the PinPoint directory? that’s pretty easy too.  Before starting you first need to:

  1. Join the Microsoft Partner Network. Before you can begin listing your applications
    on Pinpoint, you must create an account with the Microsoft Partner Network (MPN) and create a descriptive overview for your company. It can take up to five business days for your new account to activate in Pinpoint after establishing your membership in the Microsoft Partner Network.
  2. If you are already a member, or have finished the step above, the next stop is to create your PinPoint profile.

Once you are a Microsoft Partner and have a PinPoint profile, you can being to list your application for discovery by customers world wide.  This this process is 8 steps and you can save as you go!

To get started, download this handy PDF guide.

Friday, April 08, 2011

Using the KeepVault Connector to backup Roaming Client Computers

Previously, I covered the basics of Proxure’s KeepVault Online Backup, as well as what you got if you went Pro.  With the release of the RC of KeepVault for, I noticed I didn’t cover the KeepVault Connector, which is a separate add-in for Windows Home Server 2011, and Windows Small Business Server 2011 Essentials than the original KeepVault add-in. 

This add-in allows you to do the incredible.  Back up roaming computers via a “Sync” while the computer is connected to the Internet, anywhere.  Now I use Windows Live Mesh to sync most of my items between my computers and the cloud, but there are some things that I don’t.  For example, if I’m travelling and I process photos, those don’t get into my Mesh, but I still worry about them.  This solution solves that.

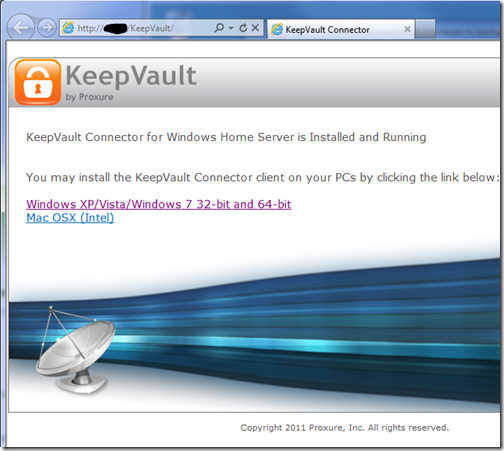
Simply download and install the KeepVault Connector for Mac & PC.  Make sure you choose the WHS/SBS 2011 version, and not the WHS Original.  Once installed, and the dashboard restarted, you’ll notice that KeepVault has an extra tab

KeepVault Connector

This add-in installs into the dashboard and adds a \KeepVault directory to your default website.  It also reads your servername (orange above), your remote access domain name (blue above) and provides an extremely secure recommended password (yellow above).  Simply click the link to Download and install the client setup.  This downloads the client component directly from your server:

KeepVault Client Download

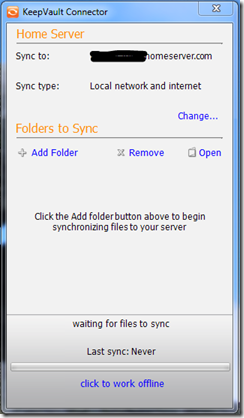
KeepVault Connector Client ApplicationOnce installed, just find the KeepVault Connector in the start menu, or in your system tray, and load up this fancy little “Sync” application and click the Add Folder button.  This will allow you to to pick a local folder on your client computer which will perform the backup. 

For me I created a “backup to home server” folder as a test, and dropped a few files in there.  While I’m local on the network, the backups are SUPER quick, but away from the network they’ll be throttled by my connection speed back to my server.

You can also choose to modify the backup locally only, or over the Internet.  Given that the built in Client Backup functionality runs when you’re local, you might not use this.  However, it’s some nice flexibility if you use a tethered 3G connectivity, so you can choose to sync when you’re on wi-fi and by default not always.  Speaking of Sync, you’ll notice at the very bottom you can click the hyper-link to work offline, so if you end up tethering your PC to your cell phone and then dumping a ton of pictures in there, you can click that and work offline, and prevent the backup from happening over your 3G connection, if you valued cost of data over loss of data.  :o)

If I had a gripe with this system, it’s only that the KeepVault connector isn’t also available to launch directly from Launchpad via the Add-ins area.  As you can see AWIECO does take advantage of this, it’d be great to see “KeepVault Connector” in here:

Launchpad with Add-ins

Add ins

I’ve heard on a few occasions that the road warrior doesn’t like the stop in the office to do a much needed backup, perhaps this solution can help.  Backups can be done from home, or coffee shops, or in my case, at work to my home!

Tuesday, March 29, 2011

Windows Small Business Server 2011 Essentials and Intel vPro Add-in

As we announced SBS 2011 Essentials RTM this morning, I thought it would be interesting to also highlight a really cool add-in that allows you to not only view your computers, but if you have the Intel vPro chipset, you can also control power management of your PCs, right from your console with the Intel vPro add-in. This was demonstrated at MMS 2011:


This solution is running on top of Acer's AC100 SBS Solution with the new Intel Xeon processor.

Friday, March 18, 2011

Going “Pro” using Proxure’s KeepVault Pro for Windows Home Server 2011

If you read my post from Tuesday of this week, on using Proxure’s KeepVault for Windows Home Server 2011 or Windows Small Business Server 2011, and when you got to the bottom, you thought to yourself.  Heck yeah I’m going Pro! Then this I post is for you. 

If you are running Windows Small Business Server 2011 Essentials, then this post will simply show you the features before you buy, because you had to get KeepVault’s pro version for your version of Windows Small Business Server. 

First, the upgrade process: If you have Windows Home Server 2011, and you’ve been enjoying the standard features KeepVault has to offer, but want to upgrade because one or more features in my previous blog post were appealing, here is how you do it:

  1. From the Launchpad, click on the Dashboard link and type in your Home Server Password to load up the Dashboard.
  2. Navigate to the KeepVault tab already installed in your Dashboard
  3. On the My Online Backup Job tab, click the link your account name.  For me it’s my email address to go to KeepVault’s website.
  4. Log into KeepVault’s website (you’ll need that subscription ID again) and follow the instructions to upgrade to Professional.
  5. Now you have to make the software aware that you’re running pro.  I remembered that the “Restore Files” link had an upgrade option, so I used that: Upgrade KeepVault Backup for Windows Home Server
  6. Since I already did the upgrade on the web, I just clicked Apply Upgrade, but you could also skip the first few steps and  have the Purchase Upgrade take you to KeepVault’s website.  When you’re finished upgrading the back end, you get this: Welcome to KeepVault Backup Pro
  7. Wow, I don’t even have to close the File Recovery wizard, I instantly have another option to selectively download from other computers I might backup. Selective Download
  8. I cancelled the above wizard, and I’m still in KeepVault Pro

You’ll now notice little changes throughout the UI like the above recovery option, for example, if you flip over to the My Local Backup Job tab, you’ll see in the drop down list that you can add a network drive to backup locally to:

Add a Network Drive ...

Sub Users and roaming backups

In addition, the Pro account now gives me access to add “Sub Users”.  Brilliant!  So now I can just install the Windows 7 version of KeepVault on my wife’s computer, and have her files and folders backed up directly to the cloud while she roams around with her laptop.  Or better yet, in Windows Small Business Server 2011, you often have roaming sales people or people who are away from the office for long periods of time (perhaps even satellite offices?) you can simply install KeepVault on their PC, sign them up as a sub-account and have them back up directly to the cloud.  Need a file from them? Then simply restore it to the server. 

Adding a Sub User Account

Accessing your Backup through the Web Portal

When you click on your account name (in my case my email address) in the My Online Backup Job and log in with your subscription ID, you can click on the Web Access tab.  It’ll prompt you for a web access password (I skipped this because I was so excited about Sub Users, If you’re like me, simply disable web access and enable web access and it will prompt you again).  Once you have your password in place, you can click the Open Now web link to jump right into your online backup.

Web Access Tab

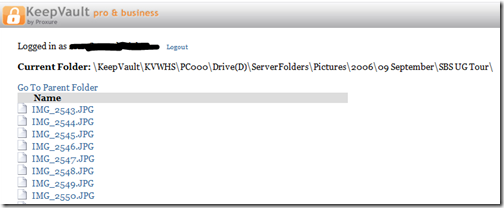
If you don’t want to log in with your Subscription ID, there is a quick jump to http://web.keepvault.com, which will jump you right to your web view of your backup.  Which by the way is raging fast, even though it’s reading encrypted files.  For example, if I wanted to download files from my 2006 User SBS Group Tour, I can simply browse to the folder, click the file and download:

KeepVault Backup Web Access

Retention Policy

As mentioned in my previous post on KeepVault, you also get a retention policy of 5 versions of files.  To restore previous versions of the files, simply do a Selective Restore, and when you get to the file, right-click it and choose the version of the file you want.  If there is no context menu, you only have one version (the latest) backed up.

From the Web Access, if you click on a file (screenshot above), you see all the versions of the file available to download.  You should keep in mind the following:

  • If you delete a protected file from KeepVault, it deletes all versions
  • File versions younger than 48 hours are never deleted (if you save a word document 10 times for example in the same day and backup is configured to “automatic”
  • The oldest 5 versions of a file are pruned (read recovered storage space) after the 10th version of a file is successfully uploaded

So as it turns out, it’s pretty easy to go Pro, if that suites you, and Small Business Owners, now you have details of all the Power Pro gives you at your finger-tips.

Tuesday, March 15, 2011

Online Backup using Proxure’s KeepVault for Windows Home Server 2011 and Windows Small Business Server 2011

As I’ve mentioned before, being a photographer, my photos are my most critical piece of data that lives on my Home Server.  When using Windows Home Server v1, I had found an Online Backup solution that I previously reviewed on this blog.  While I still think it’s a good solution, it has some draw-backs depending on the Amazon S3 back-end.  Like the cost of Amazon S3 is about as expensive as it gets, and signing up for Amazon S3 was probably one of the more confusing processes I have ever done.

While at SMB Nation 2010 in Las Vegas, I had ran into a company called Proxure who build a solution called KeepVault.  I watched a demo of their solution run and it seemed reasonable, at least to check out.  I thought it was pretty cool that they offer versions for Windows XP, Vista, Windows 7, Standard Server (03 & 08 via their Professional version), and most importantly for me: Windows Home Server.

KeepVault Add-In

While this blog covers KeepVault on Windows Home Server 2011 (codename “Vail),  the same add-in offers cloud storage to both the Windows Small Business Server 2011 Essentials (codename “Aurora”) and the Windows Storage Server 2008 R2 Essentials.  However, for these business products, you need to get KeepVault Pro.  The steps and UI, aside from the color of the dashboard, is identical.  KeepVault Pro can also be used on Windows Small Business Server 2011 Standard (codename “SBS7”), although that UI is not shown in this blog post.

Back to the review: The first thing I notice was KeepVault doesn’t bill you for what you use, they bill you for storage space in chunks (40Gb, 80GB, 130GB, 200GB … 3.5TB!).  So if you’re only backing up a very small amount of data, you could end up over paying, but if you compare to Amazon’s 15cents/GB (up to the first TB), you really see a cross over at about 15GB.  Once you get over 15GB, Proxure seems to win hands down on cost.  Plus when you hit the top mark, you click a link and you can bump up your storage. 

The Setup Process

Using the AWIECO Drive Info add-in, I determined I wanted to back up my Pictures and Documents, the things that I really care about.  That came out to about 117GB, so I signed up for the 130GB plan from Proxure.  You don’t need the AWIECO add-in, but it made it a “glance” to compute.

Installing the add-in is just as painless as installing any add-in.  Just double click on it on the server, or on any server-joined client, read and accept the EULA, and then Install it.  You’ll have to re-start the Dashboard to have it appear in the global tabs.

Proxure KeepVault Add-In

The initial page doesn’t look intimidating at all.  Simply click on the Order a KeepVault Backup for Windows Home Server Subscription Now button and sign up. I thought it was pretty slick you could pay via PayPal or with a standard credit card. I’m all for yearly payments too, so I got to save my 10%!! Within 5 minutes I was emailed my subscription ID. Typing that in, with my email ID and I’m good to go.

Choosing an encryption key I can type one in myself, or KeepVault will randomly generate one for me.  If you generate one yourself, you have a risk that you forget your key and now your cloud backup is useless.  If you’re like me, you’ve installed WHS 2011 on new hardware and it’s probably a while before that fails, so you might forget it.  If you don’t want this cumbersome task, you can let KeepVault choose one for you.  The interesting thing here is that they generate the key based on your ID and subscription numbers (as its computer agnostic).  To me that means that someone at KeepVault *could* decrypt your backup.  Although my suspicion here is that you are still safe because our data is stored in blobs and because KeepVault has more than one customer, it’ll be hard for the lay-man IT person at KeepVault to match this up to your backup.  For what it’s worth, I went with “Let KeepVault choose one for me”.

I like how KeepVault really focused on the simplicity of the solution.  With the previous solution I reviewed I could create multiple backup jobs and multiple schedules, which was nice, because parts of my collection barely every change, I just wanted them backed up.  But it was overwhelming at first.  KeepVault’s “Always/Real Time” schedule by default and the single “Job” configuration removes any daunting thoughts you might have.  The only confusion on the whole page for me was enabling the protection on the shares.  I didn’t realize the grey bar across the page were actually buttons, as most of the WHS 2011 console they are just “headers” of columns.  So once you realize that you can just click on Enable Protection to add that shared folder to the cloud backup, it was all good.  As any good add-in, you can also right-click on a Share in the list and select to enable or disable it from the context menu.

Enable Protection for Shared Folders

Using the Add button you can also add any folder you wish on the system, so it doesn’t have to be shared out to the network in order for you to back it up.  You’ll also notice in the screenshot above that I have changed the schedule to be between midnight and 6am.  This is because I am uploading 115GB of data, and I work from home, so from 8am-6pm I use my bandwidth for work, and from 6pm-midnight, I use it for entertainment.  By default, KeepVault will Encrypt and Compress your data on the box before it sends it over the wire.  Nifty…

KeepVault Job and Setting Options

The only feature that I think is missing from the Job scheduler is the ability to run 24/7 but use less bandwidth during the day, and all of it at night.

Looking at the other options, you can always pause the backup, view and delete your protected files online (ie. if you want to permanently delete some files, you can delete the file locally, and use this task to delete it from the cloud as well), view the protection/upload history, configure a proxy if your ISP requires one, and most importantly (the reason we all do backups), Recover Files.

The Event Log is KeepVault’s own list of events (like service start/stop, etc events).  Messaging (while somewhat confusing of a name, maybe “Job Notifications” or “Job Alerts” might be better, is actually really well done.  You can receive emails or SMS alerts (via your carriers E-Mail to SMS service) based on your backup failure rates.  KeepVault obviously has some mail service on the back-end that they allow you access too, because unlike the WHS 2011 Built-in Alerts, they don’t ask you to configure an SMTP service.

When the backup eventually kicks off, if you’re backing up as much data as I am, even with the 1900kbps as advertised in my standard version of KeepVault, I’m in for a long wait…  This is the same with every cloud solution the first time you back-up.  The progress is good, you get both global progress as well as file level progress
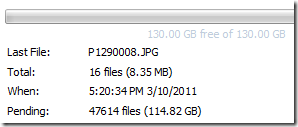
Global Progress of Upload

From 5pm to 9am (~16 hours) on a Thursday night over my cable connection, I backed up 5.1GB to KeepVault’s cloud.  Not quite as fast as the Amazon S3 solution, but then again, I don’t have a Pro account with KeepVault.

Once your data is uploaded, it lives in Proxure’s Data-Center, encrypted for only you to download in the event of a disaster.  Fingers crossed that this is just an insurance policy, and never used.

KeepVault Local Backup

You may have noticed in the above screenshots there was another sub-tab called My Local Backup Job.  Yes, KeepVault can back up to a local disk.  In the Standard version, it’s similar to the built in WHS 2011 Backup in the fact that it can only backup to hard drives attached to the system (the recommendation is still for USB for offsite storage).  If you have KeepVault’s Premium version, you can also back up to SMB Share (i.e. \\NAS\Share), so if you have another device on your network, you can back up to another share on your network.

Also, you’ll notice that this tab also allows you to compress or encrypt.  So if you’re taking that disk offsite, the encryption piece might be something you want to consider for safe storage of that disk should it be compromised.  If you don’t encrypt it.  Files are stored in “explorer friendly” format so a restore on any computer without KeepVault installed is possible.  In comparison, WHS 2011 backup is stored in VHD format, which requires you to first mount the VHD before you can actually do the restore of files.

Recovery of Files

File Recovery

The One-Click Recovery, really is just that.  Let’s say that you have a little child at home, and their favorite past time was to go into your prized photo library and use the delete button, just randomly through your collection.  Or maybe you were searching for your favorite files, and then miss-clicked and deleted your favorite files across your 100GB collection.  Restoring that can be painful.  This One-Click Recovery makes that a breeze.  As *soon* as you click next (i.e., one click), the service will compare the cloud to the local box, and recover all missing files.  If the file exists, the restore will be skipped, preferring the local file over a recovery.  So you can recover all those files our child deleted randomly, yes with one-click.  Obviously this is how you would go on a new server, because none of the files exist.

Selective File Recovery DialogThe Selective Recovery is more of the natural way we think about recovering.  You get your standard tree-view and you can drill into your cloud backup and select different files to recover.

This way is not a single-click restore, but a selective restore.  On the left-hand side if you select a folder, you can select files and folders on the right-hand side for restore.  So if you’re restoring a whole folder, select the folder above it, and then check the box next to the folder you want to restore. If you’re restoring all but a few files in a folder, that can take a few extra clicks.  Thankfully you can use the CTRL or SHIFT Keys to multi-select as you need (similar to Windows Explorer). Before moving on, you need to select if you want to over-write existing files.  This was weird to see on this dialog, because I figured it would be a sub-option on the recovery location which is next.

Once you’re comfortable with the set of files you’re going to restore (and if you want to over-write files), you next choose if you want to restore the files to the original location, or another location.  Unless I’m restoring a completely new server, I’d probably always choose another location to make sure that I’m getting what I expected.  Once you’ve chosen the folder for the location of the restore, I hit “Recover”, and just wait for the software to download the files and put them in the appropriate place.

Recovery Progress

The restore is in fact pretty painless, and yes, my photos came down in-tact…

Test Restore Thumbnail View

Why Go Pro?

As you saw above, KeepVault has two versions, Standard (which they just call “KeepVault”) and Professional (or “KeepVault Pro”).  As a home user, you  might not ever need the Pro version, but it’s certainly something you need for businesses.  So what do you get if you go Pro?

  • Support for Server solutions (aside from the WHS).  For example, the Windows Small Business Server 2011 Essentials, Standard and Windows Storage Server 2008 R2 Essentials.  Also, if you have additional servers in your environment, you can back them up to the same account (Standard Server 2008 and Standard Server 2003).
  • A much faster upload rate (5250kbps instead of 1900kbps).  This comes in handy with that first backup.  The faster you get the files to the cloud, the sooner you are protected!
  • Local Backup to UNC share.  Meaning you can back up your server to a local server share as well.
  • Higher encryption levels (256-bit encryption can be chosen instead of 128-bit)
    • This reminds me.  If you backup a file with the pro version, and then downgrade, your standard client can’t understand the 256-bit encryption and thus can’t restore the files.  It does work the other way around though.  So just be careful which way you go!
  • More Access to your data (Web Access, cross device access for restore) and other administration features.  Notice my screenshot under “Restore” above, if I had the pro version, I could backup files and folders from other computers, right to this single computer.  This means I could support cloud backup on my client computers, and then restore this to the server in the event that the client was dropped while out on a trip!  Another brilliant business feature.
  • If you’re using a management solution, error notification includes system events, so you can track errors in your online backup with your monitoring tools.
  • 5 version retention policy.  If you are with KeepVault standard, you only have the latest version stored on the internet, with Pro it keeps up to 5 versions so you can go back in time when you wish to restore.

As a business user, you’ll have to use the Professional version to get the add-in installed.  As a Home User, you should review the features above and gauge how critical they will be for you. 

If you’re still debating having a Cloud Backup solution for your most prized data, you should approach it like an insurance plan.  You have one for your house, you have one for your car.  You cross your fingers every day that you don’t need to use it, but when you do, it’s there for you.  If your hard-drive fails, recovery of such drives can often cost $1,000s, with no guarantee you can get your data back.  If you’re house burns down, like my uncle’s, this sort of thing is priceless.

I’m using KeepVault, what are you using?

UPDATE: Want to learn more about KeepVault Pro? Check out my Going Pro with Proxure’s KeepVault blog post.

Friday, March 11, 2011

CloudBerry Backup add-in now supports SBS 2011 Essentials and Windows Home Server 2011

CloudBerry Backup, a piece of software I have reviewed for Windows Home Server v1, has recently (February) released an update to support both the new Windows Home Server 2011, as well as the Windows Small Business Server 2011 Essentials. 

CloudBerry Online Backup for SBS 2011 Essentials

For the most part, I liked CloudBerry, their software is a pay once, and according to their website, upgrade to the WHS 2011 version for free. 

The biggest problems I had with CloudBerry were

  1. The complexity of setting up the Amazon S3 account
  2. The cost of using Amazon S3

So really I think if you want to use Amazon S3 as your back-end, it’s a great solution.

You can pick up their Windows Small Business Server 2011 Essentials Release Candidate, or their Windows Home Server 2011 Essentials Release Candidate.

I haven’t tried this version yet, but I’m surprised there is a price difference between SBS and WHS Versions.  The UI looks identical, and I know that the SDK they use to develop their version is identical.  The costing is called out on this webpage, but it really doesn’t say what Small Businesses are getting on top of the WHS product for a pretty hefty difference in price.

If anyone knows, drop it in the comments below.