Showing posts with label Technology Timesavers. Show all posts

Thursday, November 27, 2014

Help! I have a Virus!

I get this question a lot.  I wanted to write something up on how you can self heal your Windows 8 PC (although most of this also works for Windows 7), or at least get you started in the right direction. Let’s dive right into figure out what’s going on.  Let’s quickly talk about what a “virus” is:

  • A virus is actually software that is harmful to you or others running on your computer.  Something that erases or corrupts files or potentially participates in international denial of service attacks at an attackers whim.  These are terrible, and programs like Windows Defender, built right into Windows, if updated, will protect you against any of these.
  • Spyware is software that tends to steal from you, capture credit card information, your password etc, also bad, and again Windows Defender will capture most of these, but not all
  • Bloatware is software that that is trying to help you do something, but something you probably don’t need.  There are two types of Bloatware
    • Non signature PCs come with extra software your computer provider installs in hopes to make extra money from software vendors who want to get their software in front of users, so they pay the computer provider. (as a side note this is why I always format and re-install these computers, if you have the technical know how)
    • Software you install.  Yes, getting emoji’s at the bottom of your email, or the “music downloading app”, the list goes on.  All the little programs YOU install on your computer, some of them are bloatware, and some of them come with bloatware.

So let’s get to fixin’ that “virus”.

Step 1 – Let’s make sure it’s not a known virus

First, let’s get Windows Defender up to date, and scanning. 

  1. Hit the start button on your keyboard, or swipe out the charm menu and hit start.
  2. just start typing “Defender” and you’ll see the “Windows Defender” appear.  Tap or Click on it to drop into the desktop and you’ll see this window:
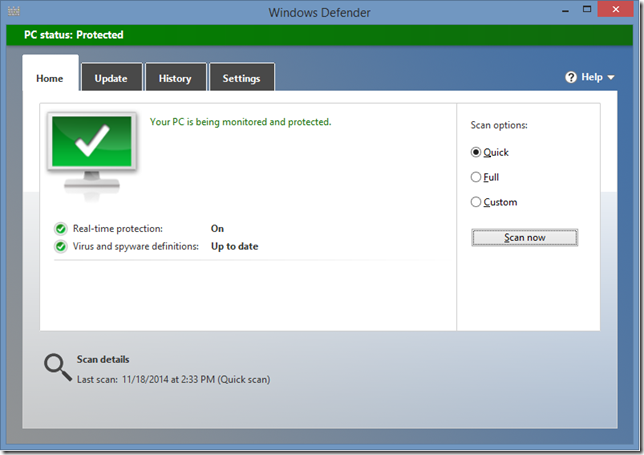
 Windows Defender

This is what a healthy PC looks like.  If your PC is unhealthy, it’ll tell you on screen what you should do.  Which is most likely download the most recent updates, and then scan your PC.  It’ll quarantine/delete any files it detects that are a virus.  Easy Huh?  You don’t need any other Anti-virus program, as Windows Defender does it all.  If someone says you need something like McAfee, Symantec, or a paid Antivirus solution, you don’t.  Those applications provide additional security, but the base prevention of viruses is included with Windows 8.

IMPORTANT WINDOWS 7 NOTE: if you’re on Windows 7, then Windows Defender doesn’t do anti-virus, you’ll need to get Microsoft Security Essentials, which is a free download. Same comment on the other antivirus solutions, they aren’t necessary and cost money for features you most likely won’t use.

Step 2 – What the heck is running on that PC of yours?

Computers only have so much memory, probably barely any if you bought your computer for under $1000, and you want to keep the programs running down to the ones you need not the ones that have just decided you need them.  While there is probably a number of things running on your computer at this very moment, what you want to prevent is things from starting that you won’t use.  Here is how

  1. Let’s crack open the Task Manager, the fast keys are CTRL+SHIFT+ESC, or you can right-click on the task bar in the desktop and choose Task Manager.
  2. Flip over to the Startup tab.  Here is what you see:

Task Manager

As you can see, I have a pretty short list.  I’ve disabled what I don’t use EVERY time I reboot my computer.  Chrome, my browser does a tone of things for me, so I allow it to load in the background, I obviously want sound, so I leave my Realtek device enabled.  I print, so I leave the HP one enabled, but I use iTunes or my life experience camera, or send to one note, or Spotify only sometimes, or not at all.  I want to load those manually if I need them, so they are disabled.  Disabling things that are of high startup impact will make your computer boot faster.

Next, let’s trim some fat.  Out with the programs you don’t need!

  1. Hit the Start page up again with the start key, or the swipe for the charms, and then the start button
  2. On the start page, type in the word control, and you’ll see the Control Panel come up
  3. Launch that by taping or clicking on it, and you’ll end up in the Control Panel on the desktop
  4. Under Programs, click the Uninstall a program link, it should look like this:
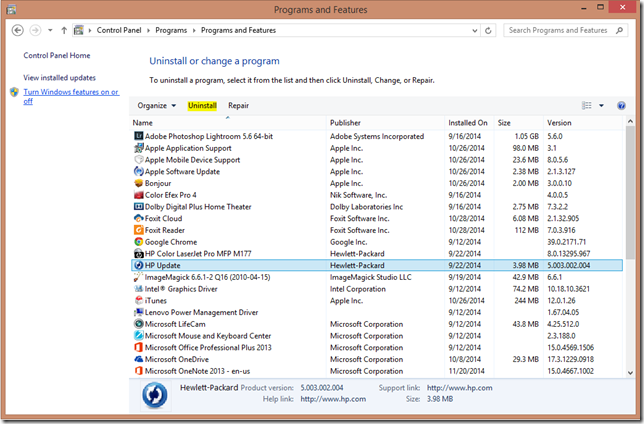
 Control Panel - Programs and Features

This is where the fun begins, you want to go through program by program, and uninstall the ones you don’t use using the highlighted Un-install button.  You’ll find that some have unnecessarily hard un-install programs, these are probably the bloatware programs you’re loathing.  I often do a Google Search for “How to Uninstall %insert program name%” and then see what the internet says.  Ultimately you want to un-install anything that you’re not using. After this step you’ll likely have to reboot your computer, when it comes up, it’ll probably already be running faster.

This next step is not for the layman.  In fact, you can SERIOUSLY mess up your computer in this step, so skip it if you don’t feel comfortable, or better yet, take a screenshot and send it to someone you trust (yes family, you can send it to me).

Let’s get into the registry

  1. On the start menu type in RegEdit or press WIN+R and type Regedit.
  2. Agree to the access prompt allowing the app to open
  3. we’re going to need to navigate to two places here to see what’s else is loading
    • HKEY_CURRENT_USER\Software\Microsoft\Windows\CurrentVersion\Run
    • HKEY_LOCAL_MACHINE\SOFTWARE\Microsoft\Windows\CurrentVersion\Run

You’ll want to take a screenshot of each of these locations and send them to your trusted advisor.  Here is what the second one looks like for me:

Registry Editor

You will see a similar list (probably more technical) to the Task Manager above.  If you do wish to edit this.  You delete the ones you don’t want BUT BUT BUT!!!! make sure you export the key first as a backup, and know which ones you’re deleting and why.  The above are actually my audio drivers, so I want them to run, but they look uber geeky right?  So be careful here!

Step 3 – Browser Extensions

Many of the “Help I have a Virus!” emails I get always have screenshots of browsers, and said browser is saying stuff like “you’re internet is slow, you have a virus, run this program!”.  Please please please don’t run this program.  Anything windows *should* run, is already running for you.  My friends at Microsoft have done this for you. They don’t tell you what you should run, it’s just running!  So don’t run anything, or pay any money to run something.  A browser should open take you to your home page, and let you get on the Internet.  The browser isn’t going to tell you about the health of your computer, or want to collect money from you.  Let’s look at two browsers

Chrome

Let’s find the browser extensions and remove what we don’t need, unless you just installed it, then there aren’t any to worry about.

  1. Open Chrome and click on the three lines in the top right hand corner of the window
  2. click on Settings, then on the left hand side, click on Extensions.

You’re presented with a list of all the extensions.  Go through one by one and hit the trashcan to delete any you don’t use.  If you aren’t sure what one does, uncheck the Enable, and then close Chrome and open it and see if there are any differences. If there aren’t, chances are you want to delete that one anyways, so go back and delete it.

Internet Explorer

Let’s get killin’ extensions

  1. Click on the gear icon in the upper right of the browser window (under the “X” to close IE)
  2. Click on Manage Add-ons and you’ll see this:

IE Manage Add-ons

Now go through all the Toolbars and Extensions, and disable the ones you don’t use.  Also check out the Accelerators and remove the ones you don’t use as well.

When you’re done these, close the browser and re-open it. 

Step 4 – Getting more insight

Last but not least, I wanted to tell you a tool that gives you more insight on the stability/reliability of your computer.  It tells you when you did things, like install apps that cause problems.  It’s the Reliability Monitor.  Let’s open it up

  1. Get to the start page (press the start key, or use the start button on the charm fly-out)
  2. Type in the word Reliability, and select the Reliability Monitor.   You’ll end up back in the desktop seeing this page:

Reliability Monitor

You can click on each yellow warning triangle, or blue informational icon and see what happened on that day. The blue bar (across the very top of the graph at #10 for me) is your reliability monitor.  That bar may not be at the top for you, but you can follow that bar back in time to see when it dropped from a 10/10 score to a lower one, and you can see the event that took place.  My guess it’s the one day that you decided to install something because you were in a rush, and you picked a bad program.  It gives you more insight to what’s going on with your computer, and what the history was and why things are probably broken.

Anyways, if you’re a family member, and ask me to connect into your computer to fix your virus. These are the steps that I’m going to follow, so now you can too!

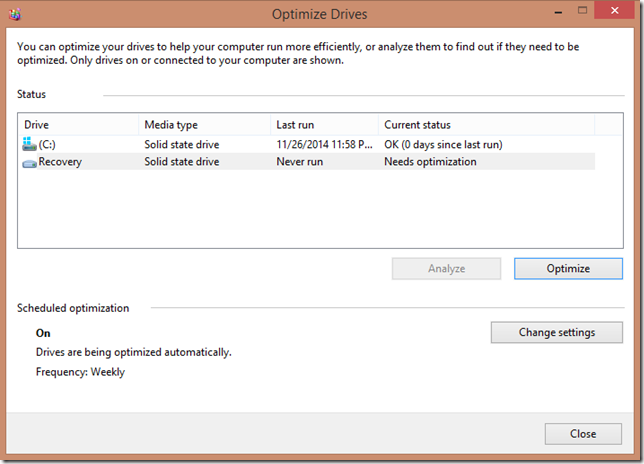
On a last note, I’m always told “oh, aren’t you going to defrag my hard drive?”.  Defragging is so 2008… with Windows 8 this happens automatically for you, but you can validate it’s enabled simply by

  1. Going to the start page
  2. Typing in defrag, and selecting the Defragment and Optimize your drives

Optimize Drives

Just click the Optimize button, or see when it was last run.  Note that the older “hard drives” need defragmenting, and the newer and faster SSDs need trimming.  Totally different technology, but Windows will handle both for you.

Good luck with your “virus”… and stop installing programs that you don’t need with bloatware!

Thursday, October 16, 2014

Quickly Archiving Mail with Outlook 2013 when using Outlook.com

Third post in a series of posts on how to single-click (or swipe/tap) to Archive mail when using Outlook.com.  The first covered how to swipe-tap to archive in iOS 8, and the second covered on how to set up an Instant Action to mouse over and click to Archive a mail on the web client. 

This post covers the most famous email client of them all: Outlook.  And most specifically Outlook 2013.  As mentioned in the first post, the pre-setup for this one is to create a folder called Archive in your mailbox. I covered how to do this this in the iOS8 post.

With Outlook 2013, there is a Quick Steps box.  You’ve probably never noticed it, it’s at the top, on the ribbon.  Well, it’s a set of customizable actions, where the Outlook team has taken the liberty of defining ones for you, mostly destined for business.  If this is the first time you’ve used these, take a look around, they are really powerful. Even on a personal account.  For example, I have one called “To Wife” which just forwards the email to my wife.  I do this a lot when I get an email on something that she should know, but I digress.  Here is what my personal account looks like:

Quick Steps

Here’s how to set up the Archive one Quick Step

  1. Click on the Create New button in the Quick Steps box (you may have to scroll down using the arrows to see it), it’s depicted above.
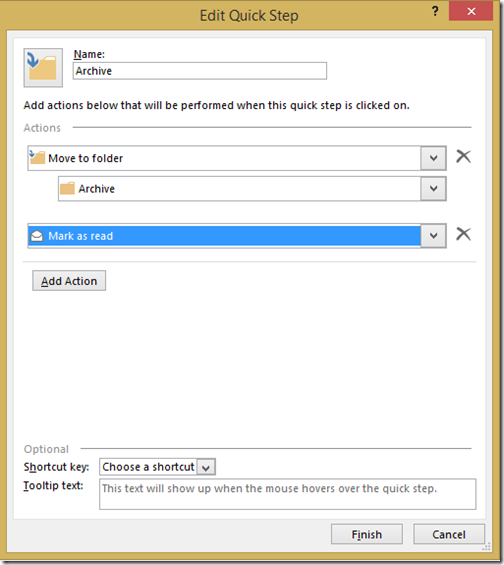
  2. Fill out the Quick Step, with your Name, and any number of actions you want to happen, it’s like a mail macro!  This is how mine is set up.  You can also assign a short cut key if you’re a keyboard kowboy. Edit Quick Step
  3. Click on Finish.

You’re Quick Step is ready to use.  Simply select the email you want to Archive and hit the new Archive Quick Step button, and the mail gets marked as read, and placed into your Archive folder.

Related Posts

Quickly Archiving Mail from the Outlook.com Web Client

In a previous post, I talked about how to quickly archive email in Outlook.com from the iOS 8 mail client. Similar to what you do with GMail, but of course we all don’t do our mail on our phones, we use computers as well! 
In this post I’ll tell you how to configure an Instant Action to do the same thing.  If you haven’t followed that post, then you are missing the pre-step to this one, which is to create a new folder called “Archive” (the name is key for iOS, not for the web client).  So do that first, then jump into these steps!
  1. First, log into your Outlook.com email account
  2. Click on the Settings gear (Settings Gear) in the top right hand corner of the page and select Options.
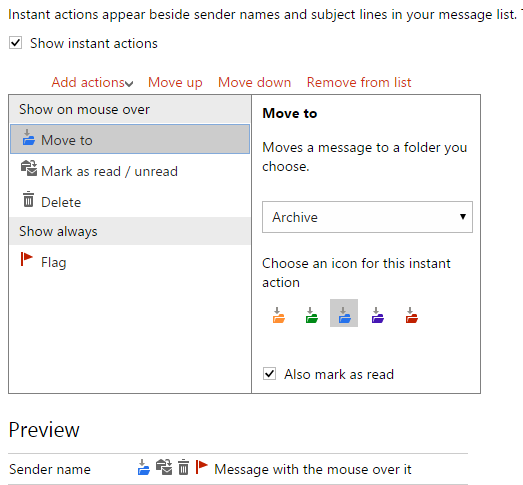
  3. On the Options page, under Customizing Outlook.com, you want to click on Instant Actions, in which you should see this Instant Actions
  4. Click on Add actions and then select Move To, and you’ll notice a Move To item show up in the list “Show on mouse over”
  5. In the right hand pane, choose to move a message to the “Archive” folder that you created, give it a coloured icon, and you can also choose to mark it as read if you want.  You can see how i might look in the preview (and how my preview looks above).  If you don’t like it the ordering, you can use Move Up and Move Down to order the list how you want.
That’s all there is to it.  Now when you mouse over the message in the message list, you get the Instant Actions to appear, and the Archiving icon you just created will single click it to the right folder.  Here is what mine looks like on the web:
Move this Message to Archive and mark it as read
Related Posts

Wednesday, October 15, 2014

Quickly Archiving Mail in iOS8 when using Outlook.com

One of my frustrations with Outlook.com, which isn’t configurable is how long it keeps deleted items for: 2 weeks.  That’s it.  2 weeks.  I for one want to have more time than 2 weeks to decide if I have to recover something from my deleted items.  And Outlook.com boasts unlimited storage now, or at least a lot of storage, to compete… so why not Archive email instead of delete it?
My workflow has changed.  Mail from computers, like Air Miles, or ZDNet or Marriott Rewards, after I’ve digested them, the deleted items is a perfect place for them.  But email from friends, family, co-workers, or even receipts and orders that I’ve done.  That mail just gets archived.. searchable.  The challenge I’ve been having is it’s hard to archive email, versus delete it.  I mean every app gives you a delete button, but not all apps give you archive, especially if you aren’t using GMail.
So, here is what I discovered on iOS 8 in order to Archive email on Outlook.com.
  1. Create a folder in your Outlook.com email address called “Archive”, this folder name is important, because iOS8 recognizes it.  In fact, now if you look at your folder list, it will look something like this.  Note the icon next to your Archive folder: Archive Folder Icon
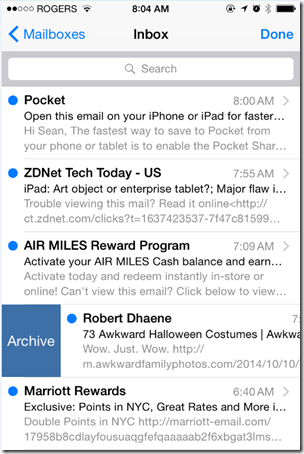
  2. Now that iOS has recognized you have a folder to Archive email to, let’s make it super easy to add mail to it.  While you could just move mail to this folder like any other folder, iOS8 has a “swipe right” in the mail list that you can customize!  So to do that go into Settings, then Mail, Contacts, Calendars, and then Swipe Options.  From here you can simply click on Swipe Right, and choose the action of Archive, thus enabling you to swipe right and Archive that particular message or conversation grouping, and you're ready!: Change Swipe Right to Archive
That’s all there is to it.  Now when you are in your email message list, and you swipe right, you can simply Archive the message into the folder you created.  Check it out:
Swipe and Archive
Related Posts

Thursday, March 20, 2014

Efficiently Using Multiple Browsers (with a single key press)

Maybe I’m weird, or maybe my job has more requirements than others, but I use Google Chrome, and Microsoft Internet Explorer interchangeably.  I know web developers have this problem, perhaps they’ve already worked out a work flow, but I wasn’t able to find one.  Ultimately for things that are work related, I want to open those in Internet Explorer, and personal browsing, I want to use Google Chrome.  While we all have our reasons for using one browser over another (I have mine), if you want to use both, there was no really good way…

So I had a friend teach me how to write my own browser

Ok, ok, I didn’t technically write my own browser, that would take a lot of work, but what I did do is build a Browser Proxy.  The Browser Proxy is the default Browser on my PC, and all it does, is validate if a key is pressed (“Left Shift” to be exact) and either launch IE or Chrome based on that key.  This means for me now, “Click” is to open in IE and “Shift+Click” is to open in Chrome!

Here’s how I did it
First, you need AutoHotKey, which I’ve written about before.  You can use it have an always-on scripting engine running to help you control Windows, or to create scripts and turn them in executable, which is what we’re going to do here.  So get that installed on your PC.
Second, Choose your actual “Default Browser” in Windows.  I made Internet Explorer default because people send me work related links in Lync, Email, and they are scattered all through documents and such, so it makes sense to make IE default for me.  This means that without the SHIFT key down, IE will be used.
Third, we need to create what I call “Browser Proxy” executable, This is going to be a bit more complicated, to get you started, My friend and I have created the browser .ahk file (AutoHotKey script) and installer .reg file (think of this as associations for your application so Windows can find it).  Download the package here, (virus scan it, because you should virus scan any weird .zip file you download from the Internet), and then unzip it.  You’ll find 3 files, one of which is a readme and you can figure that out.
Crack open the BrowserProxy.ahk in Notepad or your favorite editor, it looks like this:
GetKeyState,State,LShift
IfEqual,State,U
{
    ; Shift Key up -- launch IE
    Run,"C:\Program Files (x86)\Internet Explorer\iexplore.exe" -nohome "%1%"
}
Else
{
    ; Shift Key down -- launch Chrome
    Run,"C:\Program Files (x86)\Google\Chrome\Application\chrome.exe" "%1%"
}
Validate the paths for both Internet Explorer and Chrome. Change the paths as appropriate.  You can also chose to use a different key, like if you wanted the Left CONTROL button to be the key you use, change the “LShift” in bold above to “LControl”.  In fact you can choose whatever key you want (here is the list).
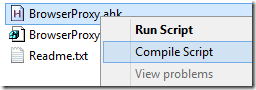
Once you’ve got the script validated, save it and then since you now have AutoHotKey installed, you right click on the script and choose Compile Script.
Compile Script
This produces a BrowserProxy.exe in the same directory. I copied this to "C:\Program Files (x86)\BrowserProxy\BrowserProxy.exe" (and agreed to the UAC prompt). You can put this anywhere, but more updates will be required in the .reg file which we’re going to use next.
Now we need to import the BrowserProxy.reg file into your system registry.  Please do feel free to open it in Notepad before importing it (you should always be aware of what you’re putting into your registry), but it does 3 important things
  1. Define the BrowserProxy.exe application under the SOFTWARE section of the registry
  2. Registers that application
  3. Sets up the root classes that the application can handle
If you changed the path of where you put BrowserProxy.exe, you’ll need to update that as well, and mind that you keep double \\ when you put the path in.
Now that your own “Browser” is ready, you need to make it default.  This is how I did it on Windows 8.1
  1. Open the Desktop Control panel (Win+R, type “control”, and click OK)
  2. Click on Programs
  3. select under Default Programs click on Make a file type always open a specific program.
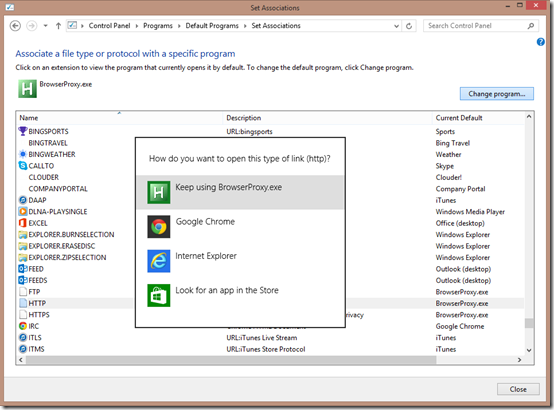
  4. In this dialog, we need to change the default to “Browser Proxy” for “.htm”, “.html”, “.shtml”, “.xht”, “.xhtml”, “FTP”, “HTTP” and “HTTPS”.  Select the item in the list and click on Change program… then select BrowserProxy.exeChange Associations
Once you have configured all 8 defaults, you should be able to immediately start using a CLICK to open in IE and SHIFT+CLICK to open in Chrome!!
Note: Some applications may cache the default browser, in which case they would need to be restarted (My offender: Outlook).  Now you can use two browsers easily without having to do the usual tricks of copying URLs between browser windows, or manually setting default browsers constantly.
Final note: If you are looking for a way to launch Firefox, try changing the launch EXE in the .ahk script to:
{
    ; Shift Key down -- launch FireFox
    Run,"C:\Program Files (x86)\Mozilla Firefox\firefox.exe" -requestPending -osint -url "%1%"
}
For Reference here is the contents of the .reg file:
Windows Registry Editor Version 5.00
[HKEY_LOCAL_MACHINE\SOFTWARE\Clients\StartMenuInternet\BrowserProxy.EXE]
@="BrowserProxy"

[HKEY_LOCAL_MACHINE\SOFTWARE\Clients\StartMenuInternet\BrowserProxy.EXE\Capabilities]
"ApplicationDescription"="Browser Proxy Application, enables you to switch between IE or Chrome simply by pressing SHIFT when you click"
"ApplicationName"="BrowserProxy"

[HKEY_LOCAL_MACHINE\SOFTWARE\Clients\StartMenuInternet\BrowserProxy.EXE\Capabilities\FileAssociations]
".htm"="BrowserProxyHTML"
".html"="BrowserProxyHTML"
".shtml"="BrowserProxyHTML"
".xht"="BrowserProxyHTML"
".xhtml"="BrowserProxyHTML"

[HKEY_LOCAL_MACHINE\SOFTWARE\Clients\StartMenuInternet\BrowserProxy.EXE\Capabilities\StartMenu]
"StartMenuInternet"="BrowserProxy.EXE"

[HKEY_LOCAL_MACHINE\SOFTWARE\Clients\StartMenuInternet\BrowserProxy.EXE\Capabilities\URLAssociations]
"ftp"="BrowserProxyHTML"
"http"="BrowserProxyHTML"
"https"="BrowserProxyHTML"

[HKEY_LOCAL_MACHINE\SOFTWARE\Clients\StartMenuInternet\BrowserProxy.EXE\DefaultIcon]
@="C:\\Program Files (x86)\\BrowserProxy\\BrowserProxy.exe,0"

[HKEY_LOCAL_MACHINE\SOFTWARE\Clients\StartMenuInternet\BrowserProxy.EXE\shell]
[HKEY_LOCAL_MACHINE\SOFTWARE\Clients\StartMenuInternet\BrowserProxy.EXE\shell\open]
[HKEY_LOCAL_MACHINE\SOFTWARE\Clients\StartMenuInternet\BrowserProxy.EXE\shell\open\command]
@="\"C:\\Program Files (x86)\\BrowserProxy\\BrowserProxy.exe\""

[HKEY_LOCAL_MACHINE\SOFTWARE\RegisteredApplications]
"BrowserProxy"="Software\\Clients\\StartMenuInternet\\BrowserProxy.EXE\\Capabilities"

[HKEY_CLASSES_ROOT\BrowserProxyHTML]
@="Browser Proxy"
"FriendlyTypeName"="Browser Proxy"

[HKEY_CLASSES_ROOT\BrowserProxyHTML\DefaultIcon]
@="\"C:\\Program Files (x86)\\BrowserProxy\\BrowserProxy.exe\",0"

[HKEY_CLASSES_ROOT\BrowserProxyHTML\shell]
[HKEY_CLASSES_ROOT\BrowserProxyHTML\shell\open]
[HKEY_CLASSES_ROOT\BrowserProxyHTML\shell\open\command]
@="\"C:\\Program Files (x86)\\BrowserProxy\\BrowserProxy.exe\" \"%1\""

Thursday, December 05, 2013

Adding Server Shares to Modern Photo App – Windows 8.1

Windows 8.1 updated the photo app to remove Facebook, and Flickr, and make it only look like you can view pictures on your local device, and on your SkyDrive.  However, this isn’t entirely true.  If you’re like me and have a NAS or in my case, a Home Server on your network, you could quite possibly have GBs of pictures stored on your server that you want to show to friends and family on your tablet.  That can be cumbersome to get to if you don’t set it up first.  And nothing makes family or friends more bored of looking at your pictures, than watching you struggle to get to them.

Here is how to add those GBs of photos to your surface “view” without actually copying them to your surface.

First you need to make sure your surface has access to the server share.  I recently wrote a post on how to do that – Using the Windows Credential Manager to Store Server Credentials in Windows 8.1.

Next follow these steps:

  1. Open up the Desktop app if you haven’t already
  2. Open up Windows Explorer and navigate to the picture folder on your remote machine
  3. Right click on the folder containing the pictures, and go to Include in library, and select Pictures to include it into the pictures library. Include in Pictures library
  4. Now you’ll see in your libraries that you have two locations for PicturesPictures library
  5. Next go back into the Photos Modern app and choose the local computer, you’ll notice all the folders inside the pictures folder you chose in step #3, if you’re on the local network Pictures Library Modern App

Now when you’re on your local network, you just look like you have a HUGE photo collection.  The downside is if you take pictures at 21megapixel like I do and use very little compression, that you’ll end up having to wait for Wireless to download each picture as you go to view it.  I find a good 2-3 second story about each picture is enough for the next picture to download in the background. Smile

Tuesday, October 08, 2013

Removing the Required PIN code on Windows Surface

My corporate E-Mail requires that any device I sync it to, enable a 4-digit PIN to unlock the device, at a minimum.  I can make this as complex as I like, but I must at least have a 4-digit PIN.  I'm fine with this, I think it's a good practice to have a PIN on your phone or tablet, so if it's lost, the thief or casual finder can't access all the data on it.  Even more so all those corporate secrets that I have! (har har! Like I'm trusted with corporate secrets!)

What I'm not fine with, is once you decide that you no longer want your work account on a device, you can't get rid of the requirement for the PIN, like how I'm re-purposing an old SurfaceRT (yes, I pre-ordered a Surface2!) to be a digital music player / weather station / morning news station / upstairs Skype phone, in the bedroom, I don't have *anything* on it that would need a PIN, and the likely hood of the tablet leaving the bedroom aside from when I move houses, is extremely small.

Searching around turned up nothing, asking around (especially @Microsoft) usually turns up something.  And this time it turned up this super handy How do I Turn Off the AutoLock in Windows 8 article.  And here I was searching around in gpedit.msc or regedit, and it's right there in the Control Panel UI!

Here's how to do it:
  • Open up the Control Panel (either Win+X or Win+R then type "Control", enter)
  • Click on the title User Accounts and Family Safety
  • Click on the title User Accounts
  • Click on the Reset Security Policy 
  • Click on the Reset Policies Button 
That's all there is to it. Now you can go into PC Settings and set the password policy to never required!  This also allows you to change the default screensaver time out as well.

There you have it.  It took me a lot of effort to find that, so I'm sharing it here (so I don't forget as well).  And now I don't have to factory reset my SurfaceRT! w00t!

Thursday, May 02, 2013

How to Change Your Email Address and Service Gracefully

So you got the Internet, and your Internet Service Provider (ISP) sold you on 5 free email addresses, and you thought: "Free is good!". Then you read my post from a few days ago about how to use email, calendar and contacts across multiple devices, and realized that Free is good, but you need to choose the right free.
So now you want to migrate your email address to an Outlook.com or G-Mail account. Allowing you keep not only your email, but your calendar and contacts as well in "the cloud".
This is not only an invasive change for you, but it's also for your friends, and this post is designed to logically tell you how to gracefully switch to a new e-mail.
  1. Create your account on your new provider.  I would recommend Outlook.com, because, well I'm biased and I really like it.  You'll want to spend some time to get a username you're happy with.  On Outlook.com you can create aliases later on if you don't like your log in, for specific purposes.  So you can create your account as mulletman@outlook.com, but then create an alias of firstname.lastname@outlook.com for your resume, and have both delivered to your inbox.
  2. Once you're happy with your new email address, you can log into it and you'll have no email.  What I did was export all of my contacts as a "CSV" file (Comma Seperated Values) from whatever email program I was using on my computer, then just went to the People tab, and chose Manage, then Add People  You can then choose to Import from file, and import that same CSV file.  (you can also import from Google, Linked In, Sina Weibo, Facebook).  Basically I get my contacts all squared away first (while still checking my old email).
  3. Ideally you want to set up e-mail forwarding from your old account to this new one you set up so when email arrives, it gets forwarded directly.  I can't explain how to do that on this post as each ISV is different.  You can call their helpdesk and ask how to do this.  The other option is to have your new account "check" your old email for new messages and download.  Outlook.com can do this by going to Settings (the gear in the title bar), then More mail settings, then under Manage your Account, click Your email accounts, which allows you to add a POP account for Add a send-and-receive account, and provide your old email address server, username and password.  Then validate that it works by sending email to your old account, and making sure that you eventually see it in your new account (eventually if you chose Outlook.com to check your email, it could take some time for it to hit your new account)
  4. Once you're happy that your old mail is flowing to your new email.  It's time to make the switch to your new account.  You'll want to send an email to ALL of your contacts to tell them of your updated email address.  You'll also want to check any subscriptions you signed up for and unsubscribe from those and resubscribe with your new email address
  5. If you still have friends emailing you at your old address, simply reply from your new address and remind them of your email address update.  After a period of time (on the order of Months) when you feel comfortable that people are using your new email address, you can turn off the old POP account you set up in step 3.
  6. And you're done!
Lots of people ask me why not stay with their ISP.  Here are my reasons:
  1. ISP mail servers typically don't offer calendar and contact service, and are old archaic mail-servers that don't have any features that work with newer devices
  2. The use of POP or IMAP uses your data plan on a schedule to check your email.  That's a bunch of data eaten out of your data plan (on a phone for example) that will probably result in no new messages for you.  Newer protocols only use data when you have email
  3. The use of POP and IMAP run on a schedule and use data, and as a result, they drain your battery faster than newer protocols
  4. ISPs are typically networking experts, they run mail servers because it's common practice for them to offer an email account with your networking.  But it's not their expertise, why not switch to someone who focuses on making these services great?
  5. If you move homes to a house outside of a service area for your ISP, Or if you simply want to switch to get a better "deal", you'll loose your email address as a result, which causes your friends to go through the pain as it is.
  6. If you travel around the world, access to your email account is slow outside of your ISP network and native country.  World-wide enabled companies like Microsoft, Google, or Yahoo, optimize their service to be access world wide and your service will be far better outside of the country.
And if you aren't sure if you want to use Outlook or GMail, why not make it super easy and use your own domain.  I've moved my email account 5 times since I've had my own domain, and none of my friends are the wiser as the email address never changes, just the back-end service.  If you want to do that, I have instructions here.

Monday, April 29, 2013

Cloud Sharing your Email, Contacts, Calendar Between Different Devices

I’ve come across a lot of people who still struggle with different devices and having to physically plug them into their computer when they want to sync their calendar or contacts.  Sure, Email is a solved problem for them, but not that pesky Calendar or the list of Contacts.  This post is intended to help those people.  But those people have to embrace “the cloud”…

The cloud sounds scary, but it’s not, you’ve been using it for years, it’s just a server on the Internet that’s always accessible. Sure this can be a single mail server that’s been holding your email until you connect it, or it can be a scale-out solution that offers compute, storage, and database needs, but let’s start small.  Your email server, is in the cloud.  Yes, that same one offered to your by your Internet Service Provider (ISV).  That’s “cloud”.  See, you have email, you’re already using “the cloud”.  Your problem is you either (a), have an e-mail only server that uses POP3, or (b), you’re not taking advantage of the features of your server to leverage contacts and calendar.

If you have an e-mail server that only does email (i.e. only offers you IMAP or POP3 access), then you are living in the stone ages.  IMAP and POP3 are to email what rotary dialing is to the telephone.  The first is to switch to something that offers the email, calendar, contact suite of products.  I find it best to switch to the product that your spouse or significant other is using, primarily because it makes it easier to share things like the calendar.  My preference is Outlook.com, but you can also use GMail or Yahoo! Or if you wanted something more powerful, you could choose Office365.  The bottom line is you need to ditch that ISV email server.  Some ISVs leverage the above services for their email solution.  That’s better than POP3, but I still don’t like being tied to an ISV, because if you move or that ISV gets bought by another, things change, but this is your call.  This may or may not require you to get a different email address.  This is by far the most painful part of the process, so you’ll want to do this part once.  If you want to use your own domain name, so your email address never needs to change.  I have instructions on how to do this with Hotmail / Outlook.com.

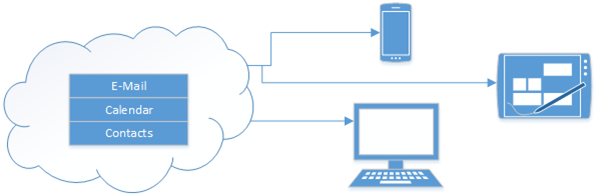
Let’s overview the set up that you’re aiming for:

Cloud to Device


This means that each phone, tablet or computer connects directly to the Internet (or cloud) to get your Email (which it does today) and your calendar and your contacts.  This means that the primary location for your E-mail, Calendar and Contacts is in the cloud.  Your devices and computers are just a “view” into that.  While you probably won’t need this with today’s devices. All of my computers are configured to use Exchange Active Sync (EAS).  Apparently Google is the only service that doesn’t use this anymore.

This works for me, and allows me to share my calendar with my wife, so we can always be in sync (provided she enters her events into her calendar!). 

I have the following devices, that are always up to date and never need to be plugged into a computer for “syncing”.

  • Windows Phone 8
  • Surface RT
  • Windows 8 PC (both built in e-mail client, and Outlook 2013)
  • iPhone
  • iPad
  • Blackberry Playbook

This is the set up you “don’t” want, as you are now dependent on your computer, and if you’re computer crashes, or dies, you loose your calendar and contacts.

Bad Setup

Monday, July 16, 2012

How to add a “Send To” shortcut for SkyDrive

With personal cloud computing on the rise with SkyDrive, Google Drive, Drop Box, etc.  you want super easy ways to get things into and out of the Cloud.  If you’re like me, sometimes you’re in a hurry and just need to slap something into the cloud on the way out the door, and organize it later.

SkyDrive

Into Windows has a great article on how to add a “Send to SkyDrive” shortcut to the context menu of the shell. You can find that article here.  Basically it boils down to simply putting a shortcut to the SkyDrive folder into your sendto special folder.  You need to be also running the SkyDrive software for Windows.

Here’s what I did, after installing the SkyDrive software

  1. Navigate to the folder above your SkyDrive folder, it’s typically c:\users\%username%\ (where %username% is the username of you on your computer)
  2. Right-Click on the SkyDrive folder and choose create shortcut.
    1. I renamed this file from SkyDrive – Shortcut to just SkyDrive, for a cleaner look
  3. Next open up Start, then Run, and type in “shell:sendto ”. This will open another explorer window in your sendto folder. 
  4. Move the shortcut created early into this sendto folder.

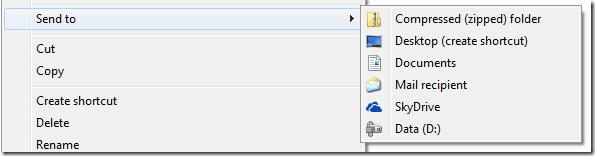
That’s it! now simply right click on any file you want to send to your SkykDrive, go to the “Send To” option and you’ll see SkyDrive in the list.

SendTo SkyDrive

Just remember to leave your laptop open long enough to wait for that file to be sync’d to the cloud!

Monday, July 09, 2012

Get Cloud Services working for you, even when you’re not!

As the saying goes, a user will do things over and over and over again, but a developer will automate it and never touch it again (until something breaks of course).

I am not a developer, but I do have a developer education, and that makes me want to automate stuff.  Why do something over and over again that a computer can handle just fine?  I do this sort of thing on a client computer, and often write scripts using AutoHotKey.  I wrote about it earlier, now’s a good time to check it out. 

I’m now excited to say that I’ve found a way for things to happen for you, without you doing anything.  Getting those beloved Cloud services working for you.IFTTT

Have you heard about If this then that? or IFTTT (pronounced “lift” without the “L”)

IFTTT is an online “batch” file service that allows you to set a trigger (“if this”), and have an action take place on your behalf (“then that”).  You can learn more about it here.

It’s my new favorite service.  Supporting all kinds of existing services including: Bit.ly, Blogger, Buffer, Craigslist, Date & Time, Delicio.us, Dropbox, Email, Evernote, Facebook, RSS feeds, Flickr, Foursquare, GMail (and almost all of Google’s services that I don’t use), Instagram, Last.fm, LinkedIn, SMS, Stocks, Twitter, Vimeo, Weather, Belkin power, Wordpress, Youtube, and more!

You can then simply create what they call “recipes”, which allows you to set some trigger on some service, and then have a action take place when that trigger happens.  For example, this is a popular one:

AutoSave Instagram Pictures to DropBox

It’s that easy, you set up your trigger actions and define your reactions.  In just a day, I’ve created a few recipes:

  • I save all my tweets to Evernote (easy and fast searching of historical tweets)
  • I automatically tweet blog posts (like this one), and then re-tweet them again later using BufferApp.com
  • I have an email alert set up for my favorite stocks
  • I automatically blog my Instagram shots on my photoblog.
  • I’m going to tweet exactly at Midnight on new years to wish everyone a great new 2013!

Security

What I like most about IFTTT is I never have to give it any of my passwords for my other sites/services, it just simply gets granted access, and I can always revoke it from the target service if I want.

So if you like automation, and you find yourself repeating the same actions over and over again, try out IFTTT

This blog post was automatically tweeted by IFTTT

Thursday, July 05, 2012

Windows 8 Keyboard Shortcuts

I’m a big believer in short-cut keys, moving your hand to your mouse, moving the mouse, and then back to the keyboard is inefficient.  If you can save a few seconds using keyboard shortcuts, and you do this constantly during the day, it’ll save you time. 

imageFurthermore, as we approach Windows 8, and you end up getting that fancy touch screen, it’s going to be even more important to use keyboard short cuts.  In fact, you can navigate Windows 8 much better with the keyboard than the mouse if you don’t have a touch screen.

So, let’s take a refresher on our keyboard shortcuts:

Shortcut

Action

Ctrl+Shift+Esc

Starts Task Manager.

Windows (tap)

Toggles between the Start screen and the foremost running app (Metro-style) or the Windows Desktop.

Windows+,

Peeks at the Windows desktop.

Windows+.

Snaps application to the left.

Windows+/

Initiate input method editor (IME) reconversion.

Windows+1, Windows+2, etc.

Switch to the (classic) Windows desktop and launch the nth shortcut in the Windows taskbar. So WINKEY + 1 would launch whichever application is first in the list, from left to right.

Windows+Arrow Keys

Aero Snap.

Windows+B

Switch to the (classic) Windows desktop and select the tray notification area.

Windows+C

Display Charms and time/date/notification overlay.

Windows+Ctrl+Tab

Cycle through apps, snapping them as you go.

Windows+D

Toggle Show Desktop (hides/shows any applications and other windows).

Windows+E

Launch Windows Explorer with Computer view displayed.

Windows+Enter

Launch Narrator.

Windows+F

Search Files using the new Windows Search pane.

Windows+H

Open the Share charm.

Windows+I

Display Settings charm.

Windows+J

Swap foreground between the snapped and filled apps.

Windows+K

Display Connect charm.

Windows+L

Lock PC and return to Lock screen.

Windows+M

Minimize the selected Explorer window.

Windows+O

Toggle orientation switching on slate and tablet PCs.

Windows+P

Display the new Project (for "projection") pane for choosing between available displays.

Windows+PgDown

Move the Start Screen or a Metro-style application to the monitor on the right.

Windows+PgUp

Move the Start Screen or a Metro-style application to the monitor on the left.

Windows+Q

Open the Search pane.

Windows+R

Display Run box.

Windows+Shift-.

Move the gutter to the left (snap an application).

Windows+Shift+.

Snaps application to the right.

Windows+Shift+Tab

Cycle through apps in reverse order.

Windows+Shift+V

Cycles through Notification toasts in reverse order.

Windows+Spacebar

Switch input language and keyboard layout.

Windows+Tab

Cycle through apps.

Windows+U

Launch Ease of Access Center.

Windows+V

Cycles through Notification toasts.

Windows+W

Display Settings Search pane

Windows+X

Access the advanced context menu on the Start preview tip.

Windows+Z

Open the App Bar.

Happy Keyboarding!

Monday, April 23, 2012

How to Sync Folders to the new SkyDrive without moving them to the SkyDrive folder

imageSo the new SkyDrive is out today, you can read about the awesome new features here (on the Building Windows 8 blog).  The SkyDrive team really amped up their battle with DropBox in this new version.  With Windows Phone, iPad, iPhone support, along with MAC and PC support, it really is pretty cool, and now completely accessible.  Also with HTML5 support, it’s super fast on the PC and MAC for browsers that hardware accelerate HTML5 based graphics.

However, I will miss Mesh.  I wasn’t asked to un-install it, as part of the upgrade, but I can see it coming (no I have no details here, speculation only)

Mesh had this ability to sync *any* folder to the cloud, which is now gone from this version of SkyDrive.  Apparently all the DropBox fans have forced the hand on this one.  Fortunately, on Windows (and I’m sure this works on a MAC too, but I can’t test it, any mac fans post how to do it in the comments and I’ll add it to the post) you can create links to folders to have things sync to your SkyDrive that aren’t actually in your SkyDrive folder!

To do this you’ll need to bust out the ol’ Command prompt, in Administrator mode, because a symbolic link just isn’t enough for SkyDrive to pick it up, you need a hard link.

  1. Click Start, and type in CMD, right-click on the cmd.exe and choose Run as Administrator
  2. Change to your SkyDrive folder, mine is c:\users\<username>\skydrive (so cd /d c:\users\seanda\skydrive)
  3. Next we’re going to make a link to a directory that lives in My Documents Folder, I’m going to do that with this command to sync my “tools” directory: mklink /j “Tools” “c:\users\seanda\documents\tools”.  You’ll get a line that says "Junction created for Tools <==> c:\users\seanda\documents\tools.

You’ll notice a new tools directory being created, and it looks exactly the same as the other directory (contents and all, you didn’t need to copy anything in).  Now you can simply drop stuff in your c:\users\seanda\documents\tools directory, and SkyDrive will pick it up.  (You might need to restart the SkyDrive system tray app for it to pick this directory up, although I didn’t.)

Additionally, if you’re trying to get this to sync between two computers, you’ll have to set up the Junction before SkyDrive can drop files in there (meaning create the folder locations manually with the junction in place.  I only use the one computer, so I didn’t test this.

Monday, January 16, 2012

Sean’s Top 10 Recommended iOS apps for Productivity

Before the slew of Windows 8 tablets come out, most folks have an iPad or iPad 2. If you go online looking for popular apps, you’ll either get a list of games or a list of apps without a description of what they do.. I’ve spend a lot of time trying to figure out the best way to use my iPad, and not just for games.. Below is my list of non-game apps and why I like them.
  1. iTap RDPiTAP RDP allows me to get to Windows clients via RDP.  Sure there are free ones like iRDesktop, but this was the only one that did TSGateway so I can get to clients behind a proxy from outside the network.  I also think that with the different mouse modes and special keys that come up on this app, this is the most functional. 
    1. You could compare this to CloudOn, which allows you to get to your MS Office apps, which uses DropBox to get to your documents.  Pretty good solution, if you trust DropBox.
    2. There is also OnLive, which let’s you RDP to a hosted version of Windows 7, but using a web browser to upload and download files seems hoaky to me.  Plus with it being free, how are they making money? what are they selling?
  2. mWOLMocha WOL is a free app in the iTunes store.  It isn’t anything other than a Wake-On-LAN client, I picked it over the other ones because it’s free.  The end.  My laptops have an aggressive sleep schedule to keep power consumption down.  My Home Server is the always on PC.  Unfortunately this won’t wake up my clients if I’m out of my home.
  3. Buzz PlayerBuzz Player is a Media player and media copier.  I like it because all of that media that I have sitting on my Home Server, this app can stream it to me when I’m in my home.  That’s 2TB of videos and music that I can just use anywhere on my LAN.
  4. Lync Mobile Lync Mobile is Microsoft’s Lync IM client, on the iPad.  Given that these days I don’t take my laptop to the couch for after hours surfing, this client allows me to stay in touch with co-workers that are world-wide.  I can answer a quick question from Shanghai.
  5. OneNote – Microsoft OneNote is another essential Microsoft app.  If you use OneNote on your PC, and I do extensively, then this gives you access to any notes stored on your SkyDrive.  This has revolutionized how I manage my soccer teams.  I simply create the notes on my PC, and then update them on the phone or iPad
  6. Grocery IQGrocery IQ is really only useful if you also have the app on your phone.  My wife and I sit down with the iPad and make our grocery list and what we’re going to eat for the week.  Then, because we have the same Grocery IQ account, when we hit the grocery store, the list is just in our pocket on our phone.
  7. FeedlerFeedler is a less popular RSS reader that syncs with Google Reader. As far as I can tell, Reeder is the most popular app for this, and certainly is more beautiful looking; but it’s missing a key feature: mark older than X days read.  I get to my RSS feeds as often as possible, and for the most part, I read them in entirty, although trying to catch up on Mashable, or Engadget, after being away for a week is next to impossible, but I do want to read a few days worth.  Hence Feedler is my preference over Reeder for RSS reading
  8. Kindle – The Kindle app is handy because it means on business trips, I only need the one device, and long plane waits etc, I can just continue on my book.
  9. SkypeSkype I am only looking forward to.  Sure I can use it on my iPad 1 for text chatting, but without a camera it kind of sucks.  I sure do love it on my phone though, and can’t wait for this communication powerhouse to become fully operational once I get an updated iPad 3!
  10. BlogPressBlogPress is my mobile blogging app.  Blogging from the PC is my preferred method, and I actually use the combination of the first two apps in this list to do 90% of my blogging, but if I’m travelling, it’s a secondary way for me to get the data out to the web, without having to wait.
Those are my top 10 favorite, non-game, iPad applications to boost your productivity and enjoyment of the iPad aside from a $700+ gaming tablet.

Update: I just recently discovered Office 2 HD for the iPad, which I had to add to this list.  It's a little spendy at $8, but allows you to do more with Word, Excel and PowerPoint than you can do with the Apple apps (like Pages).  For example, I'm able to comment on documents and send them back via email now.  They support a variety of cloud services, like SkyDrive and DropBox or even just Box (and more)!

Tuesday, January 03, 2012

How to use your Home Server as an AirPrint server for only $10

As I move more and more of my computing and data to the Cloud with services like SkyDrive.  I am reducing the amount of computing power I have in my house.  I have an iPad (v1), a Laptop, and of course my Windows Home Server.

As I’ve mentioned before, I’m looking for more ways to take advantage of my low-powered Home Server to do more for me as an *always* on device.

Over the holiday’s we had a few visitors, which of course means printing boarding passes prior to leaving for the airport.  It was frustrating to have to take out the laptop when the iPad is just right there.  But without a compatible AirPrint printer, you can’t print from the iPad….

Or can’t you?FingerPrint

I found an application for Windows (and Mac OS) that installs on your computer that shares almost any printer connected to the computer, to the AirPrint service. 

There was an old version that doesn’t work with iOS5 that is free.  But obviously, I have iOS5 on all my devices, so that wasn’t an option.  I’m also not a big fan of Jail-Breaking (I guess I know too much about security to allow a hacker full access to my device).

This application, called FingerPrint by Collobos Software, will share out any connected printer, as well as DropBox locations to the AirPrint service.  I started with the trial to make sure it worked first.

To get it set up, I downloaded the FingerPrint installer, copied it to the desktop of my Home Server and installed it. Then of course ran FingerPrint on the server.  I also had to add my network printer to a printer on my Home Server, just by going to Control Panel and adding a printer as I normally would on any Windows machine.

However, it didn’t initially work.  I had to make two changes to the configuration for it to work, probably specific to my network.  I’ll share them here incase you have the same problems.

Enabling Multicast on my router

First, I discovered that my DLink DIR-655 router wasn’t allowing Apple’s discovery service, Bonjour.  This is not always the case with routers.  But I discovered that I can enable MultiCast, on the router, which seemed to allow it.  I did this on the DIR-655 by going to Advanced, then Advanced Network, and at the bottom, selecting to Enable Multicast Streams:

MultiCast Streams

This required a router reboot, which took down my network for 30 seconds, and then it took another approximately 5 minutes for my iPad to discover the services running.

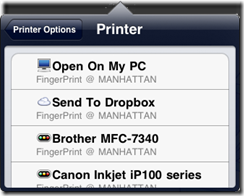
This enabled me to see the list of printers connect to my Home Server

Opening an Additional Port on the server

Per Collobos support page, I had to manually open the port 6631 on my Home Server to allow AirPrint to send the document to FingerPrint.  To do this I simply:

  1. Logged into the Home Server
  2. Clicked Start, then Run, and ran the wf.msc firewall configuration utility
  3. I clicked on New Rule
  4. In the wizard that opened, I selected Port, and clicked Next.
  5. The port is a TCP port which was the default, and I typed in the specific port of 6631
  6. I also chose to Allow the connection even if it’s unsecure (this might not be available in SBS 2011, in which case you’d also need to make a group policy change)
  7. On where does this rule apply, I ensured that it only apply to Private networks, meaning that I unchecked Domain (which doesn’t apply to WHS anyways) and Public. (Note for SBS 2011, you’d have to select Domain)
  8. Finally, I gave it a friendly name.  I used FingerPrint Port 6631 so I could easily find it in the list again if I ever wanted to remove FingerPrint, and clicked Finish.

At this point, the printing just started! woo hoo!  Of course I can play around with this for 7 days on trial, then I’ll have to get a license key for FingerPrint.

Additional Bonus!

As an additional bonus, you can manage all the documents printing from the Home Server’s print queue.  So I think it’s worth the $10 to be able to print directly from the iPad.  Plus Collobos has support if you ever get stuck.

As a final note, I have noticed that you don’t want your iPad to go to sleep before the print has happened, and it’s not exactly the fastest thing/

[Note: This is untested on Small Business Server 2011, but I don’t see why it wouldn’t work, changes are noted above, leave a comment if you try and have modifications]

Thursday, November 10, 2011

Home Server and SBS Add-in to Automate Client Backup of your MAC

One of the most popular posts on my blog is how to enable Apple’s Time Machine backup to backup to your Windows Home Server 2011 or Windows Small Business Server 2011 Essentials.  As it turns out, a company named Orbital Technologies has decided to build an add-in that enables this functionality without the need for you to walk through the steps of creating those confusing sparse files.

UWHS - Orbital Backup Configuration for MacThat add-in has been reviewed over on the famous UsingWindowsHomeServer blog, specifically in a blog post here, covering the preview of the Orbital Backup Configuration for Mac.  They additionally covered the add-in again when it was available.

Simply install the add-in, open up the dashboard on the MAC client and go to add-ins, Orbital utilities and follow along.  All you  need to know is your username and password to the server.  easy right? also free!

Keep in mind that you can still do the manual steps provided in my post if you prefer not to install anything as all this add-in does is the configuration pieces for you.

You can download the add-in directly from the Using Windows Home Server Forums, or We Got Served forums. The add-in should work fine on Windows Home Server 2011, Windows Small Business Server 2011 Essentials, and also Windows Storage Server 2008 R2 Essentials.  If you’re using any other Windows product, the manual steps are for you.

Wednesday, October 05, 2011

How to remove G+ and add proper sharing buttons to your Blogger Blog like Facebook, and Twitter!

If you’re not one of the few that uses Google+, then Google’s Sharing defaults inside of Google Blogger aren’t necessarily for you.  The scream Google sharing only.  The e-mail button is an icon of GMail, Google+ is the biggest sharing button.  Sure you can get to the others, but they are little buttons.  Don’t you want to be mainstream?

Here’s how I changed it with a little help from A Consuming Experience.

Getting your sharing code snippets

First, before I even touched my blog, I went to the appropriate sites to obtain my sharing buttons.  For me, that was the Facebook Like Button, Twitter’s Tweet Button, and LinkedIn’s Share Button (although I don’t use this one on my photo blog).  From these pages, you should use the UI to decide how you want the button to look for your site.  Make sure you specify a URL to Like, Tweet, or Share, this is a temporary URL, I used http://foo.bar.com. This is a placeholder for later.

I saved each of these code snippets into Notepad for copy/paste later.

Adding the sharing code to the Blogger blog

Inside your Blogger Dashboard, select the blog you wish to add your sharing buttons to, then click the “template” modification and choose to Edit the HTML:

Templete / Edit HTML

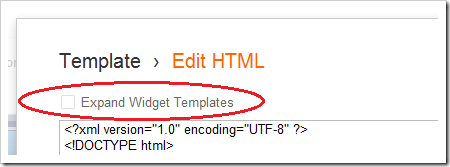
Choose to Proceed when you edit the HTML, and then make sure you select Expand Widget Templates that’s at the top:

Expand Widget Templates

Scroll down until you find the <b:include id=’shareButtons’ var=’post’> tag.  I deleted everything between that tag, and </b:includable> and replaced it with my own sharing code.

This is where things get fun. 

You need to replace that http://foo.bar.com with the URL of the blog post.  Google puts that information into a variable and replaces it at the time the page is rendered.  So we simply need to do this as well.  Let’s take a look at the twitter code, because it’s the simplest. 

Here is what Twitter gave me:

<a class='twitter-share-button' data-count='horizontal' data-via='seandaniel' data-url=”http://foo.bar.com” href='https://twitter.com/share'>Tweet</a><script src='//platform.twitter.com/widgets.js' type='text/javascript'/>

note that I have bolded the temporary URL we need to replace with the URL of the blog post.  With the help of the above website, this is what I changed it to:

<a class='twitter-share-button' data-count='horizontal' data-via='seandaniel' expr:data-url='data:post.url' href='https://twitter.com/share'>Tweet</a><script src='//platform.twitter.com/widgets.js' type='text/javascript'/>

Note I have added the expr: phrase which tells Google there is something to replace after the “=” sign.  I then put in the URL variable data:post.url, and also changed the quotes from double quotes to single quotes.  Google interprets that code and inserts the actual URL of the individual blog post.  Thus if they tweet on the main page with all the posts, they still only tweet the one that they are intending to, instead of the entire feed of posts.

So yeah, a little harder than their previous format where you had just put in <$BlogPostPermanentURL$>, but not too difficult all the same. 

Now on my blog you can see the following at the bottom of each post, without having to put that Google + link there.

Sharing Buttons

Cleans things up and standardizes them all in one.  Enjoy.

Tuesday, September 13, 2011

Outlook 2010 Speed Tip: Using the Quick Step Box

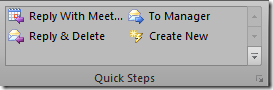
Outlook 2010 has been out for a while, but one of the more recent features I started to depend on to make email faster for me is the Quick Steps box on the dialog:

Quick Steps

The Quick Steps bar allows you to make quick and customized operations on pieces of email that you have in your inbox.  There are a bunch of default ones that I use all the time, and I’ve also created a few new ones myself. 

Let’s first talk about how to use it, it’s pretty simple.  If you have a message you want to take action on, simply make sure it’s collected and select the one you want.  If you want to reply and delete it, simply click that button.  A reply message is opened to the individual, and the original message is deleted.  It’s that simple. 

Let’s say we often move mail to a specific folder in our inbox, and it involves selecting the message, dragging it to a folder that may or may not be collapsed in the tree view, and then dropping it there.  Instead, we can create a new Quick Step for this.  To do that simply:

  1. Select the Create New Quick Step image
  2. Give the Quick Step a name like “Move to Follow Up”
  3. Select Move to a folder, under the Actions drop down. 
  4. Then select the folder in the drop box that appears that you want to move the message to. 

And that’s it.  You can additionally assign a short cut key, give it tool tip text if you have complicated rules, or even add additional actions.

It’s made my life easier, with the amount of messages I get each day, I highly suggest checking out the Quick Steps.  Allows you to cut through email pretty fast.