One of the most frustrating things for me when I first used my EX 485 HP MediaSmart server’s web-streaming application for my music was my playlists that I have in the Zune software don’t automatically appear here.

In fact, I couldn’t get them to appear at all! I dropped them into the music share, I made new ones with Windows Media Player, both .wpl and .m3u and they still didn’t appear in the list. Well, I finally figured it out and I wanted to share exactly what I did so I don’t forget, and in hopes that someone else might benefit from the same (wasting a little less time!). If you have a simpler way, I’d love to hear it. Comments are open!
Let’s say I want to move my “Favourite Albums” playlist. Here is how I did it:
- Browse using Windows Explorer to the location of your playlists. They are “.zpl” files. If you aren’t sure where this is, in the Zune software click Settings and then select Collection. Look at your music folders for where it might be stored.
- Once you’ve found the .zpl file, copy it to a new location like your Desktop. This can be an auto-playlist, or a made playlist, it doesn’t matter.
- We’re going to need to change the extension on the file to one that Windows Media Player will read. So if you haven’t already you’ll need to show the file extensions in Windows by using a Windows Explorer Window.
- Press Win+E to open Explorer
- Press Alt to activate the menu
- Under Tools select Folder Options.
- Under the View tab, uncheck Hide Extensions for known file types. (you can un-check this again after your finished if you don’t like the extensions showing)
- Click OK and close Windows Explorer. You will notice your Zune playlist will now be <name>.zpl .
- Rename the file either by slow-clicking or pressing F2. Select the .zpl extension and change it to .wpl .
- Click Yes on the dialog that warns you about changing the extension. Notice the icon will change to one that is recognized by Windows Media Player.
- Double click the playlist, and it should open in Windows Media Player. I’m using Windows 7, so these steps will be for that version of Windows Media Player
- Click the icon to drop the player into library mode. I circled it in red for you:
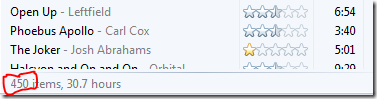
- Before we save the playlist, we have to remember that the HP MediaSmart streamer has a limit of 500 songs in a playlist. Windows Media Player will tell you how many songs are in your playlist at the bottom of the “Now Playing” list. Make sure this is < 500 before you continue.
- Now we need to save the list as a .m3u file. Again press the ALT key to activate the menu, and hover over File and click on Save Now Playing List As…
- Choose the same location, the Desktop, just to keep things easy. Then drop the Save as type box down and choose the .m3u one:
- Change the extension on the file name to .m3u and save the file:


Now we’ve got a .m3u file. All of the above steps are to convert from either a .zpl file or a .wpl file as you see fit. If you already have .m3u files, those steps can be skipped.
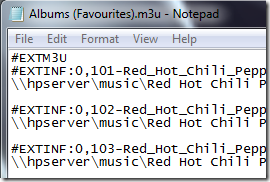
Now, as I mentioned above. I dropped custom .m3u file into the music folder before, and it didn’t work. The challenge here, is since the streaming app is running in the context of IIS, it’s access to the folders on the server is limited. If you opened the .m3u file in notepad, you'd see that each music file’s location is referenced as “\\HPSERVER\Music\<Path to song>” . IIS doesn’t have access to this. So we need to reference from the directory that the playlist is going to be stored in. I keep my playlists at the root of the Music directory, so we’ll do it this way.
To make the playlist readable by the Streaming application, we need to change the path to the file location:
- Open Notepad on your computer. I use Start, then Run, and type Notepad and press Enter
- Drop the .m3u playlist you created into the notepad window using the mouse, you’ll see it has the path to the file as mentioned above:
- Click Edit and then Replace.
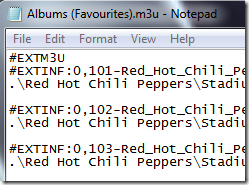
- In the "Find what:" box type in \\hpserver\music\ , in the Replace with: box type .\
- .\ is a reference to the location of the playlist file of where you will place it on the server. If you plan to put it in a folder such as \\hpserver\music\playlists, then you should use ..\ instead. the period references the current directory, two periods represent one directory higher, three periods are 2 directories higher, etc.
- Don’t forget the \ at the end of each item, otherwise you may build an invalid path to the music file!
- Click Replace All and the file should change to look more like this:
- Save the file now using the File and Save menu in Notepad, then close Notepad.
Now we have a perfect .m3u file that won’t work from a client inside your network, but it WILL work from inside the media streaming web UI. As the final step:
- Copy the .m3u doctored file over to \\hpserver\music.
- Log into your media streamer
- Enjoy your familiar playlist from the Zune software, or any other application you use to create playlists.
- You may have to wait for the TwonkyMedia server to recognize the new playlist and show it in the UI
- Finally, the TwonkyMedia add-in periodically tests for new playlists, so it might not appear for a while. The first one I did appeared in 10 minutes, the second one took a few hours.
Phew. I think I broke a sweat on this one. It’s not pretty, but it works, I now have my familiar playlists on my EX485 HP MediaSmart server, available for media streaming.
I do want to ask, does anyone know a better way to do this? I’d love to have Zune automatic playlists automatically update on the HP MediaSmart server, but this is just a huge process to try to automate.


1 comments:
Thanks for going through this and sharing! Yea, what a pain you had to go through, but I appreciate it. I'm going to be setting up an EX485 for my brother in a few days and this is going to be very useful, so thanks again.
Post a Comment